Sow six weeks before the last frost date if you’re unsure when it’s safe to begin growing seeds in a greenhouse. As early as February, you may be able to start growing veggies in your area. When it comes to effectively predicting the weather, it’s important to know your state’s hardiness zone.
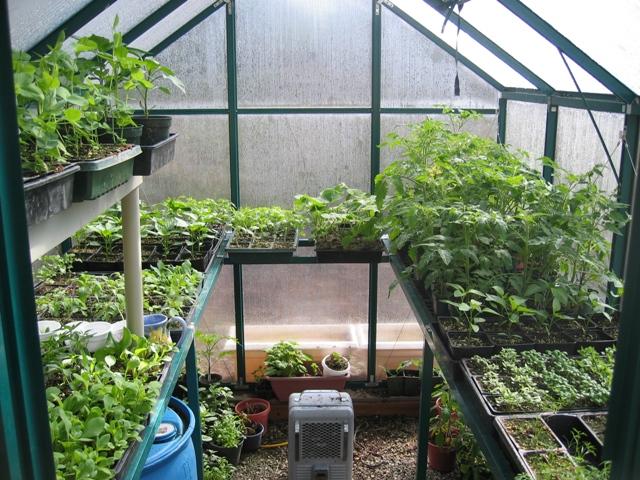
As a beginner gardener, you’ll need to learn about greenhouse gardening. When starting from seeds, be sure that they won’t be subjected to conditions that would harm them. Your plants’ germination is significantly influenced by the environment in which they are grown.
Bạn đang xem: When Is It Safe To Start Growing Seeds In Greenhouse? Helpful Information!
When Is It Safe To Start Growing Seeds In Greenhouse For Success
Frost dates
Six weeks before the last frost date, you can begin planting seeds in a greenhouse for seed germination. Is there a way to tell when the last frost was? Your state’s hardiness zone can tell you when to brace yourself. You can even tell when the first frost is forecast, so you can arrange the growth season in the greenhouse more naturally.
You’re probably wondering why you can’t start your seedlings too early. The fundamental advantage of a greenhouse over outdoor growing is its ability to regulate temperature and humidity. This is correct, however keep in mind that you’re starting with seeds and that these two things have an impact on plant growth.

It’s never too early to start seeds in the greenhouse; however, if you wish to transplant them, you should do so at least six to eight weeks prior to the last day of danger of frost. You should also keep in mind the greenhouse’s light conditions, which have an impact on when you can start growing seeds. For example, if you live in the northern United States, you’ll have to wait until the middle of February because of the lack of light in the winter.
Temperatures and seasons
You must plant seeds in the greenhouse before the final frost date in order to ensure that the temperatures are just right for the germination of seeds. According to researchers at the University of New Hampshire, the ideal germination temperature ranges from 65°F to 75°F. However, keep in mind that the ideal germination temperature for each plant varies.
For the greenhouse, the season is equally critical. You should be aware that because of its construction, it can become extremely cold at night. In this situation, a seedling heat pad is the best option for evenly warming the soil. Most gardeners choose to plant in the spring because of the characteristics listed above.
How To Grow Seeds In Greenhouse
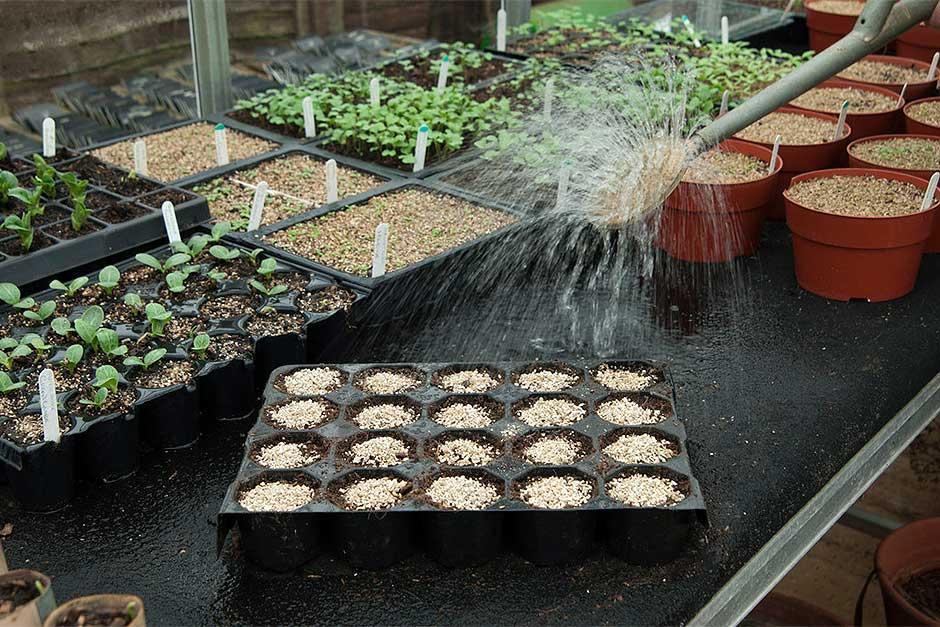
Check the seed packets for particular directions before you start sowing. Some seeds, for example, need to be soaked overnight, scarified, or stratified. Open flat trays or plug trays can then be used in the greenhouse.
Single-cell and open flat trays have different growing processes. The spacing of the seeds in the first case should be planned so that the plants can be easily thinned later on. Once the seedlings have sprouted their first set of genuine leaves, divide them into individual pots.
You can maintain the seeds on the tray for a longer period of time if you put just one or two seeds per cell. For this reason, there is no need for a root barrier to keep the plants safe. Even so, you have the option to move your seeds at a later time.
Is there a special seed starting mix you’d need for the greenhouse? The good news is that peat moss, perlite, and compost may be used to make a potting mix. Sterilize your potting media and pay attention to the right ratio between the two.
Other Factors To Consider When Growing Seeds In Greenhouse
When it comes to seed germination in the greenhouse, water and oxygen play an important role as well. Water is essential for seed germination, and as the seeds grow, so does their demand for oxygen. You may make sure you’re in compliance with these specifications by setting up a greenhouse.
Too much or not enough water might have serious consequences. A lack of water can destroy embryos, while an abundance of water can promote rot. Instead, spray the seeds and cover them with peat moss to keep them moist and prevent drying.
Germination causes an increase in the rate of respiration in the seeds. Your media must drain effectively in order to fulfill the growing demand for oxygen. There should be no heavy or wet elements in the mix.
When To Plant Seeds In A Greenhouse
Nothing says “time is everything” more than “timing is everything” when it comes to beginning seeds. While the location and method of seed germination are equally significant, the timing of seed germination is just as critical.
Step 1: Identify Your Growing Conditions
What kinds of plants can thrive in your area and when can be determined by using the USDA Plant Hardiness Zones (sometimes referred to as “planting zones” or “growing zones”).
The USDA includes easy-to-use tools to locate your precise growth zone, which contains a total of 13 zones. Maps of the United States, your state, or even your zip code are all available on their site. The average minimum winter temperature is used to identify a region’s zone.
Knowing when the last frost is expected in your area is also critical. For further information, you can check out the Old Farmer’s Almanac. To acquire a specific planting calendar for your area, simply enter your zip code.
Step 2: Identify Your Greenhouse Type
The best time to sow seedlings in your greenhouse is determined on the type of greenhouse you use. What’s first and foremost is whether or not your greenhouse is heated. Planting seedlings far early than the date on which you can direct-sow those seeds in the garden may be impossible in an unheated greenhouse with only partial sun exposure.
On the other hand, if your greenhouse is completely under your control, you can begin planting earlier. Check out this guide to discover more about greenhouses and the science behind them, as well as its advantages and downsides.
If you don’t already have a greenhouse, keep heat sources in mind when making your choice. A built-in heating system isn’t always necessary.
A greenhouse that is otherwise unheated may be able to employ heated growing mats or space heaters depending on what you want to grow and where you live. We’ve put together a list of the best greenhouse kits if you don’t already have one.
Step 3: Decide What To Plant
Germination conditions vary widely among plant species. When it comes to starting seeds in your greenhouse, our guide on greenhouse veggies is an excellent place to start.
The temperature of the soil at which germination can take place is the most important consideration when it comes to time.
In most seed packs, there is a growth zone-based recommendation for when you should start seeds indoors and when you can plant them directly in the garden.
Step 4: Calculate The Ideal Planting Time
Seeds should be sown early enough to allow them to be transplanted when the outdoor growing conditions are ideal, but not so early that they become lanky and root-bound before you can plant them in the ground. Everything has to be put together in one place.
Be aware that none of these rules are inflexible in nature. After all, the predicted date of the last frost isn’t always followed by the weather. It’s critical to have some degree of adaptability. You’ll also have to make your own judgment because all of the recommendations are merely estimations, and you’ll get various replies depending on where you look.
This could get a little tricky. Planting multiple varieties of vegetables in succession can be easier if you keep a calendar (or spreadsheet) of when to sow each variety of seed. This is especially true if you plan on using a succession planting approach.
How To Start Seeds In A Greenhouse
Step 1: Gather Your Supplies
Seeds
As long as the seeds aren’t too old, you can use them from any source. Even while seeds that are several years old are still viable, the germination rate will be decreased.
In your greenhouse, avoid starting seeds that are better suited for direct sowing (unless you are planting directly into the soil of a greenhouse with no solid foundation, and plan to leave the plants there rather than transplanting).
Plant more seeds than you think you’ll need, especially for plants with a poor rate of germination.
Seed Starting Trays
Seed starting trays come in a variety of shapes and sizes.
Ensure that each seed pot has adequate drainage. Some seed trays contain tiny holes or no openings at all, resulting in water logging and mold growth. If the drainage holes are too small, use a nail or a knife to widen them.
Xem thêm : How To Remove Fake Flowers From A Cactus? Step-by-Step Tutorial
A firm tray should be placed underneath the seed pot tray. You won’t have a muddy mess under your seedling tray because it will capture any water that runs through it.
In addition to the seedling tray, you need a clear plastic humidity dome. Essentially, it’s a little greenhouse within your larger greenhouse! It generates an ideal environment for seed germination because it is both hot and damp. Remove the dome as soon as the seedlings are close to touching it.
You can choose from a variety of possibilities, but this one is the best. It has all of the aforementioned characteristics, is inexpensive, and can be reused.
Small Pots
A “pot up” is a necessary step for many plants, especially the initial ones you start. The seedlings you bought last year can be re-used in small pots, or you can use small plastic food containers to avoid the spread of plant diseases (such as yogurt containers, plastic soda bottles with the top cut-off butter tubs). Make certain, however, that whatever you choose has adequate drainage holes at the bottom of the container.
Seed Starting Mix
For a variety of reasons, it is preferable to use soilless seed starting mix rather than potting soil. When you use seed starter mix, you don’t have to worry about a thick layer of soil covering your seedlings because it’s fine and light in texture.
Second, the thin roots of the seedling can grow more easily because of the light texture. Potting soil, on the other hand, is overloaded with nutrients. Seeds are the primary source of nutrition for seedlings in the early stages. Potting soil, on the other hand, is more prone to waterlogging, which can lead to the growth of mold or fungi on plants.
Creating your own seed starting mix is a doable task.
There are various ways to make it, but this is a nice one:
- Two tablespoons of finely pulverized compost
- Sphagnum peat moss or rehydrated coconut coir (if purchased as a block) are substitutes for the coconut coir.
- Perlite or pumice can be substituted for one component.
Some recipes don’t even call for compost. You may need to supplement older seedlings with fertilizer if transplanting is delayed by a lack of nutrients in these mixes.
Watering Tools
When watering seeds and seedlings, you must be extremely gently. You’ll need a watering can and a spray bottle to water your plants with care.
Using a nail, puncture holes in the lid of a robust, well-sealing plastic container, and you’ll have one (like a carry-out soup container). The water should drip or trickle rather than gush out of the openings.
Step 2: Prepare Your Seeds
Most seeds can be planted directly from the packaging. While some seeds may require special treatment to boost germination rates or speed up germination, other seeds may benefit from such treatment.
Scarification can help plants with strong seed coats (like okra or lupine) before sowing. Scarification is the process of injuring the seed coat in order to allow for easier water absorption.
Natural processes such as freezing and thawing or passage through an animal’s digestive system scarify seeds. It’s possible to scarify your seeds by nicking them (careful not to damage seed’s fragile interior) or freezing them overnight. Scarification, on the other hand, isn’t always essential.
Soaking some seeds in water before planting them is said to speed up germination. It’s common practice to soak legume seeds overnight before planting, and some experts advise doing the same with asparagus seeds. As a result, if you don’t soak your seeds before planting, you may wish to do it earlier in the season than you would if you soak them.
Step 3: Plant Your Seedlings
Seeds should be buried according to the instructions on the seed packet. The obscurity given by a thicker covering of soil-free seedling mix is preferred by some, whereas light is required by others.
There are many factors to consider while planting seedlings in trays, but in general, you’ll want to put no more than two seeds per cell in each tray.
The soil should be moistened before planting. Using your spray bottle on its spray/mist setting (not its narrow stream setting), lightly dampen the seeds and potting mix to avoid upsetting them.
Keep your seed trays moist and warm by covering them with a glass dome.
Step 4: Monitor And Tend To Your Babies
This is when things really start to get interesting. Observing your seed trays for signs of germination can be a complicated process.
Temperature
Germination can only take place in an environment that is warm enough. Temperatures for germination of particular vegetables are listed on this chart.
You may want to consider using heated seed mats (like this one) if your greenhouse is unheated and drops below the ideal temperature at night.
Humidity
During germination, seeds need to be kept moist at all times. The germination of some seeds is more forgiving than others, such as carrots, which will die if they are allowed to dry out during the process.
Seedlings can be drowned or suffer from mold, fungal, and “damping off” when the potting mix is too moist. Remove the clear dome if the trays look too moist (if they are heavy and don’t seem to be getting lighter) and allow the trays to dry out a little.
On an as-needed basis, rather than keeping to a regular timetable, lightly spritz or water seedlings. Instead of dry or wet, go for moist.
Sunlight
Make certain that your seedlings receive a enough amount of light. It is preferable for seedlings that require darkness to germinate to acquire that darkness from being buried under the correct amount of potting mix rather than from a lack of sunshine. Consider using grow lights if you don’t get enough sunlight.
The sun exposure in your greenhouse should be monitored even after your plants have sprouted. They’ll become lanky and weak if they don’t get enough sunlight (even if they’re warm enough).
Sprouting
The most difficult element of growing seeds in your greenhouse comes when your seedlings emerge. Reduce the number of sprouts per cell for most plants, especially those that are vulnerable to transplant shock if their roots are disturbed. When only two of three tomato seeds sprouted after being put in a cell, it’s time to remove the third. Use sterile scissors to snip off the tops of any excess seedlings once the strongest-looking one has grown strong enough for you to be confident in its survival.
Decapitating your infant plants may be painful, but it is vital if you want to give the remaining seedlings enough room to establish their roots. It also saves you the trouble of having to separate the roots of many seedlings when it comes time to transplant them.
Potting Up
To prevent them from growing too large, or because of an unexpected cold spell, you may have to transplant your seedlings into smaller containers. So they won’t get too tangled up in the roots. If you notice roots sprouting out of the drainage holes in the bottom of the tray, it’s time to up the pot size.
Hardening Off
Prior to transferring your sprouts outside, you should let them get used to the exposed circumstances of the outdoors. If all of your seedlings are ready at the same time, all you have to do is gradually lower the temperature and open up the vents.
Harden each group of seedlings outside for a few days if you have seedlings ready at separate periods, as is the norm. Starting with just an hour or two at a time, gradually increase the amount of time your seedlings spend outside by removing the trays from the greenhouse during the day and returning them at night. Planting can begin as soon as they’ve gotten used to the sun, wind, and other weather conditions.
When to Start Your Seeds
I used to diligently record my gardening experiences in a journal. However, I didn’t keep a daily journal like Thomas Jefferson and other notable journal keepers did, but rather on a weekly basis, keeping track of my key chores, as well as an overview of the weather and the flora in bloom. I stopped writing as my schedule got busier and busier. Unfortunately, I miss the ability to study journal entries from previous years. Would it be possible for me to remember when my first tomato was harvested, or when the first blooms of the lilacs appeared? However, all of the great details of previous gardening seasons have been erased from my memory.
Xem thêm : How Long Plants Can Stay In Different Sized Trays? Comprehensive Guide
My seed-starting calendars are one of the things I’ve managed to keep track of. I can remember exactly when I sowed the alyssum and pepper seeds last year. It’s also clear to me if I sowed my onion seeds earlier or later than the year before. My seedstarting regimen is vital because I start around 40 different kinds of plants from seed (and about 70 different variations).
In the table below, I’ve arranged my personal program by “start” week before the latest frost date. However, this isn’t necessarily the schedule I’d advise you to follow. It is too cold for me to cultivate in Zone 4. In a cold upstairs bedroom, where seedlings develop slowly, I have my grow lights set up. When it’s April, all of the seedlings are moved to my greenhouse, where they thrive in the warm and bright conditions. Every year, I take a look at my calendar and make a few tweaks. Aiming for seedlings that are mature but not overrun at the time of planting is my primary objective.
In your personal seed-starting situation, your planting timetable will have to be adapted to suit your needs. One simple approach to get started is to inquire of a gardening-savvy neighbor about when they put their seeds. You can, however, create your own planting timetable by following these steps:
Sort your Seed Packets
Make two piles: one for seeds that can be put directly in the garden, and one for those that need to be started indoors. You may expect to find the vast majority of common garden fare in the outdoor compost pile. This includes anything from beans to melons to squash. Set aside the seeds you’ll be sowing outside by wrapping them in a rubber band.
Zinnias, asters, lavatera, nasturtiums, sunflowers, bachelor’s buttons, nigella, and calendula are just a few of the annuals that will go into the direct-sow pile. Some of these annual flowers can be grown indoors if your growing season is short or the conditions in your yard are particularly challenging. Most perennial flowers must be started indoors in order to grow.
Get your “sow inside” pile out and begin reading the seed packs’ backsides. There is a good chance you’ll find that planting instructions are somewhat ambiguous. Home gardeners would benefit tremendously from seed corporations providing us with the data we require. A minimum of six to eight weeks before the latest frost date should be stated as the time period for the earliest bloom or fruit production.
Make separate heaps for 5, 7, 9, and so on. There are certain seeds that merely tell you how long it takes them to germinate, especially for perennials. Add six weeks to that figure (which is generally a range) if that’s all you have to rely on. Then, place the packet in the correct pile.
If there is no instruction on the seed packet, you can start all of your seeds about six weeks before you intend to plant them outside. Make a note of which plants are too big or too tiny when you plant them, so that you may make modifications the next year. Eileen Powell’s book, From Seed to Bloom, is a must-read for anybody who wants to learn how to grow 500 species of annual and perennial flowers (Storey 1995).
Creating the Calendar
To get started, look up the average date of the last frost in your region. Entering your zip code online will yield frost dates for your area. To figure out your planting dates, you must count back one week at a time from the date of the last frost. (I use Saturdays as my seed-starting day because that’s the day I’m most likely to have available). The last day of frost in my location is May 15th. Week 4 for me is the week of April 15, Week 11 is the week of February 26, and so on. Use a rubber band to hold each pile of seeds together by writing the week number on each packet. It’s as simple as picking the right packet and getting to work.
Making Adjustments
Here are a few reasons why you might want to tweak your schedule now that you’ve got a solid one:
Temperatures are lower at this time of year, which slows the germination of seeds and the growth of plants (below 70 degrees F). The seed-starting timetable may need to be shifted a week or two early if you plan to grow your seeds in a cool basement or bedroom.
As you can see from my calendar, I began planting greens and broccoli around the end of February. The reason for this is that these seedlings are put outside a month before the final frost date. Seedlings can be planted several weeks before the final frost date if you employ season-extending techniques like cold frames and greenhouses. Row covers and pop-up covers can also be used. Sowing your seeds on the correct date is as simple as subtracting that anticipated date from the current date.
If you’re growing your seedlings in a greenhouse or a room that’s more than 70 degrees Fahrenheit, you’ll want to start later. Faster development is facilitated by heat, so you can find yourself in possession of gigantic plants that are ready for the garden even before it becomes warm.
It is my sincere wish that you find this material useful and not daunting. The best way for me to figure out what I should be planting each week is to establish a plan ahead of time. Keep track of your schedule as soon as you begin transplanting into the garden so that you may make adjustments for the following year. Every year will be a little different, so you’ll never get it completely right, remember. It’s part of what makes gardening so enjoyable for me.
Obtaining Seeds
Once you’ve decided on the plants you want to grow, you can order the seeds you need.
Choosing non-GMO organic or other specialty seeds is up to you.
Temperature, humidity, and other factors must be taken into consideration when following the planting instructions.
In order to keep your seedlings from contracting fungal disease, you should follow these guidelines.
seed-starting trays and soil should be sterilized and sterilized seed trays and soil should be sterilized.
Sowing the Seeds
Before sowing large seeds, like beans or tree seeds, soak them in warm water for the night.
Use a spray bottle to apply a little mist on the soil’s surface. Once germination has occurred, place the tray in a clear plastic bag to keep the seeds moist.
A heated mat can speed up the germination of seeds. If possible, use a thermostat-controlled mat to keep the soil from overheating. 70 to 85 degrees Fahrenheit is the ideal soil temperature for many seeds.
Keep the soil moist before and during the seedling stage by watering as needed.
One healthy seedling should be placed in each tray cell. Individually transplant seedlings as soon as they have two or more genuine leaves.
Keep greenhouse temperatures between 10°C and 21°C (50°F and 70°F) at night and daylight, respectively, to avoid overheating.
Put seed trays beneath fluorescent lights if your greenhouse receives less than 16 hours of sunlight per day to keep the plants well-lit. A height of 6 inches above the trays is ideal for the lights.
Spread out the containers in the greenhouse to keep the air moving.
Containers should not be pushed too close together. A lack of airflow is a result of this.
Half-strength application of soluble fertilizer should be applied to seedlings when the first genuine leaves develop.
Transplanting
In a greenhouse, you can start seeds at any time of year. The best time to start seeds inside in the greenhouse is six to eight weeks before the latest expected frost date in your location.
Prepare your plants for the garden by starting the hardening off process two weeks before to your zone’s last frost date, in the early spring. For a few hours each day, place the plants in a shady area outside. Over the course of two weeks, gradually increase the amount of time the plant spends outside. When the plants have finished hardening off, they can be moved to their permanent placements in the garden. Some plants, like melon, cucumber, and dill, do not fare well when transplanted. It’s possible to plant these seeds either directly into the ground or into a greenhouse-sized container.
Conclusion
Because of the greenhouse, seed-sowing should not be a daunting task for a novice grower. It is necessary, however, to understand when it is safe to begin seedling cultivation in the greenhouse. Six weeks before the latest frost date is often recommended since seeds are more vulnerable to adverse weather conditions.
As a result, you should plan your growing season by using your state’s growing zone to determine your frost date. As a greenhouse grower, you have the ability to control the temperature to guarantee that your seeds germinate. After that, follow the instructions provided by university extension services in order to ensure that your seeds will develop well.
Nguồn: https://iatsabbioneta.org
Danh mục: Garden


