Because of recent changes in import requirements, New Zealand producers now confront a unique and hard learning curve in learning to grow ranunculus from seed rather than the conventional (easier) universal practice of growing from professionally manufactured corms.
Method
- Plant your ranunculus corms in full sun in the fall or winter/early spring, depending on your location and the type of setup you’re working with. Corms can be planted in the fall and overwintered outdoors in mild winter climates (USDA zones 7 and above) with the use of a low tunnel or frost cloth. Ranunculus must be cultivated in a minimally heated hoop house in colder places (USDA zone 6b and lower) or kept back and planted out at the end of winter/early spring. Corms will freeze and eventually decompose if exposed to temperatures below -4°C (25°F). As a result, make cautious to keep them out of the cold.
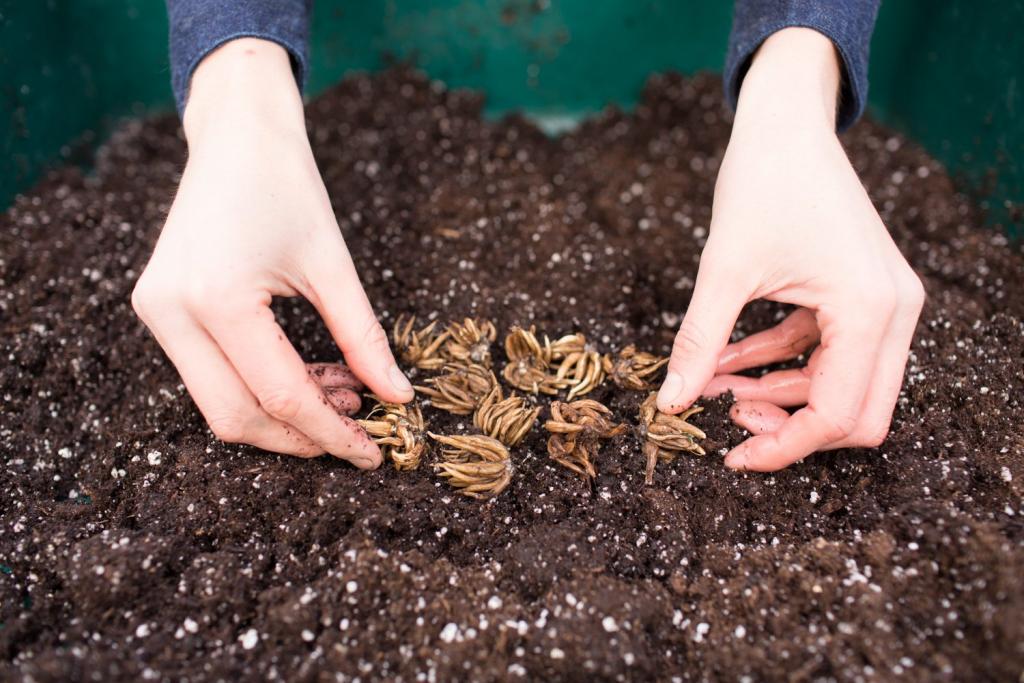
- When you open your corms, you’ll discover that they look a lot like little brown octopuses. These odd-looking creatures will, in fact, produce a profusion of beautiful flowers in the spring.
- Soak the corms for 3 to 4 hours in room temperature water before planting. The last thing you want is for them to go bad because of an excessive amount of soaking. The corms will grow in size while they soak, sometimes even tripling in size. When the corms have been soaked, they can either be planted straight into the ground or presprouted. The blooms will blossom a few weeks early if the corms are sprouted prior to planting.
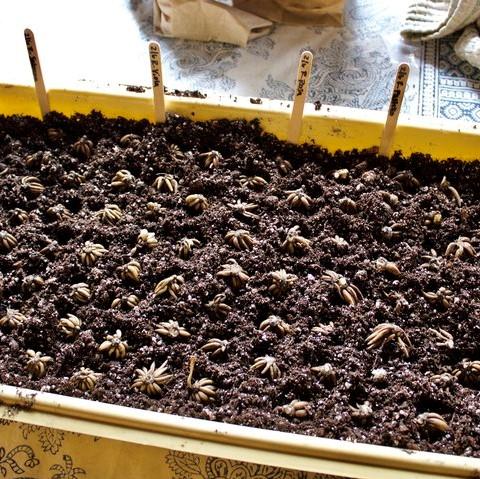
- Fill half of a seed tray with damp potting soil to begin presprouting. Cover the corms with extra soil once they’ve been sprinkled with the soaking corms. In an area where rats won’t be able to find it, store this tray for 10-14 days in a cool spot (40-50°F/4°C-10°C). Remove any rotten or moldy corms from the soil every few days, making sure the soil is moist but not waterlogged.
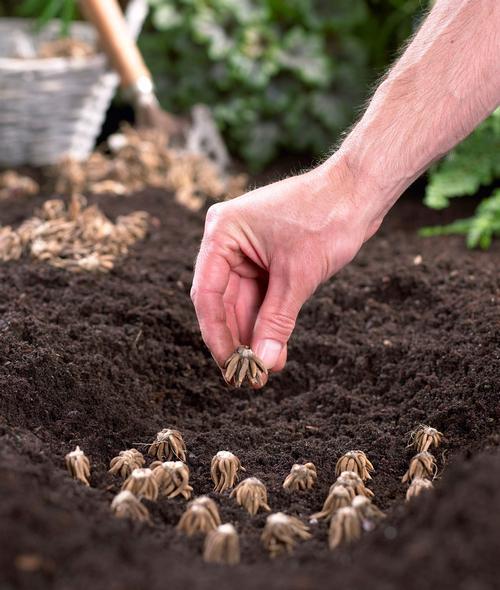
- During this time, corms will swell to about twice their original size and develop little white rootlets that resemble hair. Once rootlets appear, it’s time to plant them in the ground. Before planting, it’s important to prepare the growing beds. We add a generous dose of compost (2-3 in / 5-7.6 cm) and a balanced organic fertilizer (such as Nature’s Intent 7-2-4) and mix it thoroughly into the soil. Ranunculus corms are planted 9 in (23 cm) apart at a depth of 2-3 in (5-7.6 cm), with 4 rows per bed. Plant corms with the “octopus tentacles” pointing down.
- Corms will grow to nearly twice their original size during this time and sprout tiny white rootlets that look like hair. As soon as the rootlets form, it’s time to plant them. Growing beds must be properly prepared prior to planting. Compost (2-3 in / 5-7.6 cm) and a well-balanced organic fertilizer (such as Nature’s Intent 7-2-4) are generously applied and thoroughly mixed into the soil. A row of ranunculus corms is divided into four sections, each with a depth of 2-3 inches (5-7.6 cm). Corms with the “octopus tentacles” pointing down.
- With an average vase life of 10 days, ranunculus are one of the longest-lasting flowers. For a vase life of 10 to 12 days, cut the buds when they are colorful and spongy like a marshmallow but have not yet fully opened. However, cut blooms that have already opened will last only a few days before becoming brittle and unusable in transit. To encourage fresh blooms, be careful to remove all of the spent blossoms from the stems.
SEED VS CORMS – WHAT’S THE DIFFERENCE?
Corms (claw-like bulbs/tubers) are formed by all ranunculus seedlings, but not all corms are produced by seed. It is common for ranunculus to be propagated in two ways and grown for a year in order to yield corms, which are then exchanged or sold.
Although each cultivar/variety has a somewhat different genetic make-up, new variants can be created and produced by the use of pollination, breeding, & isolation, which is prevalent in seed-grown plants. Tissue culture can be used to create homogeneous clones for increased cut-flower production by breeders who aim to produce/find the best of the best individual plants. After a year of growth, both seed and tissue culture procedures generate corms that are ready to be sold to growers.
HOW IT USED TO BE
To date, almost all of New Zealand’s cut-flower ranunculus corms have been imported from other countries. This is because the vast majority of the world’s exceptional cut-flower ranunculus corm breeding and production takes place in Italy, France, Israel, the United States, and Japan.
WHAT CHANGED AND WHY WE NOW HAVE TO LEARN TO GROW FROM SEED
Even century-old olive trees were decimated by the development of the Xylella fastidiosa bacteria, which caused severe drought-like symptoms in olive trees, despite the absence of drought conditions, throughout Italy and other areas of Europe between 2013 and 2017. Some of the hosts of Xylella are symptomatic (such as grapes and olives) whereas others are mostly asymptomatic carriers, and regrettably, ranunculus are one of those carrier species.
Consequently, as a precautionary measure, in 2017 MPI updated import requirements to effectively ban the importation of all species known to be hosts/affected by the bacteria from all countries known to have the bacteria (it is technically possible, but not recommended, to import and have them quarantined and tested for the bacteria).
However, although Australia and South Africa are known to be free of the xylella pathogen, it is still possible to import corms from these countries, only the normal garden/poppy style single/double types are produced in these countries.
The best varieties of ranunculus in the world are now unavailable to New Zealanders, but fortunately, we can still import the seeds, which are not known to be carriers of the bacteria. While we can’t get our hands on the cloned corm varieties, we can still enjoy the Italian Elegance and French Amandine series, two outstanding ranunculus series that are propagated exclusively from seed. Yay!
THE CHALLENGES OF LEARNING TO GROW RANUNCS FROM SEED
Xem thêm : How To Collect Begonia Seeds? Step-By-Step Process
So, after figuring out that I could import ranunc seeds, I’ve found that mastering their cultivation has been a very steep learning curve. As a result, there is little to no information about the specific nuances of seed-grown ranunculus around. International breeders, for all their brilliance, don’t share their knowledge in this way either.
For commercial cut-flower growers, ranunculus are not the easiest flower to cultivate even from the corm, and needing to grow from seed is even more difficult and less productive (aka the cost of producing high quality ranunculus in NZ means they have to sell at a premium price for growers have any hope of making a profit on them). It’s worth it every time, though, because of their lovely layers of petals.
Corm plants grow more larger and more quickly than seed grown plants. The seed grown ranuncs shown above are around 3-4 months old, but the presprouted corms seen above are about 2 months old.
It’s easy to observe how to divide ranunculus plants two years following seed sowing by looking at these tiny ones.
Some kinds yield larger/better corms the first year from seed than others.
How to Grow Ranunculus From Seed
It is said that the flowers of the ranunculus are reminiscent of old-fashioned cabbage roses. During the growth season, they produce dozens of flowers on each plant, ranging in color from white to purple to pink. Ranunculus are commonly grown from bulbets, but they also produce seed, making seedlings a viable option. About a month before your average last spring frost, germinate the seeds in a seed starting kit. When the daytime temperature is consistently in the 50s, the small plants can be transplanted outside.
Rose-like cabbage-flowering plants, ranunculus bloom with gorgeous flowers. There are dozens of flowers on each plant during the growing season, and the hues range from white to purple to pink. Ranunculus are commonly produced from bulbets, but they also generate seed, making seedlings a viable option as well. Prior to your usual last spring frost date, germinate seedlings inside. When the daytime temperatures are consistently in the 50s, the little plants can be transferred outside.
- It is said that the flowers of the ranunculus are reminiscent of old-fashioned cabbage roses.
- Ranunculus are commonly grown from bulbets, although they can generate seed, making seedlings a viable option.
Sprinkle the growing mix liberally with ranunculus seed. Because this flower’s seeds germinate slowly, it’s best to scatter as many as possible. Sprinkle a thin layer of the seed starting mix on top of the seeds. Gently firm the top of the soil with your hand.
Sprinkle the growing mix liberally with ranunculus seed. Because this flower’s seeds germinate slowly, it’s best to scatter as many as possible. Sprinkle a thin layer of the seed starting mix on top of the seeds. Gently firm the top of the soil with your hand.
- Sprinkle a generous amount of ranunculus seed over the developing mix. Plant a big quantity of seeds because the germination rate for this flower’s seeds is poor. Sprinkle a thin layer of the seed starting mix on top of the seeds. Gently firm the top of the soil with your hand.
- The seed starting mix should be sprinkled over the seeds.
Xem thêm : How To Collect Dragons Breath? Comprehensive Guide
Fluorescent lights should be placed around 4 inches away from a plant pot. For roughly 20 to 30 days, keep the pots at a temperature of 50 degrees Fahrenheit.
Start thinned seedlings at a height of around 2 inches The strongest plant in each 2-inch container should be snipped off with the point of a scissors. Remove the undesirable seedlings by digging down to the soil’s surface and removing them.
Maintain a space of about 3 to 4 inches between the tops of the seedlings and the light bulbs by raising the lights as they grow. The lights should be left on for 14 to 16 hours per day.
- Fluorescent lights should be placed around 4 inches away from a plant pot.
- Maintain a space of about 3 to 4 inches between the tops of the seedlings and the light bulbs by raising the lights as they grow.
When the daily temperature is in the upper 40s, you can begin hardening off the seedlings. Increase the amount of time the small ranunculus plants spend in the shade each day until they are exposed to the sun all day. As a last step, gradually increase how long each day the pots are exposed to full sunlight. Bring your plants inside at night or whenever there’s a risk of frost.
Choose a spot in the yard where the soil drains properly and gets plenty of sun. Regular, unimproved garden soil should be used for the transplants, which should be spaced 8 to 12 inches apart.
Using a hand watering can, irrigate the transplants as you plant them. Raise the watering frequency for ranunculus to 1 inch per week.
- When the daily temperature is in the upper 40s, you can begin hardening off the seedlings.
- Increase the amount of time the small ranunculus plants spend in the shade each day until they are exposed to the sun all day.
Apply a water-soluble fertilizer to each plant using a hand watering can every week. Use a combination that is half the manufacturer’s recommended application rate.
Organic mulch, such as buckwheat hulls or shredded bark, should be applied to the soil in the garden bed at a depth of 2 to 4 inches. Chilly-season perennials like ranunculus like their roots to be cool but not damp.
After the leaves have fallen and the ground has frozen, it is the perfect time to apply winter mulch to the roots. Protect the roots from freezing weather by laying down a 6- to 12-inch layer of hay or straw.
Nguồn: https://iatsabbioneta.org
Danh mục: Guide


