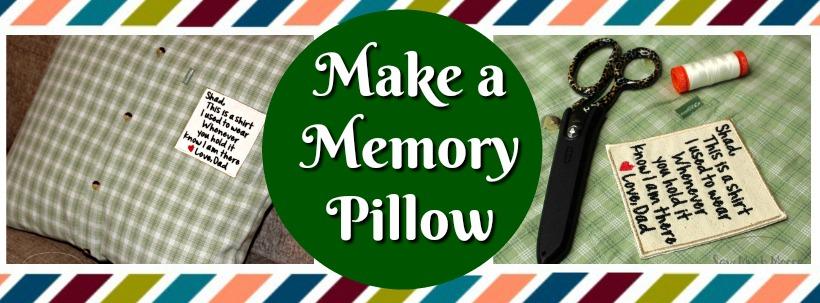
Friends that enjoy doing things yourself, please join me in welcoming all of you! The Thrifty Thursday series, Less Is More, is back once again. Recently, I’ve been particularly drawn to sentimental endeavors. Truthfully, I’m working on things that I’ve wanted to do for a long time but never finished. Some I didn’t even begin because I was afraid of ruining them. My Grandfather’s old shirt was used to make this memory pillow for me.
I’d want to begin by saying how much I enjoy working with my fellow home design bloggers on this monthly post. We’re always looking for new ways to inspire you. Because of them, I’m forced to complete my work quickly. Also, don’t forget to take a look at their completed work at the conclusion.
Bạn đang xem: How To Make A Memory Pillow? Comprehensive Guide
A Favorite Shirt Memory Pillow
My Grandpa died two years ago, and the loss was painful. We were devastated by the death of our pillar of strength. Since his death, neither my grandmother nor the rest of my family have been the same. We had a gathering at the farm a while back, and I asked everyone to select their favorite shirt from his collection to be turned into a memory cushion for them.
To keep Grandpa’s perfume fresh, I purchased pillow inserts, ironed the shirts, and then kept them. And left everything to sit.
For the sake of preserving Grandpa’s cologne scent, I purchased pillow inserts, ironed the shirts, and placed them in airtight containers. Then I just walked away and let it all stew.
I struggled with the task of slicing into something so precious. Instead of producing something beautiful and meaningful, I was continually concerned that I was making a mess and destroying a beloved blouse. However, I’m pleased I took the risk since the outcome was well worth it, and the process of working on it was therapeutic as well.
My first Memory Pillow was constructed from a shirt. If you’d like to make one, here’s how I did it:
Get The Good Stuff!
![]() If you like my blog, please consider joining my mailing list. You’ll get my weekly newsletter and my freebies if you sign up for my newsletter. Get in touch!
If you like my blog, please consider joining my mailing list. You’ll get my weekly newsletter and my freebies if you sign up for my newsletter. Get in touch!
Getting Started: Plan Your Memory Pillow
When it came to the size of my Grandpa’s shirts, an 18-inch-by-18-inch pillow was perfect. If you want a better fit and a nicer cut, you may need to go up a size.
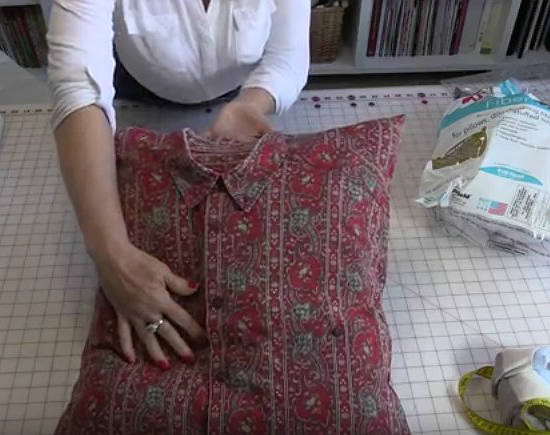
Slipped the cushion inside my button-down shirt was my initial step. In this way, I was able to see where the pockets lined up, how the collar would rest, and where I would want to cut.
Then, I sewed the shirt around the pillow and pinned it shut. This was done to keep the shirt’s fabric in place when I cut it. Keep in mind from previous experience that you should always pin the cushion seams together in the centre. Make sure that the front and back of the shirt both have equal amounts of material, or else you’ll have a difficult time sewing them together. Rather from laying flat when you sew the two sides together, the cloth will bunch up at the top or bottom instead. Having a longer backside than a shorter front has taught me that this is the case.
Make Your Cuts
This was the step that had me stymied for the longest time. Cutting through my Grandpa’s shirt required a lot of self-control. Having the pins in place around the pillow gave me more confidence to start cutting and sewing.
To be honest, I’m not sure whether it’s just me, but for me, sentimental undertakings are more stressful and weighted because I want them to end out well. Because of the element of surprise and creative freedom that comes with DIY, I never know exactly what the final product will look like. When I’m doing something new, like painting this rainbow lamp, I feel more at ease and excited. Whenever I work on a project that involves strong emotions, I have to put my faith in my own abilities and the accuracy of my estimates.
Keep the scraps after you’ve made your cuts. This means that you’ll need a large piece of fabric (like one of the sleeves) for the collar flap. A few steps down, you’ll get the gist of it.
It is time to remove the pillow insert from the shirt and remove the pins. I’m confident in my abilities. Turn your shirt-pillowcase inside out for stitching to look nicer. Throughout the process, I discovered that unbuttoning my shirt made inserting and removing the insert the most convenient option.
Flip It and Reverse It
The pins in your shirt can be removed by first removing the pillow insert from the pillowcase. Invert the shirt so that the pillow is on the other side, and then stuff the pillow back in. Repin the shirt in the same manner as before, except this time with the shirt on the inside out instead of the outside. A few of these stages are unnecessary, and I wanted to see if there were any ways I could eliminate them. In my opinion, the first step in planning the location of your pillows is crucial, and this one will help you achieve smoother edges.
Xem thêm : 3 Factors That Causes Freezing Of Air Conditioners. How To Unfreeze Air Conditioner?
To finish up the pillowcase, you’ll need to sew along the raw edges and stitch lines, but this time they’ll be hidden from view on the inside.
Sew It Up
Remove the cushion from the shirt. When sewing, you want the fabric to lay flat and not bunch up along the seams. It’s time to sew it all together. Prepare your sewing machine and matching thread (I chose grey). To keep my thread in place, I reverse stitched at each end after sewing each side.
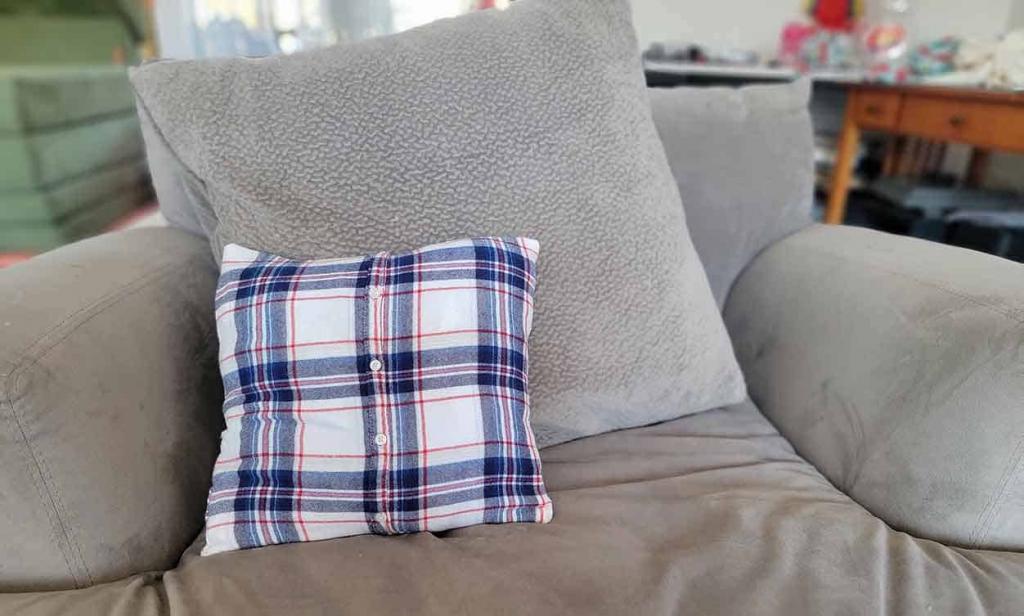
Flip the memory pillowcase right side out once you’ve finished sewing and enjoy your workmanship.
Then then, you’re not done yet! The pillow insert will be hidden by a flap in the pillowcase. Without putting in any more effort, this has a noticeable impact on the appearance and feel of the pillow. What a good idea to save the scraps!
Turn Scraps Into Flaps
Tuck the pillow insert into the shirt pillowcase after cutting a piece of cloth large enough to cover it completely. Alternatively, you can cut off a part of the tail of the shirt and use it as a sleeve. It was from there that I obtained mine, and from there, the pin stripes were oriented correctly.
To prevent a fraying edge on the flap, stitch up the sides.
Pin the flap to the collar with a safety pin. To make it fit snugly beneath the collar, I sewed it in place.
Your flap is now ready for sewing. As the stitches are visible on both sides of the cushion, take your time.
Before the flap, my cushion looked like this:
And here it is with the flap attached and protruding:
Here is the cushion with the flap tucked in and the pillow insert hidden:
Do you think it looks better? Flip the insert over and unbutton the shirt to remove it for cleaning.
A Happy Ending
My grandmother’s hospital room was allowed to have this pillow, which makes me happy. And she was overjoyed! It was well worth the stress of cutting my Grandpa’s shirt to construct a memory pillow.
I used my heat press and htv to put her name to the back of the pillow. Her pillow won’t go lost this way. Attached it to the cushion under the collar so that it could be seen but not easily rubbed away.
I sincerely hope that these directions are clear and that they serve as motivation for you to construct a memory pillow from an old t-shirt of your own. It took me two hours to plan, cut, and sew this pillowcase together after I started working on it. I wish you or someone you care about the happiest of holidays with this and your other endeavors!
How to Make a Memory Pillow With a Collar: Step-by-Step
The ways in which people honor the memory of a loved one who has passed away are as varied as the people themselves. You could re-enact a pastime you had with the departed. Sharing memories of a loved one who has passed away with those close to you can be a source of consolation. Processing your emotions can be accomplished by engaging in creative activities such as sewing or painting.
Jump ahead to these sections:
- Getting Started with Your Memory Pillow Essentials
- Detailed Instructions for Making a Collared Memory Pillow
- Ideas & Inspiration for Memory Pillows
One particular type of memorial craft will be examined today. Making a collared shirt memory pillow will be the focus of today’s discussion. If you have some basic sewing skills, you may easily complete this endeavor and end up with a treasured piece of clothing.
What You’ll Need to Get Started on Your Memory Pillow
A deceased loved one’s belongings might be difficult to let go of, especially if you have a close connection to them.
Xem thêm : 4 Steps To Oil Window Air Conditioner Fan Motor
You can use a collared shirt as a memory pillow if you have a special object in mind. With some basic sewing machine abilities, you should be able to get up and running very quickly. We’ll break down the materials needed for a job like this as thoroughly as possible.
A collared shirt that belonged to your late loved one
This is a tutorial for collared shirts, not t-shirts. If you’re going to wear a shirt, you might as well wear something that’s appropriate for the occasion. This memorial DIY craft project has a unique style because of the collar’s inclusion.
Choosing a shirt for a body pillow usually comes down to personal preference and a strong emotional attachment to the shirt. However, there are a few additional things to keep in mind as well.
Try to choose a shirt that doesn’t have any seams or darts, which can make it tough to work with. This assignment calls for a shirt that falls loosely over the body, with no narrowing at the waist. Ensure there are no tears or spots on the garment that you’ll have to make up for in the future.
A square pillow insert
For projects like this, basic square ornamental pillow inserts are available at most craft stores. If you prefer, you may buy pillow inserts online from sites like Amazon. If you’re working with a large shirt, you’ll need to select the appropriate cushion size.
Pillows that measure 18 inches by 18 inches should work well if the shirt is small or medium. If the shirt is extra-large, a 20-inch by 20-inch pillow may be a better option.
A sewing machine
The sewing machine isn’t necessary for this project, as it’s a rather easy one. It doesn’t matter what you have on hand, as long as it works.
Thread
Closing your memory cushion will necessitate the usage of thread. Make sure to choose a color that either complements or at least blends in with the fabric you’re working with.
Fabric scissors
A excellent pair of fabric scissors is a must-have for anyone who even sometimes sews. Because of their sharp angle and lack of serration, they are able to cut through the fabric with ease.
Tailors’ chalk, pins, and a ruler
You can use any of these tools to keep track of your progress as you work on your project.
Memory Pillow Ideas and Inspiration
The best approach to change an old shirt into a meaningful object is to make a memory pillow out of it. Make this treasure even more unique by adding your own touch. To further personalize the pillow, you may add an embroidered message.
The phrase can be stitched onto a patch and sewn to the shirt for ease of use and aesthetics. Make a tribute to a departed loved one with a personalized memory cushion. Here are some ideas:.
“Life ends. Love doesn’t.”
A Mitch Albom quote has been condensed here. It serves as a poignant reminder that even if someone you care about is no longer with us, their memory endures.
“Holding you in my heart.”
One of the reasons why memory pillows are so special is that they provide a tangible reminder of the person you’re missing. Embroidering this message near your heart on your shirt’s left lapel would look stunning.
“All that we love becomes part of us.”
This is a condensed version of a quote from Helen Keller that I found. It’s a sign that the spirit of the deceased lives on via your own acts.
Crafting Your Way to Inner Peace
Art therapy has been around for a long time. An art project can serve as a diversion when you’re coping with challenging or complex emotions.
You can feel more in control if you have a definite goal to work toward. When you create something beautiful, it has the power to heal and restore you. Creating memorial crafts in memory of a deceased loved one is a simple but significant way to keep their spirit alive.
YOU ARE FINISHED!
I hope crafting your memory pillow brings you some comfort. I’d love to see what you’ve done! Let us know what you think by leaving a comment below. I wish you all the best with your upcoming projects!
Nguồn: https://iatsabbioneta.org
Danh mục: Home