Why do you feel bad that you didn’t properly insulate your metal building sooner? There’s still time.
- How To Get Rid Of Thrips In The House? Comprehensive Guide
- How To Make A Dorm Bed Comfortable? More Tips to Optimize Your Dorm Room for Sleep
- How To Make A Recliner Into A Power Recliner? Comprehensive Guide
- How To Clean Silk Curtains? Curtain Cleaning Do’s and Don’ts
- How To Insulate A Window Air Conditioner For The Winter? Step-by-Step Tutorial
While it’s ideal to add insulation at the beginning of the construction process, it is possible to do it after the fact. There are many of us who have reached this phase in the construction process, and you’re not alone. Due to the high expense of building insulation, many people are reluctant to install it during the construction phase. Insulation, on the other hand, is required based on the use of the building.
Bạn đang xem: How To Insulate An Existing Metal Building? Step-By-Step Process
If you’re in the same boat, we’ll explain why and how to insulate your existing structure if you do.
Do You Need Insulation?
Insulation may or may not be required for a building, depending on its intended purpose and location. Comfort and energy savings are the primary reasons for installing insulation. Insulation, on the other hand, has several drawbacks, such as its flammability. Metal buildings can’t catch fire on their own. The additional information adds an extra level of caution.
Why Insulate Your Existing Metal Building?
The benefits of insulation extend beyond energy conservation and a pleasant living environment:
- Ensures temperature stability
- Moisture is reduced
- Sound is absorbed.
As a general rule, insulating your steel building can help keep moisture out of it. To keep mold, mildew, rust and corrosion from forming. Insulation prevents moisture from leaking between the structure and the insulation board.
How to Insulate an Existing Metal Building
Metal buildings can be insulated in a variety of ways. Insulating an existing metal building might be a difficult task, but there are other solutions that are more straightforward. To help you make the right choice, we’ve listed the many types of insulation available.
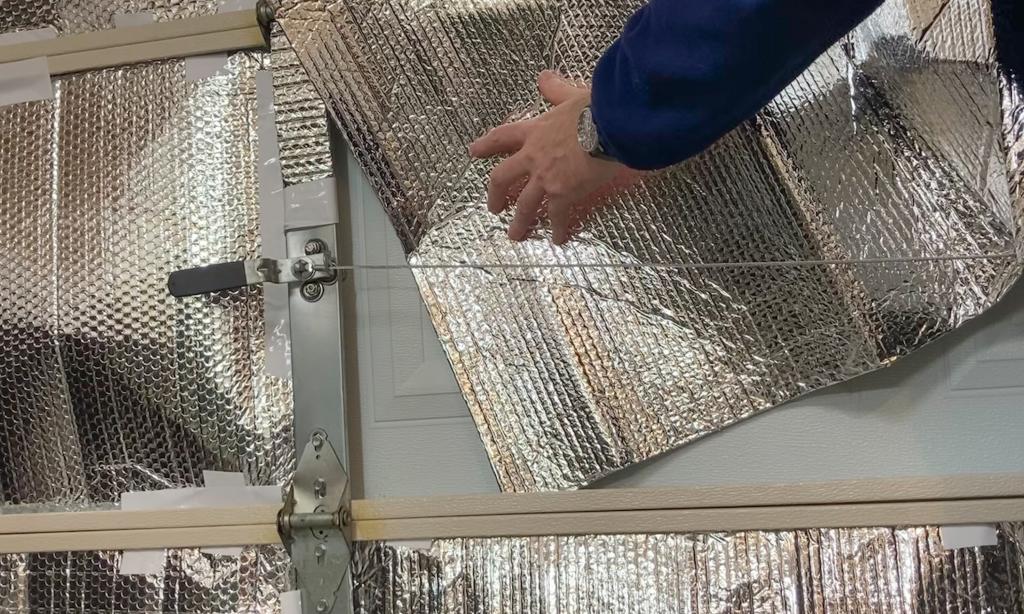
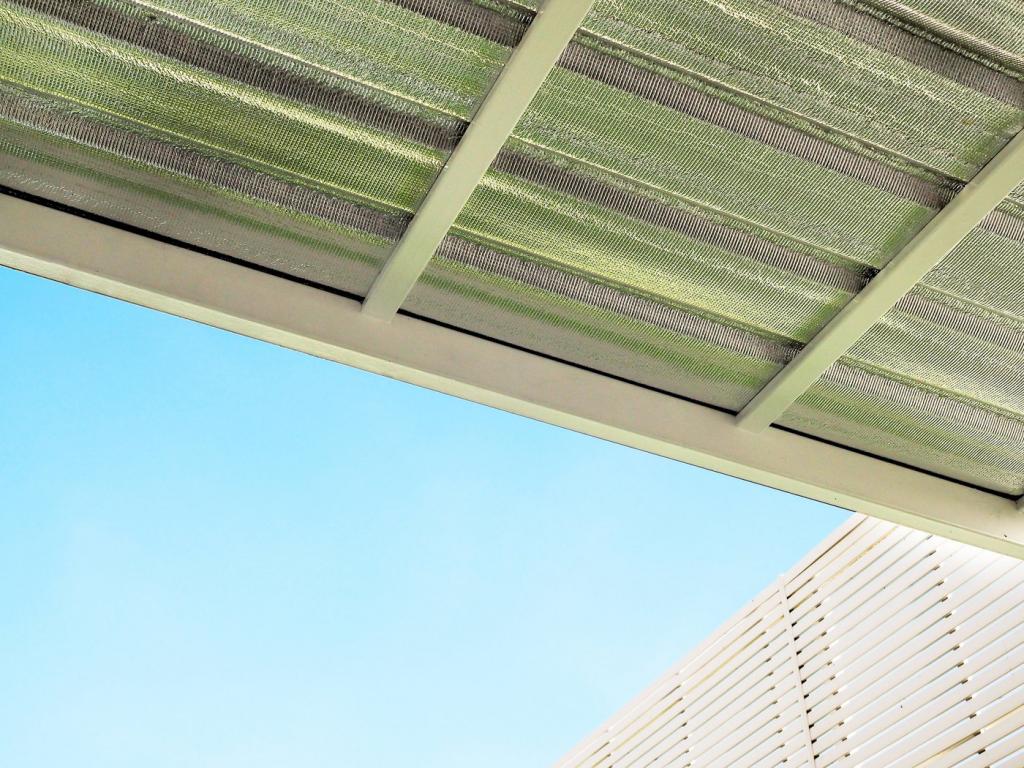
Radiant Barrier Insulation
Metal constructions are likely to benefit the most from radiant barriers. Heat is prevented from escaping by their reflective properties. Aluminum foil is the most common comparison for the thin, lightweight material. As an additional benefit, radiant barriers can be utilized as a stand-alone kind of insulation or as a foundation for other types of insulation.
Step 1: Install the radiant barrier
Staple: From one end of the rafters to the other, place the radiant barrier across the floor joists.
Double-sided tape should be applied to the frame studs from the top down.
Step 2: Double It
The second row should be two inches in front of the first.
Step 3: Final Touch
Get rid of anything that may be in the way of heat-producing or protruding gadgets.
If there is a problem with moisture, fix it before installing insulation. In addition, be on the lookout for any signs of damage to the wiring.
Spray Foam Insulation
This is probably the simplest way to insulate an existing metal structure. You can save time and money by using spray foam insulation instead of radiant barrier insulation if your metal panels are already fastened to the frame.
Step 1: Foam Distribution
Distribute the foam uniformly using a pressed implement.
Step 2: Avoid Spills
Accidental spills should be avoided at all costs because the foam hardens quickly.
Step 3: Let Dry
Internal wall sheeting should be applied after letting dried foam.
It’s critical that you pay close attention to the spaces in between the studs of the frame and cover them entirely.
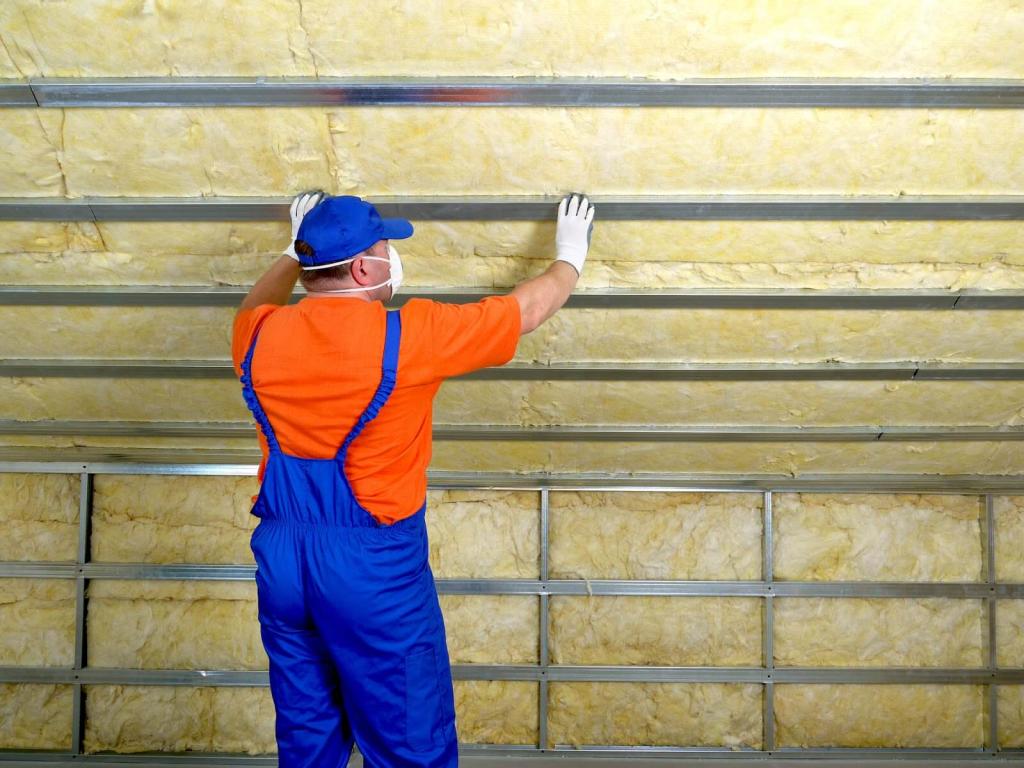
Fiberglass Insulation
When it comes to building and home insulation, fiberglass sheets are a tried-and-true material. Insulation is probably the first thing that springs to mind when you think of it. For existing metal buildings, we do not advocate this solution.
In the case of metal buildings, fiberglass does not work as well as it does in the case of residential buildings.
Issues with Fiberglass for Metal Buildings:
Spacing Issues
- Typically, rolls of rolled fiberglass are between 15 and 24 inches broad
- A common metal building stud spacing is between 4 and 5 feet.
- This causes additional tape to be required, spacing difficulties, peeling, and gaps.
Moisture Issues
- Mold can grow on fiberglass because of its tendency to gather and keep moisture.
More Insulation Options:
- Loose-Fill: The wall cavities are filled with loose fibers or pellets. This is usually a more expensive option.
- For flat roofs, rigid board provides greater soundproofing capabilities.
- Batt: An affordable and well-liked option.
How Much Insulation Do You Need?
Measure your walls and roof to determine how much material you’ll need. What you measure and the equation you apply depends on the geometry of the building you’re attempting to measure. Consider a typical two-sloped residential roof. The formula would be as follows:
Xem thêm : How To Clean A Window Air Conditioner Without Removing It? Best Guide
If the length is 6 meters, and the height is 3 meters, then:
6m x 3m is equal to 18m2.
A total of 36m2 is the result of multiplying 18m2 by 2.
There are 36m2 of space in total.
How Much Will it Cost?
The expense of Metal Building Insulation can quickly escalate. Below you’ll find an idea of what you should expect to pay in terms of materials and labor.
More about Pricing:
Aside from material, installation, and square foot costs, there are other costs. R-Value is another factor to consider. Thermal resistance is measured by the insulation’s R-Value. Temperature resistance improves with increasing numbers. As a result, the final cost is affected. Keep this in mind when you’re out shopping for supplies.
Pre-Installation
1) Choose the Best Way To Attach the Insulation
For truss supports, it’s time to decide if you want the BlueTexTM insulation to go on top or underneath the trusses (blue and red lines below). The red line is Ed’s preferred route, although either one will work.
Using self-drilling screws as fasteners
Attach the BlueTexTM to the framing with self-drilling screws driven into round insulation washers using a screw gun/drill (cordless works wonderfully). Screws and washers are included in the package. These screws don’t require any pre-drilling. 34-inch (5/8-inch) screws with hex-shaped heads are what we propose (as opposed to Phillips heads). Using a magnetic nut-driver attachment for your drill makes it a cinch to grasp and drive screws into metal, making it a breeze.
Installing BlueTexTM in this manner is best done with the help of a person who can pull it across the framing. The BlueTexTM can be pulled 30 feet or more at a time, and it’s extremely durable. Attach the BlueTexTM to the next metal support by screwing it in place. As you approach closer to your helper, maintain the BlueTexTM attached to the framing while the helper pulls it tight.
The helper/pull tight method is preferable to using double-sided tape for holding in place while connecting.
Let’s get started preparing the building for the installation now that you know how you’ll connect the product to the metal.
2) Pre-assemble and paint your fasteners
This is an optional step, but if you want to present yourself in a more professional manner, we recommend it. Using a drill and a pair of work gloves, assemble the screws and locking washers.
Make rows of screws out of cardboard or foam board. Apply a coat of paint and allow them to dry completely.
3) Prepare for the transitions in the corners, the gables and between the walls & roof
The corners of the building need to be firm enough to screw the insulation into. Using 2′′ x 2′′ pieces of wood, or “ripping some 2x4s (or any waste wood), you need enough for each corner support, from the ground up to the tops of each wall. ”
TeksTM screws or normal self-drilling metal screws can be used, although we prefer the hex-head self-drilling screws for fastening the wood to the metal framing.
Drill holes in the wood before inserting screws into it, then screw them into the metal frame.
Adding a 12 or a 14 across the wall, a few ins away from the wall’s top edge, can help you smooth out any rough spots where the walls meet the roofline. When the BlueTex is fastened to the wall at the roofline, it will have a hard surface to fasten into, much like crown molding.
In order to attach the wood to the metal skin on the overhead door’s sides, use a 2×2 and an industrial adhesive that may be left to dry over night. When compared to other methods for installing the BlueTex around the door, this one is both simple and more attractive.
4) Mark up the metal frame as a guide before you get started
In order to have a successful installation, this is perhaps the most important step. Assume for the sake of illustration that you’re working with 48-inch broad material. The first component will be placed at the bottom of the walls, on the ground.
Measure 48 inches from the floor with a Sharpie and make a mark on the metal with your pen. Do this on each and every frame component around the entire structure.
The second run is now complete. Since you want at least a 4′′ overlap, you’ll measure 44′′ above the first mark (48′′ from the ground) and create a second mark.. The second set of markers will be set at a height of 92 inches above the ground. Keep marking in 44-inch increments up the wall until you reach the central ridge, and if necessary, continue to make more marks further up the wall and onto the roof (for more information, check the video).
Light fittings and conduit should be removed now, but for the time being leave the corner bracing alone.
Xem thêm : How To Clear A Clogged Air Conditioner Drain Line? Complete Step-by-Step Guide
You’ve completed all of the preliminary work and are now ready to begin!
Begin Your Installation
In this case, I propose starting with the side walls and working your way to the roof before finishing with the end walls and gable ends. Another choice is to use a method known as a wrap around. Going all the way down one wall, turning around and going around the four walls, or stopping at a door or another corner depends on the size of your structure.
STEP 1-A The Walls
Begin from the bottom and work your way up: Use the floor and the bottom of the framing as a starting point. For best results, place a tape tab facing DOWN while installing BlueTexTM so that its foil side faces outward (away from you) (you actually will NOT use the tape tab on the first run of insulation). It is easier to remove the paper backing and adhere to insulation’s back side by folding and sticking the tap tab over its edge.
Line up the insulation with the ground and the 48-inch high markers. In the middle of the wall, place a screw within the first 2′′ of floor and another around 40′′ up from the ground – approximately 8′′ below the top edge of the BlueTexTM. Keep the BlueTexTM in place while you continue this outward. The corners aren’t done yet.
STEP 1-B The Corners
4 to 5 inches of material should remain at the corners or enough to continue down the wall until you reach another corner, whichever comes first. In order to connect the screws and washers into the wood piece that you installed during your prep, use a flat blade (like a putty knife or drywall blade) with the flat edge and tip to press insulation deep into the corners. A total of three screws should be used for each 48-inch broad piece, one at the bottom, one towards the top, and one in the middle, according to this guide.
Using our matching tape or pre-painting the screws and washers white to match the BlueTexTM is a simple way to hide the screws. Once you’ve completed the initial run across the bottom of the building, repeat this procedure around the building’s perimeter.
STEP 2-A The Second Run
To finish the second run, use the Sharpie to mark 92 inches above the ground and align the insulation so that it points down toward the bottom piece. Overlap the seams by four inches to help attach the tape and ensure a strong bond.
Again, start in the center and insert your first screw approximately 8 inches from the piece’s peak, and then insert your second screw at its base, exactly where your overlap region is located. Using the same strategy, begin in the center and work your way outward toward the corners.
Keep in mind that the second or third piece of insulation is generally where you’ll find the corner bracing if the structure has it.
STEP 2-B Prepping the Corner Bracing
Follow these procedures if you have corner bracing and want to go behind it (see red line in top example).
Unscrew the brace’s bottom two screws. NOTHING can be harmed by removing the brace’s top screws. If you’re not sure how much to pull away from the wall, measure 2 to 4 inches. Use the corner bracing as a guide to run your BlueTexTM along the wall. Starting at the middle of the wall and working outward, begin by screwing in the top screw, followed by the second screw on the overlap of the BlueTexTM. Right now, only the top and bottom need to be secured.
Reposition the brace so that it sits directly on top of the BlueTexTM and tighten the two remaining bolts. It is best to cut the BlueTexTM with your utility knife, one on each side, using a brace. The bracing may then be pushed into the slots, and the screws you removed earlier can be used to realign the brace and reattach it to the frame.
Using the 6mm product, the screw holes may no longer align, therefore you may need to drill new holes for screws if necessary. You should be able to utilize the self-drilling screws you removed once you’ve drilled new holes in them.
STEP 3
It’s ideal to maintain a continuous interior surface and connect the walls to the roofline. If this is a problem, please email us some photographs and we’ll be happy to provide you with some technical guidance.
Be careful to check out the video above if your gable end is connected to the roof via square tubing.
Insulation tape may also be used when attaching the gable ends to the rooftop. Keep going up the roofline until it reaches a point where the two sides meet. In this situation, you must determine whether or not to vent the building.
The Battle of the Vented vs. Non-Vented
When a structure does not have a vent, the sides should be overlapped by 6 to 10 inches at the middle ridge and fastened with washers or screws/washers. Top seam tape is not required.
No matter if you have a ridge vent or not, if your structure is ventilated you should still leave a 3 to 6 inch slit/gap at the top of the roof. It’s possible that this space will allow air to escape from the roof by the quickest and most direct route, even though you don’t have any ridge vents. Gable vents or a gable fan are common alternatives.
STEP 4
Close and tape all of the seams on the walls and roofline, and you’re done! Use extra tape to “clean up” any exposed seams or loose parts that were cut during the process of making the garment.
Bringing an old structure up to code can be a difficult task, and we understand that. The reduced discomfort and absence of sweating/condensation are definitely worth it, however.
It’s amazing to see the impact that a radiant barrier can make. We’ve had tens of thousands of clients install them.
STEP 5*
*You can skip this step if you like. FINISHING THE INSIDE: The installation is complete if you only cover the internal layer of BlueTexTM. But if you want a polished look, you can use just about anything to cover the BlueTexTM’s white surface. As a general rule, the most typical interior finishes include OSB (plywood), plywood, tongue and groove, or drywall to secure shelves, signage, racks, etc.
Nguồn: https://iatsabbioneta.org
Danh mục: Home