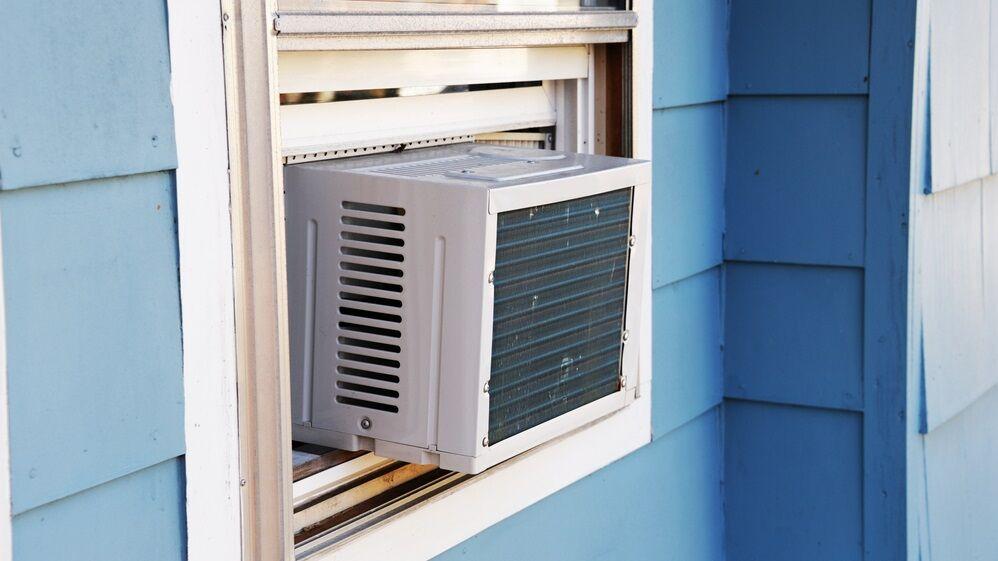
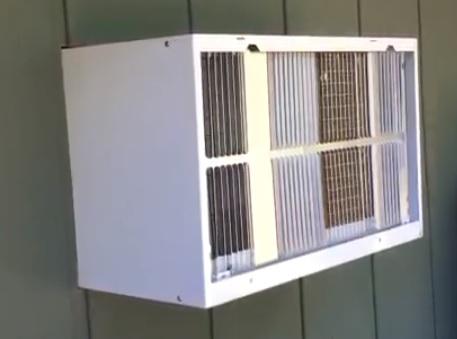
How do I put in an air conditioner sleeve that goes through the wall? To get started, you’ll need a sturdy sleeve and some basic supplies like screws, caulk, and levels. A through-the-wall air conditioner is perfect for spaces without windows. Having this air conditioner gives you the freedom to place it in any part of the room that you like.
You’ll need a sleeve to keep the unit in place and let it to cool the space. The sleeves must first be secured in place by drilling a hole in the wall.
Bạn đang xem: How To Install Through The Wall Air Conditioner Sleeve? Step by Step Instructions
Preparation for the installation is key, so be sure you have everything you need before you begin.
Rather than paying someone to perform the work for you, you can save money by doing it yourself. To discover more about how to attach the sleeve, continue reading.
How to Install a Through the Wall Air Conditioner Sleeve
Unpack everything you need for the assembly of your wall air conditioner sleeve from the box. Double-check all of the parts with a manual. Once, you are ready we can start.
Step 1: Preparation
Unpack everything you need for the assembly of your wall air conditioner sleeve from the box. Double-check all of the parts with a manual. Once, you are ready we can start.
Tools You Need:
- Open the package and locate all of the tools and materials you will need to assemble your wall air conditioner sleeve. With a manual, double-check each and every one of the pieces. When you’re ready, we can get started.
- Screwdriver
- Gloves that protect the wearer’s hands.
- Sealings
Step 2: Sleeve panels together
Let go of the sleeve and place it on the ground. Take one of the side panels and use screws to attach it to the other. Once you’re done with the first side panel, repeat the same on the second one.
PRO TIP: In my experience, arrow indicators pointing to the interior side of the in-wall AC sleeve are typically found on the bottom section. It’s important to keep in mind.
As of now, the shape of the letter U appears on your sleeve. Let’s move on now. Put a panel on top of the letter U and secure it in place. Screws can be used to secure it. The square holes in the plastic clasps should be inserted as follows: (those holes are closer to the exterior side).
Step 3: Fasten the rear grill
I can see the end in sight. The rear grill must now be installed. A sleeved box normally doesn’t include the rear grill. A through-the-wall air conditioner is sometimes included in the package, but this isn’t always the case. Before making a purchase, I recommend double-checking it.
A louvered rear grill or an enlarged rear grill are two types of options for the rear grill. Fasten the grill in place by placing it on the backside and fastening it with screws and washers.
Step 4: Install sleeve brackets
Screw two brackets to the sleeve’s upper surface using the screws provided. Then, using two more brackets, attach one to each side of the sleeve as shown.
Step 5: Slide the sleeve into a wall
I demonstrated how to install the air conditioner sleeve through the wall. Depending on the sleeve model, the brackets may be positioned differently. The sleeve’s maker may also include additional screws for attaching the sides. However, this is purely for your own benefit.
You can slide your sleeve into the wall opening once it is ready. First, make sure the sleeve is straight from front to back and from left to right.
Step 6: Sealing gaps
Check for any gaps, cracks, or holes that could allow water or air to get in after the sleeve has been installed successfully. It could badly damage your unit and sleeve or reduce the efficiency of the working unit. Use a high-quality caulking product to fill up every nook and cranny.
Important Points To Consider Before You Begin
Check for any gaps, cracks, or holes that could allow water or air to get in after the sleeve has been installed. Damage to your unit and sleeve are both possible, as is a decrease in the working unit’s efficiency. Use a high-quality caulking product to fill in any holes or gaps that may exist.
Tip #1. Measure the wall’s thickness
There are certain walls that are thicker than others, so keep that in mind when planning. Because they exhaust outdoors, through-the-wall air conditioners need to know how thick the wall is. Using this information, you may determine which wall air conditioner is best suited for your needs.
Tip #2. Place the air conditioner next to the outlet
Electricity is, of course, necessary for the AC to work. It’s important to pick an area near a power outlet. Installing an outlet if you can’t find a place with an outlet is my recommendation.
Tip #3. Locate the studs
Inside the walls, you’ll find a tangle of pipes and cables. If we don’t detect the studs correctly, we run the danger of harming or cutting these items. Consequently, it is imperative to verify and locate the studs before cutting the wall.
Tip #4. Select a sleeve that is suitable with the AC’s size
Through-the-wall air conditioners come with sleeve included. Not to worry, the device will fit properly in the sleeve in this scenario. Make sure the sleeve you purchase is the suitable size for the device before purchasing it separately.
Basic Steps to Install a Through-the-Wall Air Conditioner
- Make a mark on the wall where the gadget will be installed. Begin by marking the wall where an aperture will be carved. Find all of the studs and mark them with a pencil.
- Follow the lines on the marked sheet rock to cut it out.
- Remove the insulation from the wall and look for pipes and cables that may be buried there.
- In order to have a manufacturer’s guide to follow outside, drill through the wall on all four corners.
- Preparation for header/footer construction may necessitate cutting studs.
Set up the header and footer so that the device can be inserted.
Cut the hole all the way through.
Twist the sleeve into place before putting it on.
To prevent leaks, apply caulk to the external sleeve edges.
- Screw the gadget into position in the sleeve. Turn it on and see whether it works.
Why Should You Get a Through The Wall Air Conditioner?
If you already own a through-the-wall air conditioner, you can skip this part and move on to the next one.
Xem thêm : How To Clean Air Conditioner Drain Line? Complete Step-by-Step Guide
Even if you’re not ready to buy yet, you might want to read this short part if you’re curious about the installation process before making a final decision.
The popularity of through-the-wall air conditioners has steadily increased during the past few years.
Because of their low price, high cooling capacity, and ability to be permanently installed, these appliances are now on par with both window and portable air conditioners.
To learn more about the advantages of through-the-wall air conditioners, continue reading our guide to the best wall-mounted air conditioner units, which follows next. The information you’ll find there will help you make an informed decision about the best equipment for your specific requirements and budget.
The three most important advantages of wall-mounted air conditioners are as follows:
- Average-sized air conditioners through the wall don’t need a lot of electricity to run. As a result, your monthly electric cost will be lower, allowing you to save money. Running the unit costs most people between $20 and $30 a month.
- This is a long-term solution to your cooling demands because the units are incorporated into the wall. Other types of air conditioners, such as window and portable models, necessitate their removal and storage during the winter months. Some people may find that a hassle.
- In addition to providing air cooling, certain wall air conditioners can also provide supplemental heat. This is the most cost-effective solution for year-round comfort.
How To Install A Through The Wall Air Conditioner
Tools Required
You’ll need to gather the necessary equipment before beginning the installation process for your through-the-wall air conditioner.
Your installation will go as easily and quickly as possible if you follow these steps.
The following is a list of what you’ll need to get this device installed:
- You should get a sleeve (sometimes known as a “bracket”) with your order. Otherwise, make a purchase.)
- With a Glue Gun
- a caulk made of silicone
- A Tape Measure
- Stupidity Detection (or you can use a small penny nail for finding the studs)
- Paint
- Pencil
- Pry Bar:
- Saw, Circular
- A Hand Sawn Timber
- Hammer
- Nails
- Level
- Plentiful amounts of 2x4s (for framing)
- Bits and drills
- It’s a utility blade.
- 1 sheet of drywall
- a single piece of drywall
- Wall Knife
Step 1: Choose a Spot
Look around the room to see where the best place to put the through-the-wall air conditioner is.
Consider the most visually appealing sites and the places where you believe the message will have the greatest impact. Keep it close to an electrical outlet so that you can plug the device in after the installation has been completed. ‘
The bottom of the AC unit should be at least 1 to 5 feet above the ground. If the air filter is set too high, it could cause condensation to build on the ceiling, therefore this will help to reduce the quantity of dust it collects from the floor.
Step 2: Mark the Wall Studs
Wall studs (2 x 4 lumber) are used to construct and support walls, and their standard spacing is 16 inches.
To begin the process of cutting through the drywall, you need to mark the studs in the area where the appliance will be installed. In addition, you want to minimize the number of wall studs that you have to remove in order to speed up the process.
The following are your two choices:
- Locating the studs by using a stud finder
- Finding the point where the sound shifts from hollow to solid by tapping on the wall with your knuckles. To be sure you’re in the appropriate spot, pound a tiny penny nail into the wall. A stud is a nice thing. Retry if necessary.
Mark three or four wall studs with an X on the drywall using a pencil after you’ve located them.
Take a measurement of the air conditioner’s width, and use it to mark the studs in the wall where the unit will be installed. An installation guide, which you can tape to the wall and trace the outline of, should have arrived with your appliances as well. In the event that this is not the case, use the sleeve (bracket) instead.
Use a guide paper or sleeve to cut through the fewest studs possible.
Step 3: Turn Off Power to the Room
Locate the electrical panel (breaker box) in your home and turn off the circuit breaker for the affected room. You don’t want to accidently cut through electrical wires when you’re cutting through the wall in the next phase.
Run an extension cord from another room with electricity to power your saw and drill.
Step 4: Making the Hole
Use the accompanying guide paper or sleeve to sketch the outline of the air conditioner on the wall so you can mark the air conditioner’s aperture.
Make sure your outline is level by using your level tool while you are marking it.
Make a second outline, this time 2 12 inches larger than the first. The 2 x 4 timber pieces will now have enough room to be used to construct a supporting frame for the unit.
Then, with a drywall knife, cut out the shape. Strike vertical lines above the wall studs, as well.
As soon as the score lines are visible, hit each section of scored drywall with a hammer to make them pop out. Instead of hammering these bits of drywall out, you might use a hand saw to cut them.
Remove all of the drywall so that you can only see the studs in the wall. You may need to take out the insulation in the wall to match the hole you created in the wall.
Step 5: Cut Through the Wall Studs
Cut the wall studs inside the wall opening flush with the outline using a circular saw.
Step 6: Construct a Frame for the Air Conditioner
Using the dimensions of the wall opening, cut two 2 x 4’s to the same length as the wall.
Xem thêm : How To Drain Haier Portable Air Conditioner? Easy Step-by-step Guide
Using a tape measure, deduct the aggregate thickness of the two 2 x 4s from the wall opening’s height. Afterwards, cut each of those to the appropriate length.
Using the four 2 x 4s, you may construct a frame. Make sure they’re all in place.
Using nails, nail the 2 x 4 frame you created into the wall studs and then slide it into the opening.
Step 7: Create a Hole In The Exterior Wall
Each of the inner frame’s four corners must be drilled through the outer wall with a drill.
Using these holes, you’ll be able to figure out exactly where to cut on the outside of the house.
Draw four straight lines connecting the holes on the external wall with a pencil and a level.
Cut the outside material with the circular saw so that the inside and exterior holes are now perfectly aligned.
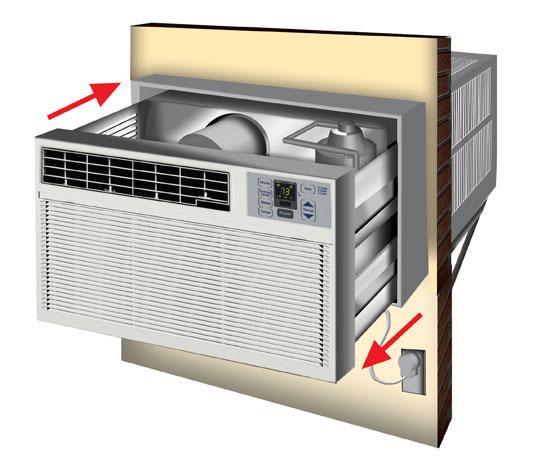
Step 8: Installing the Through the Wall AC Unit
After inserting it according to the instructions, fasten the metal sleeve (bracket) to the wall.
Secure the gadget in the bracket by placing it in its sleeve and tightening the strap.
Plug in the power wire to the nearest outlet.
Step 9: Completing the Installation
Patch and cut any exposed drywall around the appliance with the new material.
Use drywall nails to secure it in place.
Using drywall compound and a drywall knife, fill in any cracks or holes.
The drywall should be primed and painted to match the current wall color.
Using a caulking gun, apply a thick bead of silicone caulk around the unit’s borders on both the inside and outside of the house. This will stop any air from leaking into or out of the house..
Trim or molding can be installed around the device to give it a finished look.
Step 10: Turn the Power Back On
Power will be restored to the room if the breaker is flipped back on.
After that, you can relax in the cool air provided by your air conditioner.
How Much Do Through The Wall Air Conditioners Cost?
Some of you who haven’t previously purchased a through-the-wall air conditioner may be curious as to how much they cost now that the installation instruction has concluded.
When it comes to purchasing and maintaining a wall-mounted air conditioning unit, the entire cost relies on how large a space you need to cool.
As for the most efficient wall air conditioners, here are your options:
Through the Wall Air Conditioner Total Cost Chart
We hope you found the information on how to set up a through-the-wall air conditioner and the associated costs useful.
Installation isn’t difficult if you have the right tools and follow the right instructions, as you’ve seen. In addition, owning a wall air conditioner is a terrific method to save money on cooling costs.
Conclusion
An air conditioner may now be installed in a room with no windows, making it easier to keep the temperature down. Just remember the basics of cutting the wall, attaching the sleeves, and making sure the structure is secure.
If you keep in mind where the wall is and where the studs are inside, the process will go more smoothly. Another factor to consider is how much money you could save by doing it yourself.
All you need to know about installing an air conditioner sleeve in a wall is this: I sincerely hope that you gained some knowledge from reading this article. Click here for more fascinating articles.
Nguồn: https://iatsabbioneta.org
Danh mục: Conditioner