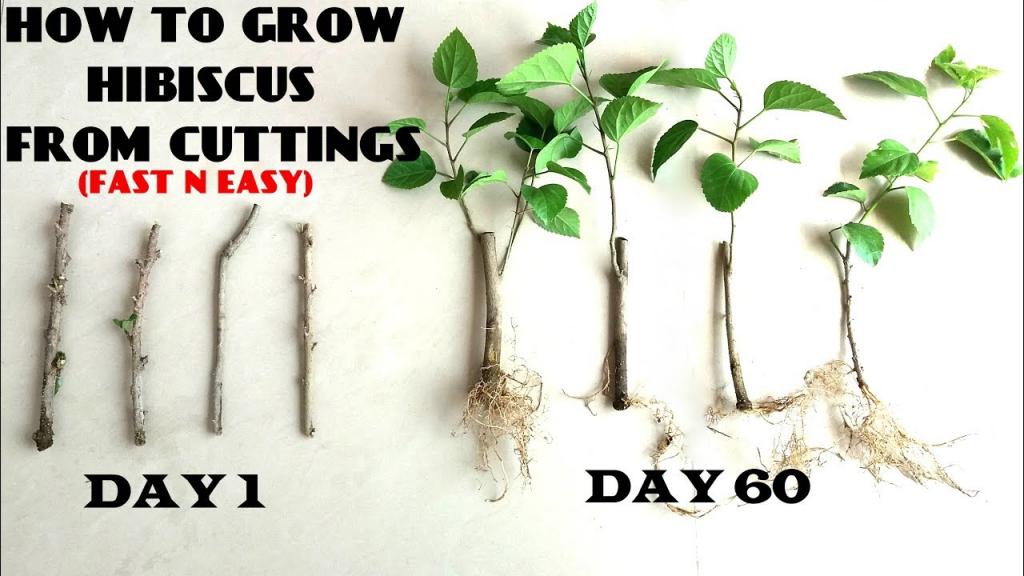
Some hibiscus types, such as the Chinese hibiscus, cannot be propagated from cuttings. Colorful, eye-catching blossoms of the Hibiscus rosacensis (Hibiscus rose-sinensis) are extensively grown as a landscape ornamental in USDA plant hardiness zones 9b to 11a for their beauty. As compared to many other perennial shrubs that take longer to root from cuttings, this one does it in a matter of months. To ensure that hibiscus cuttings root well, they must be taken at the appropriate time of year and treated appropriately.
- How To Fertilize Basil? Special Tips and Tricks
- How To Plant Oleanders? Complete Guide
- When To Apply For Growing Spaces Greenhouse In Kind Grant? Helpful Information!
- How To Make Money From A Hobby Greenhouse? A Few Tips to Remember
- How Are Transpiration And Photosynthesis Related? A Must Read Guide
Things You Will Need
- Utility knife
- Making a paste with rubbing alcohol
- Nursery pots with a 4-inch diameter are made of plastic.
- Perlite
- Coarse sand.
- Powdered rooting hormones (optional)
- Bag with a capacity of 1 gallon
- Wooden skewers
- A mister for plants
Preparing to Grow Hibiscus From a Cutting
When attempting to develop hibiscus from a cutting, timing is critical to the process’ success. Hibiscus plants should be started from softwood cuttings, according to the University of Florida Department of Environmental Horticulture. These cuttings should be taken in the summer when the shrub is actively growing. Tip cuttings are the best for rooting, but they are also the most susceptible to drying out. To avoid withering, they must be potted as soon as possible after harvesting.
Before collecting hibiscus cuttings, make sure you have all the necessary tools. While prepping the rooting container, sterilize a utility knife blade with rubbing alcohol and place it on a clean paper towel. Perlite and coarse sand can be used to fill a 4-inch plastic nursery pot with a rooting medium that can hold moisture. There should be a slight dampness to the medium, but it shouldn’t be soggy. Bring along some extras like a 1-gallon plastic bag and a few wooden skewers just in case.
Gathering a Hibiscus Cutting
Cuttings can be taken in the morning because the plants are most moist in the early morning hours. Select a healthy, youthful stem tip cutting with a plump stem free of injury or disease. Cuttings that are 4 to 6 inches long are recommended by the Iowa State University Extension. The utility knife can be used to cut through the stem immediately below a group of leaves and remove the leaves from the bottom part of the cutting. Cut the larger leaves in half and remove any flowers or buds that may be present.
Pot Up Your Cuttings in Water or Rooting Soil
There is no need to use rooting hormone to successfully root a hibiscus cutting. Sprinkle hormone powder on the stem’s leafless portion, being careful not to get any on the leaves. The bottom set of leaves of the hibiscus cutting should be able to fit in the pot of medium that you’ve made a planting hole in. Stick the cutting into the hole and press the medium firmly against the stem to ensure good contact.
Hibiscus cuttings can be effectively rooted even without the use of rooting hormone. Take care not to get any hormone powder on the leaves when dusting the leafless stem with it. The bottom set of leaves of the hibiscus cutting should be able to fit into the pot’s planting hole. Stick the cutting into the hole and press the medium firmly on the stem so that the two create a good contact.
The roots will be ready for transplantation sooner if they are grown in the soil.
Start with soil when propagating hibiscus to grow a garden shrub to reduce transplant shock danger.
The less stressful the transplanting process is on the hibiscus, the less likely it is to turn yellow. As a result, a few of the leaves will fall from the tree.
Starting your cuttings in soil will save you all of that time and effort. Good rooting soil has a mixture of perlite, river sand, vermiculite, or peat moss.
Xem thêm : How To Start Growing Plants In A Greenhouse? Comprehensive Guide
When cuttings are planted in rooting soil and then transplanted to potting soil, they form strong roots.
Use a tiny plastic pot with drainage holes to pot up your cuttings. Up to 30 cuttings can be stored in a 15cm container.
For each cut, make a hole at least an inch deep using your finger or pencil.
Soil should cover the lowest one-inch of the branch. The container should be placed in a location that is both bright and receives indirect light.
To speed the process along, a clear plastic bag can be put over the container. This increases the heat and moisture retention under the canopy.
A clear plastic bag can be placed over the container to expedite the process. As a result, the canopy retains more heat and moisture.
Transplanting Rooted Hibiscus into Pots
Each rooted cutting will necessitate a pot at least 10 inches in diameter (10 cm).
Hibiscus prefers a mixture of 4 parts soil to 1 part peat. Fill the pot with the soil leaving about one inch of space at the top.
4 parts soil to 1 part peat moss is a good potting soil for hibiscus. Leave a one-inch space at the top of the pot when adding the soil.
To encourage new growth, give each cutting a few weeks of indirect sunshine, then move them into direct sunlight.
Once potted hibiscus reaches one to two feet in height, they’ll be ready to transplant outdoors, or you can keep them in containers. You may need to re-pot them in larger containers after a few months though.
The hibiscus can be transplanted outside once it reaches a height of one to two feet, or you can maintain it in a container. After a few months, you may need to re-pot them in larger containers.
Xem thêm : How To Grow Mums From Cutting? Things You Will Need
When the potted hibiscus reaches a height of one to two feet, you can either transfer it outside or maintain it in a pot. It’s possible that after a few months you’ll have to re-pot them into something bigger.
How to Propagate Hibiscus From Cuttings
When the potted hibiscus reaches a height of one to two feet, they are ready to be transplanted outdoors or kept in containers. After a few months, you may need to re-pot them in a larger container.
Step One: Take Your Hibiscus Cuttings
Find a healthy mother plant. For the cuttings to grow into an exact clone of the mother plant, choose one that has blossoms that you find appealing. Deprived of the ability to regenerate. Each cut should be between four and six inches long.
Step Two: Prepare Your Hibiscus Cuttings
Remove all but one of the leaves from the stem. Then, using rooting hormone powder or liquid, coat the bottom of the cutting. A powder called RootTone is available at your local nursery store.
Step Three: Make a Simple Mini-Greenhouse
Water the cuttings and place them in a pot. The pot should be covered with a clear or white bag of some sort. Place a pole in the middle of the pot to keep the cuttings upright and steady.
The cuttings should root within a month or two. There’s a chance they won’t all be accepted, but the majority of them should be. After a few months of rooting, you can transplant them into individual pots. Put them in the garden as soon as they are a foot or two tall.
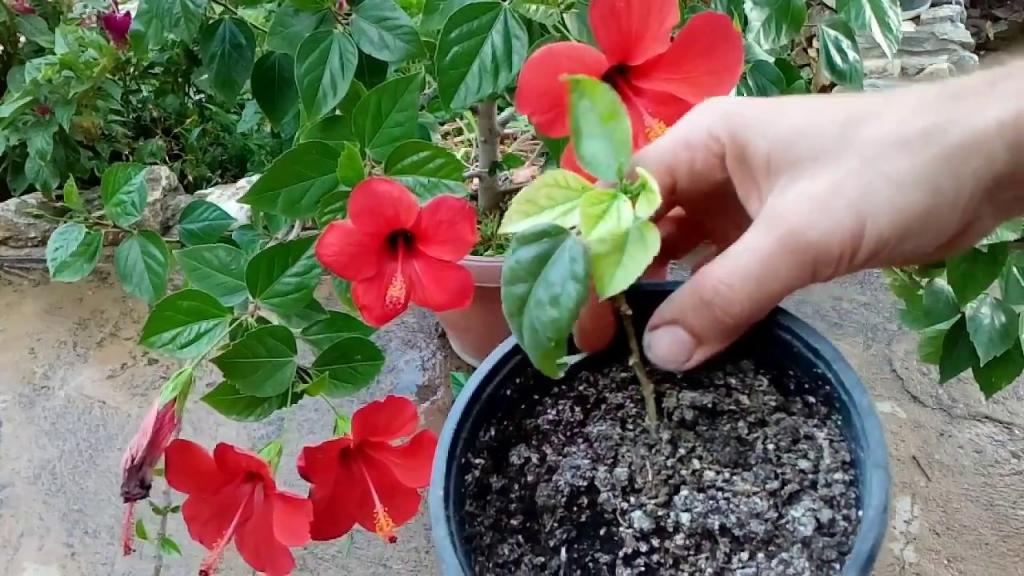
A few months back, I rooted the following hibiscus:
Why not ask your friends for hibiscus cuttings instead of purchasing them? There’s no need to pay a nursery to start hibiscus cuttings for you because it’s so easy. It’s as simple as taking some cuttings, sticking them, and waiting a few months. You’ve got a tiny hibiscus of your own. In fact, as you can see in the image above, they don’t take long to begin flowering.
In my garden right now I have two large hibiscus shrubs that are taller than me and covered in beautiful blooms. Both started as little cuttings. If I can do it, so can you.

Frequently Asked Questions about Hibiscus Propagation
Do you need a rooting hormone powder to grow hibiscus from cuttings?
At the moment, my garden has two enormous hibiscus shrubs, both of which are taller than I am and dripping with lovely blooms. It all began with a few tiny snippets. That means you can as well.
When is the best time to grow hibiscus from cuttings?
Presently blooming in my garden are two enormous, taller-than-I hibiscus plants. Little cuttings were the beginning for both. You, too, can accomplish this if I can.
Nguồn: https://iatsabbioneta.org
Danh mục: Garden


