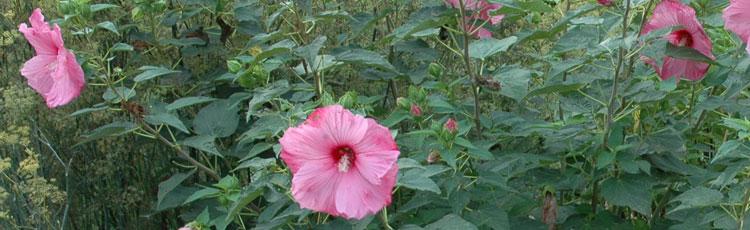
Several varieties of the late-summer scene-stealer hibiscus are hardy even where climates are less than tropical, including rose mallow (Hibiscus moscheutos; USDA zones 5 through 10), rose of Sharon (Hibiscus syriacus; USDA zones 5 through 9), Texas star hibiscus (Hibiscus coccineus; USDA zones 6 through 9) and confederate rose (Hibiscus mutabilis; USDA zones 7 through 9). All of these plants produce many showy flowers that last one day each on canes that grow up from the roots each spring. The plants are also easily propagated by seed – indoors or out – and can bloom in their first season.
- How To Root Geranium Cuttings In Water? Ultimate Guide
- How Do I Know If My Orchid Is Dead? Everything To Know!
- How To Harvest Echinacea? Comprehensive Guide
- Which Gives Better Light For Growing Plants In A Greenhouse Fluorescent Or LED?
- Do You Need Humidity Domes When Planting Seeds In A Greenhouse? Helpful Information!
Indoors From Purchased Seed
1. Nick the Seed Coat
Nick the hard seed coat at the wider, rounded end of the seed with a clean craft knife.
2. Soak the Seeds
Soak the seeds in a small bowl of hot water for up to 24 hours. Begin the sowing process 12 weeks before your last expected spring frost.
3. Prep the Planting Tray
Fill a planting tray with moist seed-starting mix, usually a soil-less product that combines perlite, vermiculite and peat moss.
4. Sow the Seeds
Sow the seeds 1/4 inch deep, firming the moist seed-starting mix over the seed. Place one seed per plug if your seed tray has inserts that hold the mix in separate 1- to 2-inch compartments. Otherwise sow seeds a few inches apart so seedlings will be easy to remove later.
5. Keep Them Warm
Set the tray on a waterproof greenhouse heat mat set to 68 to 72 degrees Fahrenheit or in a room with the same temperature range.
6. Conserve Moisture
Cover the tray with its included clear plastic dome or with plastic wrap to keep moisture in.
7. Check the Seed Tray
Check the seed tray regularly over the one to three weeks it takes the seeds to germinate. Ensure the soil is moist but not soggy. Too-wet soil can cause the seeds to rot before they germinate.
8. Remove the Plastic
Remove the plastic when plants emerge and move the tray to a site where it receives bright, indirect sunlight.
9. Apply Fertilizer
Apply a balanced, water-soluble fertilizer mixed to half its recommended strength with every other watering after the seedlings produce their first true leaves – the first pair of leaves after the initial seed leaves that emerge at germination. Water enough to keep the potting soil evenly moist, never letting it dry out or become waterlogged.
10. Transplant the Seedlings
Transplant the seedlings to separate 1-gallon containers filled with standard potting soil when they have at least three sets of leaves. Allow them to grow in a sheltered area for several weeks before transitioning them to their permanent outdoor location when all danger of frost has passed.
Outdoors From Fresh Seed
1. Harvest the Seeds
Harvest the papery seedpods from an established hardy hibiscus in late fall when the pods turn brown, but before they break open. Remove the fuzzy brown seeds from the pods with a gentle squeeze.
Test Seed Viability
Wrap several seeds in a damp paper towel to test if they are viable. If your plant is a hybrid, seeds may be sterile, meaning they won’t germinate. Place the towel in a plastic bag and set it in a warm location, such as on top of the refrigerator or on a seed-starting heat mat, for about a week. Check the contents every few days, looking for the seeds to swell and send out a root. If all or some of them do, your hibiscus produces viable seed you can sow.
Sow the Seeds
Sow seeds harvested from the pods 1/4 inch deep in moist, well-drained soil in full sun as soon as possible after they are harvested. Plant several seeds in each site and thin to the strongest in the spring after the seedlings emerge.
Things You Will Need
- Craft knife
- Small bowl
- Planting tray
- Seed-starting mix
- Heat mat (optional)
- Plastic wrap or tray cover
- Water-soluble fertilizer
- 1-gallon pots
- Potting soil
- Paper towel
- Plastic bag
Tip
Fresh seed from an established hardy hibiscus can be saved in a cool, dry location until spring and started indoors following the method recommended for purchased seed.
Growing Hardy Hibiscus From Seed (Step by Step)
In this article, we cover the easy steps involved in growing Hibiscus from seeds. Hibiscus seed sowing can be started from March through Mid September. If your patient you can have a variety of beautiful Hibiscus in no-time.
Pots
To start Hibiscus seeds you’ll need some small pots. We recommend 3 – 4 inches in diameter. Use pots with drainage holes so that the soil does not remain too wet to prevent root rot.
Potting Soil Mixture
For 100% germination, start with a potting mix of 90% coco peat, and 10% Organic compost. This mixture works great for Hibiscus.
Plant Seeds
After your potting soil mixture is prepared, fill your pots with potting soil and plant two seeds per pot. Plant seeds a quarter-inch deep and a few inches apart.
Once the seeds are planted in each pot, water the soil. Seeds should start to germinate in 6-10 days.
Use Transplant Tray as a Greenhouse
Store the pots in a plastic container with the lid closed. This will help the seeds germinate faster. The plastic container helps retain the moisture in the soil for a longer period, it creates an environment like a greenhouse.
Light Requirements for Seed Germination
The closed container should be kept from the direct sun. Keep pots in a bright environment with indirect light.
Watering Seeds
It’s best to keep the soil moist at all times but not to wet as this will cause the seeds to rot. Touch the soil and if it feels dry, water. Hibiscus does best in slightly moist soil.
Move Seedlings to Bright Indirect Light
Once your plants have started and have leaves, remove the lid from the container and keep your pots in a location where it gets a bright indirect light source.
Transplant to Individual Pots
Once your seedlings are 6-8 inches tall, you can transplant them to an individual pot.
Fertilize
Fertilize your Hibiscus plant with diammonium phosphate fertilizer and vermicompost each year from March – September. You can fertilize your Hibiscus every 30 days to ensure maximum blooms.
For more information on growing Hibiscus check out our complete guide here.
How to Sow
Hibiscus may be grown from seed sown early indoors and transplanted outside after frost, or planted as plants or bare roots.
Sowing Seed Indoors:
- Sow hibiscus seeds indoors 10-14 weeks before last spring frost date using a seed starting kit
- Soak seeds in room temperature water for about 8 hours to speed germination
- Sow seeds ¼ inch deep in seed-starting formula
- Keep the soil moist at 70-75 degrees F
- Seedlings emerge in 14-21 days
- As soon as seedlings emerge, provide plenty of light on a sunny windowsill or grow seedlings 3-4 inches beneath fluorescent plant lights turned on 16 hours per day, off for 8 hours at night. Raise the lights as the plants grow taller. Incandescent bulbs will not work for this process because they will get too hot. Most plants require a dark period to grow, do not leave lights on for 24 hours.
- Seedlings do not need much fertilizer, feed when they are 3-4 weeks old using a starter solution (half strength of a complete indoor houseplant food) according to manufacturer’s directions.
- If you are growing in small cells, you may need to transplant the seedlings to 3 or 4 inch pots when seedlings have at least 2 pairs of true leaves before transplanting to the garden so they have enough room to develop strong roots
- Before planting in the garden, seedling plants need to be “hardened off”. Accustom young plants to outdoor conditions by moving them to a sheltered place outside for a week. Be sure to protect them from wind and hot sun at first. If frost threatens at night, cover or bring containers indoors, then take them out again in the morning. This hardening off process toughens the plant’s cell structure and reduces transplant shock and scalding.
Planting Potted Plants in the Garden:
- Select a location in full sun with good rich moist organic soil.
- Prepare the bed by turning the soil under to a depth of 6-12, inches removing any debris, and lightly raking as level as possible.
- The addition of organic matter (leaf mold, compost, well-rotted manure) benefits all gardens and is essential in recently constructed neighborhoods.
- Plant on a cloudy day or in late afternoon to reduce transplant shock.
- Dig a hole for each plant large enough to amply accommodate the root ball.
- Unpot the plant and gently loosen the root ball with your hands to encourage good root growth.
- Place the top of the root ball even with the level of the surrounding soil. Fill with soil to the top of the root ball. Press soil down firmly with your hand.
- Use the plant tag as a location marker.
- Thoroughly water and apply a light mulch layer on top of the soil (1-2 inches) to conserve water and reduce weeds.
Planting Bare Root Plants in the Garden:
- Select a location in full sun with good rich moist organic soil.
- Dig a hole deep and wide enough to accommodate the bare root.
- Set the plant so that the crown is at or just slightly below the ground level. Allow the roots to fan out from the crown at around a 45 degree angle. Roots should spread out separately, like stretched fingers, from the crown, and not bunch up. It may be helpful to build a cone-shaped mound of soil in the bottom of the hole and spread the roots around it. It is very important to set the roots such that the crown is roughly level with the ground.
- Cover the roots with soil and tamp down firmly to get rid of air pockets. Fill the soil to just the top of the crown, where the top growth and leaves will emerge. Make sure all the roots under the crown are in good contact with the soil.
- Water very well to fully saturate the roots and the soil.
- Wait until new growth starts to appear before applying a layer of mulch.
How to Grow
- Keep weeds under control during the growing season. Weeds compete with plants for water, space and nutrients, so control them by either cultivating often or use a mulch to prevent their germination.
- Mulches also help retain soil moisture and maintain even soil temperatures. For perennials, an organic mulch of aged bark or shredded leaves lends a natural look to the bed and will improve the soil as it breaks down in time. Always keep mulches off a plant’s stems to prevent possible rot.
- Careful watering is essential in getting perennials off to a good start. Water thoroughly at least once a week to help new roots grow down deeply. Soil should be damp at about 1 inch below the soil surface. You can check this by sticking your finger in the soil. Water early in the morning to give all leaves enough time to dry. One inch of rain or watering per week is recommended for most perennial plants. You can check to see if you need to add water by using a rain gauge.
- Until plants become established, some protection from extreme winds and direct, hot sunlight may be necessary. Good air movement is also important.
- After new growth appears, a light fertilizer may be applied. Keep granular fertilizers away from the plant crown and foliage to avoid burn injury. Use low rates of a slow release fertilizer, as higher rates may encourage root rots.
- Hibiscus may require staking to prevent them from falling over in the wind.
- “Deadhead”, remove spent flower heads to encourage continuous flowering and prevent seed development.
- Remove and discard foliage after a hard frost in fall.
- In colder regions, apply another layer of mulch (1-2 inches) after the ground freezes in fall. Evergreen boughs (from Christmas trees) provide additional protection. Remove this mulch in the spring.
- Divide when plants become overcrowded, bloom size begins to diminish or plants lose their vigor. Divide hibiscus in early spring. Dig clumps from the ground and with a sharp knife or spade, cut into good sized divisions, each with several growing eyes and plenty of roots. Remove any dead or unhealthy plant parts and cut back stems. Replant one division where the plant was originally and plant the extra divisions elsewhere in your garden or give them away to gardening friends. Plant the divisions immediately, or as soon as possible, and water well.
Growing Tips
- Many gardeners do not cut back perennial flower seed heads in the fall, but wait until early spring before the new foliage appears. This provides food for wildlife over the winter.
- Remember hibiscus flowers only last one day, do not be concerned if you see them fall off, plenty more will come!
Common Disease or Cultural Problems
Alternaria Leaf Spot: Small, round reddish brown spots with white to gray centers form on the upper surface of the leaves and along the midrib. The lesions may encircle the stems and cause wilt. This disease is worse in warm, wet or very humid weather. Burpee Recommends: Avoid getting water on the foliage. Remove infected plant parts and do not work around wet plants. Provide plenty of air circulation. Contact your Cooperative Extension Service for fungicide recommendations.
Bud Drop: When the buds fall off the plant generally due to lack of food or water. Burpee Recommends: Regular watering and fertilizing.
Plants die over the winter in recommended zones: Wet soils with poor drainage in winter can kill plants. Burpee Recommends: Make sure plants are in a well-drained soil. For container grown plants, add one zone colder than your zone when selecting varieties, and keep containers in a protected area outside, mulch heavily.
Xem thêm : How To Keep Small Bugs Out Of Your Greenhouse? Helpful Tips To Remember
Root Rots: A number of pathogens cause root rots of seedlings as well as mature roots. Burpee Recommends: Pull up and discard infected plants. Make sure your soil has excellent drainage. Contact your Cooperative Extension Service for recommendations.
Yellow Leaves: When the leaves turn yellow and drop off the plant. Burpee Recommends: Do not be alarmed, this happens to the older leaves several times a year. When the old leaves drop, the new ones will begin to grow.
Viral Diseases: Viral diseases spread by insects may cause deformed or cupped foliage with mottled patterns. The plants lose vigor. Burpee Recommends: There is no cure. Remove and destroy infected plants. Control aphids and other insects which spread the disease. Be careful when working in the garden and do not touch any plant until you have washed your hands or gloves after touching infected plants. Clean tools after working with each plant.
Common Pest Problems
Aphids: Greenish, red, black or peach colored sucking insects can spread disease as they feed on the undersides of leaves. They leave a sticky residue on foliage that attracts ants. Burpee Recommends: Introduce or attract natural predators into your garden such as lady beetles and wasps who feed on aphids. You can also wash them off with a strong spray, or use an insecticidal soap.
Japanese Beetles: Burpee Recommends: Hand pick early in the morning into a bucket of soapy water.
Mealybugs: Mealy bugs are 1/8 to ¼ inch long flat wingless insects that secrete a white powder that forms a waxy shell that protects them. They form cottony looking masses on stems, branches and leaves. They suck the juices from leaves and stems and cause weak growth. They also attract ants with the honeydew they excrete, and the honeydew can grow a black sooty mold on it as well. Burpee Recommends: Wash affected plant parts and try to rub the bugs off. They may also be controlled by predator insects such as lacewings, ladybugs and parasitic wasps. Check with your Cooperative Extension Service for pesticide recommendations.
Spider Mites: These tiny spider-like pests are about the size of a grain of pepper. They may be red, black, brown or yellow. They suck on the plant juices removing chlorophyll and injecting toxins which cause white dots on the foliage. There is often webbing visible on the plant. They cause the foliage to turn yellow and become dry and stippled. They multiply quickly and thrive in dry conditions. Burpee Recommends: Spider mites may be controlled with a forceful spray every other day. Try hot pepper wax or insecticidal soap. Check with your Cooperative Extension Service for miticide recommendations.
Thrips: Thrips are tiny needle-thin insects that are black or straw colored. They suck the juices of plants and attack flower petals, leaves and stems. The plant will have a stippling, discolored flecking or silvering of the leaf surface. Thrips can spread many diseases from plant to plant. Burpee Recommends: Many thrips may be repelled by sheets of aluminum foil spread between rows of plants. Remove weeds from the bed and remove debris from the bed after frost. Check with your Cooperative Extension Service for pest controls.
FAQ
Does hibiscus make good cut flowers?
No, the flowers close up in one day and will not last if cut.
Why are the leaves turning yellow and falling off?
During the season, hibiscuses shed its older leaves to push out new growth.
Does hibiscus attract butterflies?
Yes.
Is hibiscus deer resistant?
Yes.
When will my hibiscus bloom?
Hibiscus bloom from July to September.
Nguồn: https://iatsabbioneta.org
Danh mục: Garden


