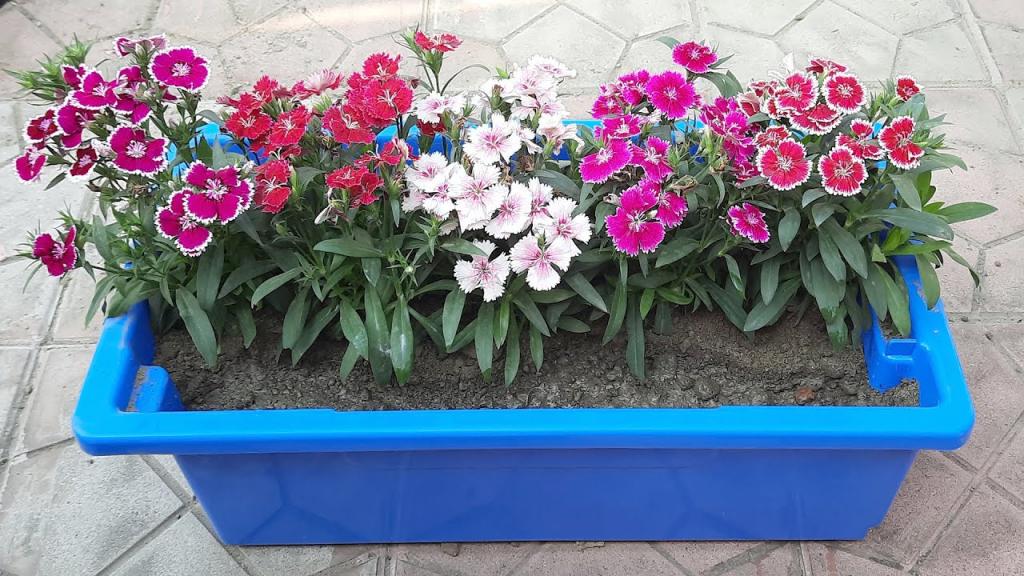
You don’t need a lot of open space to cultivate these lovely flowers if you know how to grow dianthus in pots. It’s also possible to grow them in a greenhouse and arrange a collection of cloth pots of potted flowers Dianthus plants grown in another setup might be used as bedding later on.
Dianthus includes a wide variety of plants; you can pick among annuals, biennials, or perennials, depending on your preferences before continuing with the article. It’s also a good idea to choose a cultivar or variety that’s appropriate for your area. If this isn’t an option, invest in a greenhouse and customize the conditions to meet the needs of your plants.
Bạn đang xem: How To Grow Dianthus In Pots? The Simple Secrets To Success
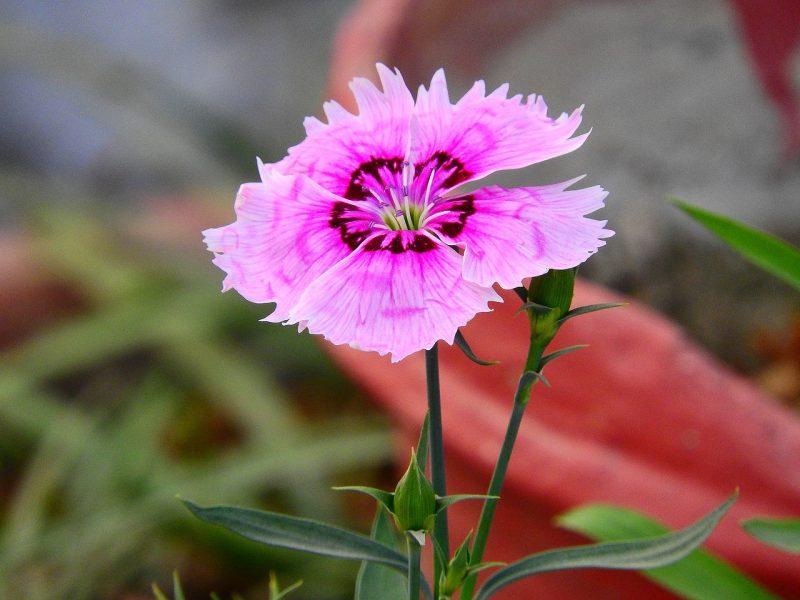
Dianthus Plant
Known as Sweet William (Dianthus barbatus), the dianthus plant also has a cinnamon or clove-like scent. The plants grow to a height of six to eighteen inches (15-46 centimeters) on average. The most common colors of Dianthus blooms are pink, salmon, red, and white. The stems are sturdy, but the foliage is thin and thinly distributed. A breeder discovered in 1971 that Dianthus could be grown in varieties that did not set seed, resulting in a longer flowering season. Depending on the variety, it can bloom anywhere from May to October on modern plants.
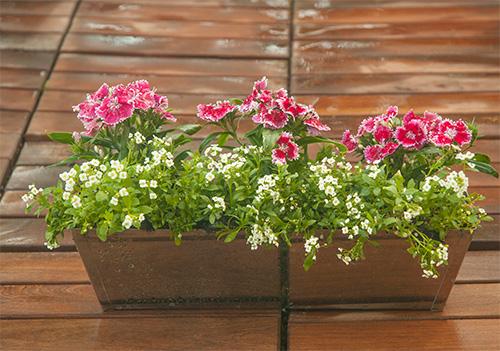
How To Grow Dianthus In Pots Successfully
Step #1. Medium and site preparation
The media you use is the most important factor in ensuring good dianthus development. Fertilizing, calcareous, and somewhat wet soil with a neutral pH is what you’re looking for. While some species like acidic soil, others have a different requirement, these characteristics might vary based on the variety of dianthus you have.
In addition, you may need a particular substrate that can supply the nutrients your dianthus plants require. A good rule of thumb is to look for bark mulch or natural clay in your soil. An improved quality medium should have the added benefits of perlite and peat.
What is the best location for your pots? It’s advantageous to utilize the greenhouse to grow potted dianthus because the framework shields them from harsh weather conditions like wind and rain. However, a sunny location is needed to produce vibrant and aromatic dianthus flowers.
Step #2. Planting and maintenance
The best time to grow dianthus is in the spring or fall, when the threat of frost has gone or has not yet arrived. Check your projected frost dates so you can cover your crops or start them in a greenhouse as soon as possible in order to avoid unnecessary damage. The seeds should be carefully pressed into the pot and kept moist during the germination phase.
Dianthus flowers produce seeds that can be collected from their potted plants in the future. But if the seeds fall into a garden, they’ll grow well enough on their own without any support from you.
Watering and feeding dianthus in pots
It’s advisable to evaluate the watering and fertilizer requirements of each dianthus type first. Dianthus plants, on the other hand, can usually endure a certain amount of dryness. Only watering when the medium is dry is recommended to avoid overwatering, which might cause problems.
Fertilizing during the growing season, on the other hand, can help stimulate growth. Fertilize before they blossom in the spring by doing this once a month. Dianthus plants don’t need a lot of fertilizer, so a little goes a long way.
Cutting dianthus in pots
Your potted dianthus plants need to be pruned of dead blooms, leaves, and stems. Because the wilted portions aren’t competing for nutrients, your plant will be able to produce more flowers. A third of a plant can be trimmed back after the flowering phase to promote better development for the next year.
How to Propagate Vinca Minor Plants
There are many ways to propagate Vinca minor (common periwinkle), including division, stem cuttings, and seed. Plant division is the fastest method of propagation, although taking cuttings or distributing seeds may be more effective if you want many new plants.
Division
Common periwinkle stems are trailing and root easily, which makes them an effective ground cover for partially sun and shaded areas. Because they spread so quickly, periwinkle may become invasive, but this also makes it easy to propagate new plants by division.
Xem thêm : When Do I Remove Seedlings From Hobby Greenhouse? Gardening Tip
It is possible to grow common periwinkles as a ground cover in regions that receive some sunlight but are shady. Periwinkles may become invasive because they spread so quickly, but this also makes it simple to propagate new plants through division.
Dig around the cluster with a sharp shovel and then lift it up. You won’t have to dig very deep because the plants have shallow roots. The division should be planted immediately, at the same height as it was before. The earth should be compacted around the roots, and then watered well.
Cuttings
Periwinkle plants can be propagated through stem cuttings. During the growing season, you can take cuttings from fresh growth at any moment. One hour before taking cuttings, give the periwinkle some water, and then trim off the flowerless tip of a stem with a good pair of scissors or pruning shears. At least three sets of leaves should be included in each cutting. Trim the bottom half of each cutting’s leaves once you’ve taken the cuttings.
Peat moss with sand or perlite make a good rooting mixture in a pot, so fill it to the top. Drainage holes should be present in the pot. Before planting the cuttings, water the mixture and allow it to dry out.
You can use a pencil to make a hole in the seedling’s rooting mixture, then insert your cutting into the hole and secure it with rooting mixture around the stem. As long as the leaves don’t contact, you can insert many cuttings in the same container.
Make sure the plastic bag does not come into contact with the leaves when covering the pot to keep out moisture. Ventilation is best achieved by leaving the bag open to a third of its total length.
The soil should be damp but not soggy when the pot is placed in a warm area with indirect sunlight. Cuttings should be able to root in two to three weeks, so you can remove the bag.
To keep the cuttings moist, spray them with water on a regular basis. After a few months of growth, move each cutting to a larger pot or plant them in the garden if there’s no danger of frost and the weather is not excessively hot or dry.
Seeds
Periwinkle cuttings and divisions are easier than starting seeds if you need extra plants. Periwinkle seed can be saved to experiment with different flower colors and plant forms, as well as to start a large number of plants at the same time, if you have patent-protected hybrids. Because patents only prohibit asexual propagation, you can grow hybrid plants from seed.
Plants from hybrid seeds will not appear exactly like their parents, therefore a wide range of flower colors and plant shapes can be expected from the seedlings. Consider this an experiment because the seeds may be infertile.
As the periwinkle blooms fade and the seed pods form, keep a watchful eye on them. Snip the seed heads off the plant one at a time as they begin to turn brown.
Allow the seed heads to dry for one to four weeks in shallow cardboard boxes. When the pods are totally dry, remove the seeds and place them in a labeled paper envelope. While waiting to plant, keep the seeds cool and dry.
Before the last frost date in April, begin planting seeds 10 to 12 weeks earlier than usual. Fill a shallow container with drainage holes with damp seed-starting mix, and then place the seeds 1/4 inch deep to restrict light. Spray the medium with water to help the seeds germinate.
When seeds begin to germinate, keep the tray in a dimly lit area with temperatures around 77 degrees Fahrenheit for the next one to two weeks so the soil is kept moist.
Maintain a temperature of at least 70 degrees Fahrenheit after the seeds have sprouted. When the seed mixture begins to dry out, re-water. Immediately after the last traces of frost have departed, transplant the seedlings to individual pots and then plant them in the garden.
How to Care for Dianthus
Xem thêm : How To Grow Geum? Complete Guide for Beginners
The instructions for caring for dianthus are simple and easy to understand. Apply fertilizer every six to eight weeks and water the plants when they’re dry. At planting, you can also incorporate a slow-release fertilizer into the soil, removing the need for you to feed the plants thereafter.
Deadheading dianthus is essential in order to limit the number of volunteer plants and to encourage more blooms.
Division, tip cuttings, or even layering can all be used to propagate perennial types. In addition to being readily accessible at garden centers, dianthus seed can also be sown indoors six to eight weeks before the risk of frost has passed..
Dianthus Flower Varieties
Most gardens will have an appropriate dianthus plant. Dianthus chinensis, called Chinese pinks, is the most common annual dianthus. Cheddar (D. gratianopolitanus), Cottage (D. plumarius) and Grass pinks (D. gracilis) are among the perennial types (D. armeria).
All of these plants have blue-gray foliage that is speckled with a variety of hues. Sweet William (D. barbatus) is a biennial and the most common variety. The cultivar reseeds itself with both double and single flowers. At least eight weeks of flowering are possible with the long-lasting Allwood Pinks (D. x allwoodii).
In terms of height, they range from 3 to 6 inches (8-15 centimeters) to 10 to 18 inches (25-46 centimeters).
Common Problems In Growing Dianthus
No matter where you plant your dianthus, you should be aware of the most typical issues that may arise. This is a wonderful thing for novice gardeners, as these plants have no significant diseases that can set them back. Sanitation, correct watering, and maintaining optimal conditions are all examples of basic management techniques that can aid in the prevention of fungal illnesses and other issues.
Dianthus plants can be pesty if not properly cared for. Dianthus gardeners are probably all familiar with the annoyance that is the greenfly. You can also use organic insecticides, which should be just as effective as chemical pesticides.
Propagating Dianthus
Dianthus can be started in the greenhouse to ensure growth. Cuttings or division can be used to propagate your variety. Regardless of which strategy you choose, you’ll be able to cultivate a flowering plant in the same way.
Gather dianthus cuttings with at least three leaf nodes and root them in late summer or autumn for eight weeks of development. Division, on the other hand, is a great option if you observe that an adult plant is showing signs of decline. The plant should be divided into sections prior to new budding so that each area has buds.
Conclusion
Not having a lot of room doesn’t have to mean you can’t have beautiful pink plants. Dianthus in pots may be grown in just two simple steps, which may come as a surprise to you. The medium and position of the pots should be chosen based on the type of dianthus you’ve chosen.
After that, you may begin the seed-starting process by pressing the seeds firmly into the ground and moistening the soil around them. In order to keep potted geraniums healthy, only water them when the soil is completely dry, and feed them once a month from now until the first blooms appear in the spring. Dead leaves, stalks, and blossoms can also be pruned to improve the appearance of the plant.
Finally, dianthus plants are free from pests and illnesses. As long as you keep a close eye on their health, they aren’t at risk of serious illness. Organic pesticides are available on the market if you see their most prevalent pest, greenflies.
Choose a pot at the very least, the mix and water thoroughly, and you’ll be on your way to growing dianthus.
Nguồn: http://iatsabbioneta.org
Danh mục: Garden


