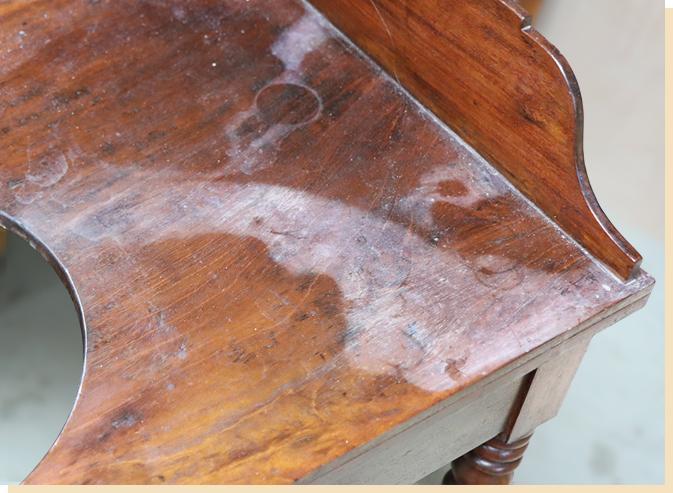
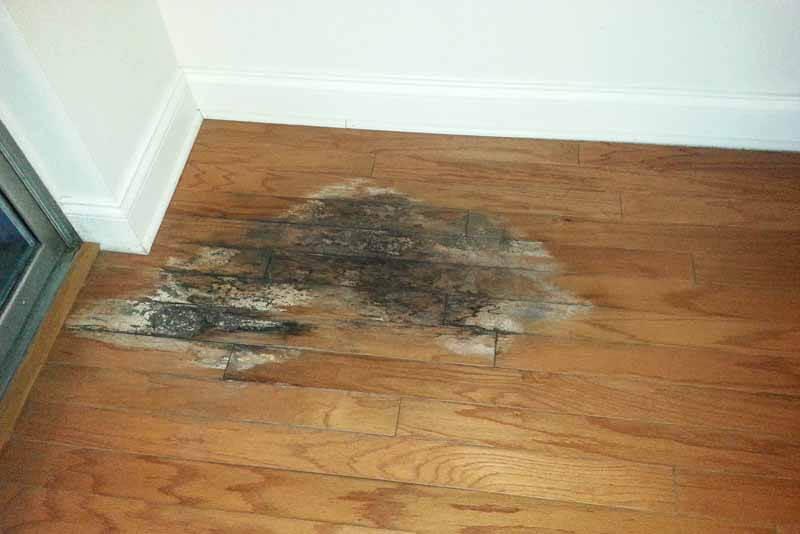
Water damage to your kitchen cabinets is a common result of a flood or leak. Cabinets made of particle board are particularly vulnerable to water damage. All it takes is a drop of water for them to swell, split, or even crumble. Water is destructive to both MDF and solid wood cabinets. Water damage to cabinets can be repaired if the water is extracted and the area is dried as soon as possible. Our manual covers the steps necessary to fix kitchen cabinet water damage.
Our water damage team has the tools necessary to dry out damp storage units promptly. Just just 1-888-609-1520 to get a free, no-obligation quote.
Bạn đang xem: How To Fix Water Damaged Cabinet Bottom? Step by Step Instructions
How to Repair Water Damaged Kitchen Cabinets
If your kitchen’s particle board cabinets have been wet, you may dry them out and fix them by following these procedures.
1. Empty Out Your Cabinets
The first step is to clear up all of your storage areas. Containers made of glass or plastic are safe for storing food, whereas cardboard or plastic bags should be discarded. Toss out paper products and wash towels and other materials.
2. Remove the Water
The next step is to get rid of as much water as you can. There will be more damage to your cabinets if the water is allowed to sit there. Use heavy blankets or towels to soak up the moisture. Then use rags or towels to dry the kitchen cupboards. You can now check to see if your cabinetry is dry to the touch.
3. Remove Cabinet Doors
Take the doors off as well. This will not only help things dry up faster, but it may also help mitigate any harm. It’s possible that the doors’ combined weight will be too much for the particle board and it may sag or crumble. To dry the doors, you can either leave them in a different room or use powerful fans. For best results, lay them flat to prevent warping.
4. Dry Wet Cabinets
Now that the doors can be opened without obstruction, you may begin drying wet kitchen cabinets. However, fans in the home should be avoided. The particle board will warp if they try to dry it out. Your cupboards are more prone to disintegrate before they are dry.
Instead, you should hire a company to supply you with high-velocity fans and structural drying dehumidifiers. Two or three fans and a dehumidifier will dry the cabinets in a standard kitchen in a day.
Reposition the fans in the cabinets every four hours and check on their status. It’s important to remember to dry the areas behind and under the kitchen cupboards as well.
5. Repair Water Damaged Kitchen Cabinets
Kitchen cabinets may be salvageable, depending on the level of water damage. Apply carpenter’s glue and clamps to the areas where the cabinet was delaminated by water. The cabinets can be reassembled with the help of some carpenter’s glue and clamps.
The use of 24 boards as bracing can assist restore the original shape of severely bowed or bloated cabinetry. When repairing a door, it’s best to screw into the rear so that the screw heads are out of sight. After the doors and cabinets have dried, the bracing can be taken off.
6. Replace Damaged Cabinets
Cabinets that have been damaged by water are not always salvageable. Particle board cabinets are more prone to breaking than solid wood ones due to the fact that water degrades the glue. When they begin to fall apart, no amount of glue will save them.
Only by tearing down the old cabinets and installing the new ones can you hope to fix this problem. If you can’t find cabinets that are an exact match, you may want to consider staining the wood or using a veneer.
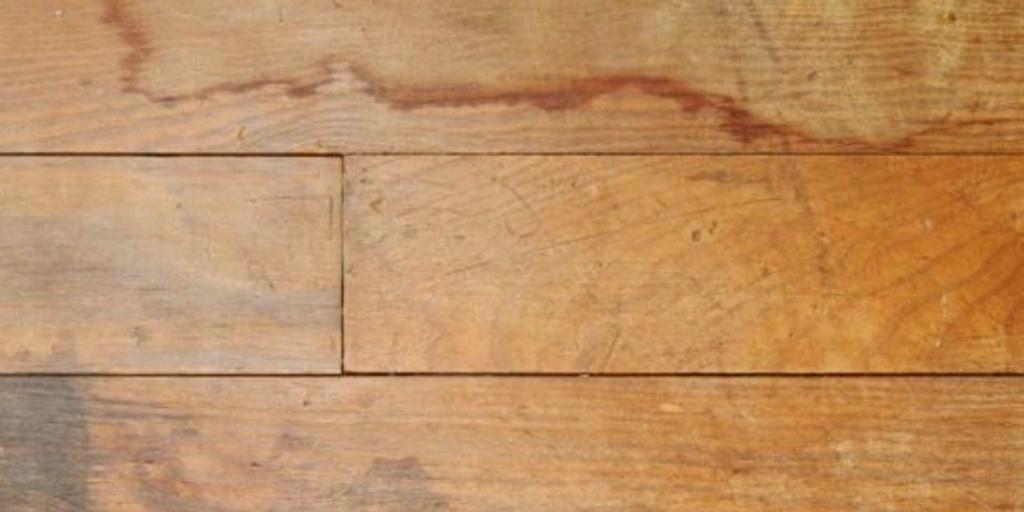
7. Clean Water Stains
Your water-damaged cabinets, even if salvaged, will probably still be stained. Water stains on wood are easiest to remove with oxalic acid. You’ll have to sand off the finish first, but we’re sorry about that.
For best results, oxalic acid is best when diluted with water, so be sure to read the label carefully. Then, brush on the solution and let it dry as you replace the cabinet doors. Minor stains may only require one coat of paint, but most will require two.
When you’ve finished removing the discoloration, neutralize the acid. In order to clean the cabinets, combine half a cup of baking soda with a gallon of water. The next step is to thoroughly wash the cupboards with clean water and then dry them out.
8. Disinfect and Deodorize
Despite your best efforts, mold and unpleasant odors can grow inside your dry cabinets. Wipe your cabinets down with a solution of one cup of bleach per gallon of water. This will kill mold and bacteria as well as remove smells.
9. Refinish Your Cabinets
It’s possible for mold and unpleasant odors to grow within your cabinets even if they are airtight. Use a solution of one cup of bleach to one gallon of water to wipe down your cabinets. As a bonus, this method is effective against mildew and bacteria.
Apply a sealer to the wood to preserve it and create a base for the stain, and then stain the wood evenly. Lastly, apply a protective finish coat or top coat to the wood. If you want the best results, do exactly what it says on the label.
Why Does Water Damage Kitchen Cabinets?
Xem thêm : How To Fix Water Damaged Wood? A Few Tips to Remember
Water is a wonderful solvent that can damage or destroy very nearly anything, yet its potency is often overlooked. However, the most significant cause of water damage to kitchen cabinets is the cabinets themselves and the way they are constructed.
Particle board is used for the vast majority of kitchen cabinetry. An extensive variety of manufactured wood goods are made by combining wood scraps with glue. Particle board can be made to look more like real wood by applying a veneer on its outside surface.
Cabinets made of particle board have two problems when they become wet. Once wet, wood expands as it takes in more water. Second, the glue holding the cabinet together begins to breakdown as a result of the water. The rate of the cabinet’s disintegration will increase as the wood absorbs more water.
This is why you need to get the water out of your cabinets and start drying them right away. Call a restoration service if you don’t want to mess around with it or don’t have the resources to do it yourself.
Have Water Damaged Kitchen Cabinets Dried and Repaired
If you are unable to dry and repair your water damaged kitchen cabinets on your own, we can help. Restoration Local provides prompt and dependable services for drying out flooded areas. Call 1-888-609-1520 to speak with a local restoration expert who can provide a free quote for cleanup and repairs right away.
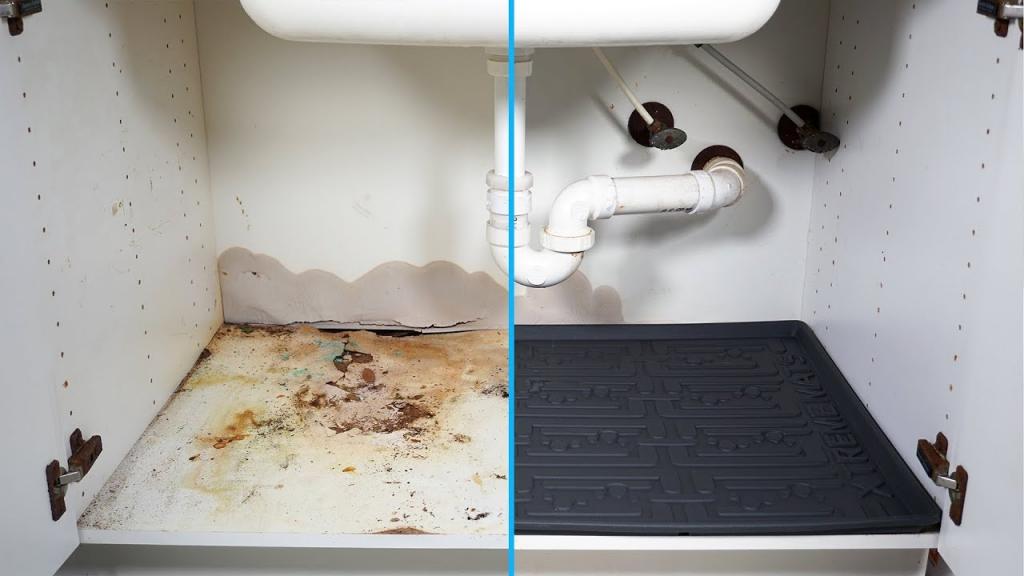
Replacing A Water Damaged Cabinet Bottom
Women have no more limitations than men.
Understand that your cabinets’ primary support comes from the sides rather than the bottom. As a result, the sink’s support system won’t be compromised if the bottom cabinet is repaired after a flood. There are two primary ways to handle the problem, and both depend on the level of damage.
- The whole base is taken off.
- After the old one is carefully removed, a new one is custom-made to cover it.
That’s a lot of time to invest on this. Do not feel rushed. You will be ripping out the old wood, applying mildew remover, installing new supports, and anchoring in the new bottom of the cabinets. It may not seem like much, but you should take your time so that the end result is satisfactory.
- Sharp as a Saber
- Hammer
- Power Drill
- Putty Knife
- Formica
- Plywood
- Staples, Nails, and/or Screws
- Sawing with a Table Saw or a Skil Saw
Keep in mind that you’ll have to work around the pipes already in the ground if you want to do any serious plumbing work. The amount of piece work that may be necessary is also related to the sort of cabinet you have.
What do I mean when using the term “piece work?”
There have been numerous times when I’ve had to use anywhere from two to three individual pieces of plywood to create the new bottom. This typically occurs when there are numerous plumbing fixtures that must be avoided. Once they were firmly attached, I laminated Formica over them.
To replace a European style cabinet, you should be able to simply slip in a new one without having to make any modifications. In order to insert the new board into a face frame-constructed box, you may need to remove the central stile. Careful inspection of the site will reveal any and all necessary cuts in the surrounding structure or the replacement component.
Replacing the bottom of a water-damaged cabinet with a new piece of wood. My advice is to not simply lay a new plank on top of the old one. Drill few holes in the bottom of the shoe, as high as you can, to let air in and dry out the inside.
To eliminate any remaining mold inside the cabinets, simply drill some small holes in the back and spray the mold killer inside. Put a fan at the right spot, and air will be blown through the holes for days. Shim material must be placed between the new and old cabinetry section in order to compensate for any warps or dips.
In order to get around the plumbing, you might have to install two different parts if you’re working with a face frame design. Caulk should be used to fill in the gap between the seam and the wall or floor, as well as any other gaps along the borders. Fill the gap and paint the edge after installing the new cabinet bottom, or laminate a veneer or plastic laminate (“Formica”) strip over the joint.
When I ran into plumbing issues that necessitated using two pieces of wood for the bottom, I simply laminated a third piece of 1/8″ Masonite or mica over the two. Because of their thinness and flexibility, both of these materials can be useful for detours around the pipes.
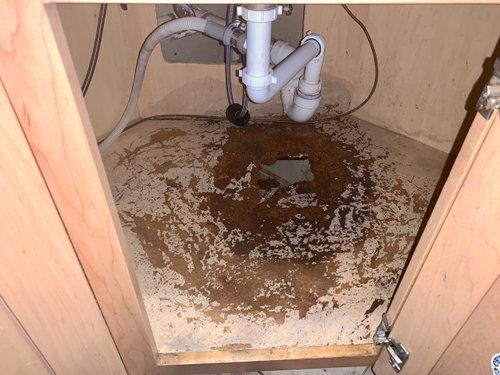
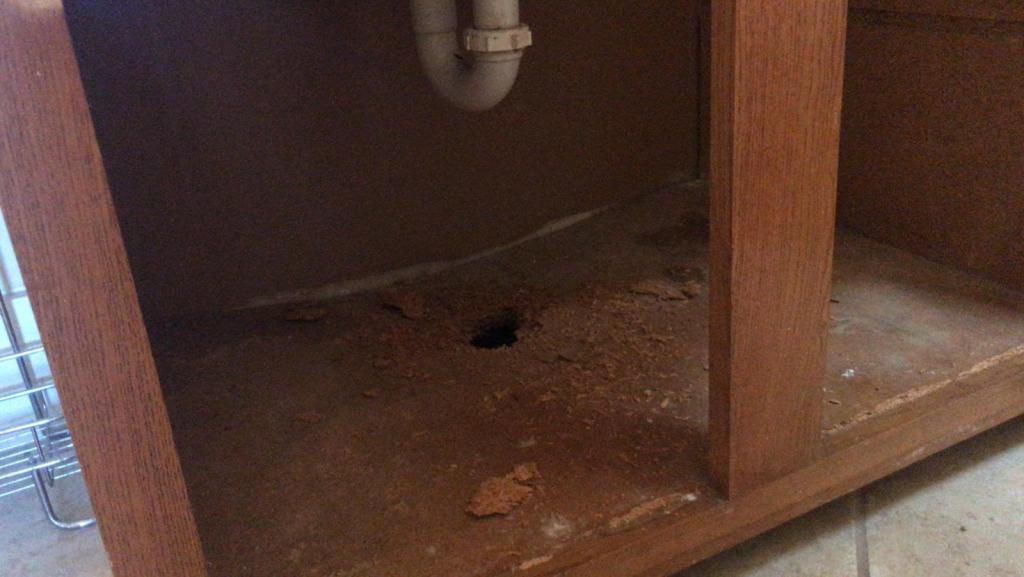
To repair a sink cabinet bottom that has been damaged by water, one option is to rip it out completely. Obviously, the old one needs to be taken down and mold killer sprayed below. A saber saw and a hammer are the typical tools of choice for this task.
Remove the corroded fasteners with a pair of diagonal cutters or needle nose pliers.
Pull out the staples by grasping them and wiggling them side to side. To get the right height, you’ll also need to lay down some 2x4s or other boards underneath. Liquid nails can be used to attach the support boards to the floor and the cabinet bottom to the supports. If the gap between the toe base and the new board is too great, cabinet shims can be used to fill it.
Cabinet L-brackets, if you don’t mind having them on display, can be beneficial at this point as well. As long as they are placed tastefully, they can be integrated into the design of the cabinet without drawing too much attention to themselves.
In case your sink cabinet has been ruined by water, those are the fundamentals of fixing it. Cabinetry repair after flood damage requires careful preparation and a lot of patience. Working out the details of a project like this usually happens as you get started.
There are two main ways in which replacing the bottom of a sink cabinet might help you save money. Otherwise, you’d have to pay for a plumber’s services in addition to the cost of a new sink cabinet if you wanted to replace the whole thing. When in doubt, get an expert cabinet installer.
Xem thêm : How To Clean Water Damaged Carpet?
You should not attempt this unless you have solid finish carpentry skills.
Steps In Fixing A Water Damaged Cabinet Bottom
If you wish to repair the base of your water-damaged cabinet, you will need to remove the damaged section, as mentioned above.
Method #1. Particle board cabinets
Thanks to their attractive qualities, particle boards are frequently utilized in furniture construction. Water damage, however, causes them to swell and become deformed. Fixing a particle board cabinet floor can be done in the following ways.
Step #1. Dry it out
The first step in restoring water damage is always drying up the affected area. Some people, especially those residing in more humid climates, may find this process to be quite lengthy. However, you should do this because it’s necessary, so leave your cupboard doors open and let the air circulate.
Step #2. Even out the raised area
Particle boards with a raised area can be sanded down to a more uniform thickness. Buffing (polishing) your particleboard too often can reveal the dry and damaged areas. The following stage can be accomplished with some sanding and buffing.
Step #3. Remove damaged areas
The damaged sections of your particleboard can be thrown away after they have been sanded down and dried. If the damage is substantial, you can either replace the damaged section of the floor or the entire base of the cabinet. Alternately, you can cut away damaged sections and fill them with wood filler if the damage is minimal.
Step #4. Wood fillers
Fill the holes in your particle board cabinet using wood fillers if you think the damage can be fixed that way. Wood filler can be applied with a knife to the holes in your particle board cabinet.
In case you have to remove a sizable section of your cabinet bottom due to damage, you should construct a basis on which to rest the remaining portion of your cabinet bottom (Step #4.1). Create a base that is the same height as the cabinet floor.
Establish and fasten the floor to the front and rear of your cabinet’s base. Afterwards, install a new particle board floor and fasten it down.
Step #5. Sand the floor again
After patching up the holes or replacing a sizable chunk of your particle wood bottom, sand the floor of your cabinet. Doing so will guarantee a flawless and uncluttered surface for your board. After the board has been filed and the dust has been removed, a waterproof seal can be applied to assist prevent further damage from moisture.
Method #2. MDF cabinets
The MDF material reacts much like particleboard. When exposed to water, it expands and warps. The bulge can be smoothed out with sandpaper if the material hasn’t separated.
The first step in repairing water damage to furniture is always drying it thoroughly. Following that, proceed as follows:
Step #1. Sand using 80-grit sandpaper
Sand the spot down by attaching sandpaper to a hand block. Assuming the extent of the damage, sand it down till the paint comes off.
However, if the damaged area is minimal, you can simply sand it down. If the high spots can’t be evened out, try a different grit of sandpaper.
Step #2. Fill in damaged areas
Fill the gaps in the MDF cabinet with a mixture of powdered resin glue and water after sanding the affected areas. It’s best to let the mixture hang out overnight to dry before moving on.
After the resin glue has dried, you may need to fill in any gaps that have appeared. This time, a wood filler may be used.
Then, using 100-grit sandpaper, smooth it all over again. Sandpaper can be used to mimic the cabinet’s molding details.
Step #3. Coat
Last but not least, use a sealer and a brush to apply a coat to the areas you just sanded. Then you should apply two coats of water-resistant paint to the cabinet bottom to protect it and make it look like the original color.
Is water damage included in a cabinet’s insurance coverage?
Water damage is not covered by the warranties for Glenwood Kitchen or Laurysen Kitchen cabinets. However, this is not limited to only those brands. Most manufacturers of furniture made from natural wood do not include water damage in their standard guarantee.
If you feel you need water damage insurance, your attorney might suggest businesses that may provide such coverage.
Conclusion
This article will show you how to replace the bottom of a cabinet that has been damaged by water by using a variety of materials. The information provided above should help address some of your concerns regarding the setting of water-damaged cabinet bottoms and insurance.
Nguồn: https://iatsabbioneta.org
Danh mục: Damaged