Do you have a pressing need to learn how to repair root rot in hydroponics?
There are a few things to keep in mind, the first of which is manually cleaning the roots.
Bạn đang xem: How To Fix Root Rot Hydroponics? Everything You Need To Know
If you removed everything that was lifeless or slimy in texture, you’d be better off. The root rot will be saved and your plant will flourish if you take this step.
In order to avoid more serious problems in the future, we’ll talk about how to repair hydroponic root rot in this post.
Before you know it, we’ll be on our way.
What Is A Root Rot?
Root rot is a disease that affects plants whose roots are growing in moist soil, according to the dictionary definition.
There is only one way to get rid of this sickness, and that is to destroy the plant itself.
If you don’t want to kill your plants, you can also take corrective steps.
The leading cause for root rot is a fungus, and several kinds are known as the culprits.
The leading cause for root rot is a fungus, and several kinds are known as the culprits.
A fungus is the most common cause of root rot, and several different strains have been identified.
Plants in a root rot stage are unable to receive the necessary nutrients for growth.
It’s possible that the plants’ appearance suggests that they’ve been suffering from dryness and stress.
Steps In Fixing Root Rot Hydroponics
Root rot is a likely death for your plants, and it will quickly spread to other healthy plants.
It’s important to know how to treat root rot hydroponics in order to rescue your crops from extinction.
The following are the steps:
Step #1. Shutting off the hydroponic system
Your hydroponic system in your garden or farm needs to be turned off first.
You should get rid of or remove any plants that have been damaged on the course.
Step #2. Washing and detaching the roots
Detach dead roots and other debris from the roots by soaking them in flowing water.
Step #3. Removing the unhealthy parts
Remove the unhealthy portions of the root with a pair of scissors.
Don’t forget to get rid of any infected cells you find.
Step #4. Draining the solution
The nutritional solution in your system must then be drained.
Clean all contaminated portions of your multi-plant system, but don’t harm the rest of your plants.
Step #5. Rerunning your hydroponic system
Add more nutrient solution to your hydroponic system and run it again.
To be certain of the solution’s sound effects on plants, beneficial microbes might be added.
Step #6. Ensuring the nutrient solution
In order to keep your plants healthy, you should keep the fertilizer solution at roughly 70 degrees Fahrenheit.
Ways To Prevent Root Rot
This section of the article will assist you if your goal is to avoid rather than remedy.
To ensure a successful prevention, please take the time to go over the following guidelines attentively and retain them in your mind.
The following are the details:.
#1. Keeps a sterile environment
Cleaning your tools after each usage is an absolute must. If you disinfect them, you’ll get better outcomes.
Pathogens won’t have a chance to spread and harm your garden plants if you do this consistently.
#2. Add some beneficial bacteria to the nutrient solution
Adding helpful bacteria is a smart decision if you’re looking to grow a healthier crop.
Your plants’ roots will be able to take in more oxygen and produce a fuller one as a result of this.
Furthermore, plants with strong roots are less vulnerable to root rot.
#3. Make your garden tidy
To prevent the spread of fungus in your garden, you must eliminate dead plants and waste.
Make sure there are no extraneous things in your nutrient solution as well.
#4. Keep roots in a dark area
In areas with a lot of light, bacteria and algae thrive.
It is possible to limit the risk of root rot by using thick materials and dark colors.
#5. Give adequate aeration levels
Root rot cannot enter your hydroponic system if the nutrient solution has the correct aeration level.
The final product will be improved if air stones are included.
#6. Monitor the presence of pests
Observing pests in your garden is the best way to prevent the spread of disease-carrying fungi.
If you put up traps and vents to keep pests away from your plants, you’ll be doing yourself a favor.
How To Fix Root Rot In Your Hydroponics
Xem thêm : How To Prune Phlox? Comprehensive Guide
Root rot in hydroponics can be remedied by first determining what’s causing it. Now that you’ve located the issue, you’re in a better position to address it. Root rot can be detected in the following methods.
#1 Identifying Root Rot in Your Hydroponics
It’s important to look at signs from their leaves all the way down to their roots. Check for the following symptoms to see if hydroponic root rot is a problem:
- The leaves will begin to turn yellow, wilt, or dry up.
- When your leaves start to wilt, it’s a sign that your roots are weakening. Look at your roots right now. A dark, slimy, and twisted root indicates a sick plant.
- As soon as you remove the tank’s cover to smell the roots, they’ll give off an off-putting aroma.
#2 Fixing Root Rot Hydroponics
In order for your plant to have a chance of surviving, early discovery and prompt action are essential. To rescue your rotting root, follow these simple instructions:
- Your hydroponic system can be shut down now.
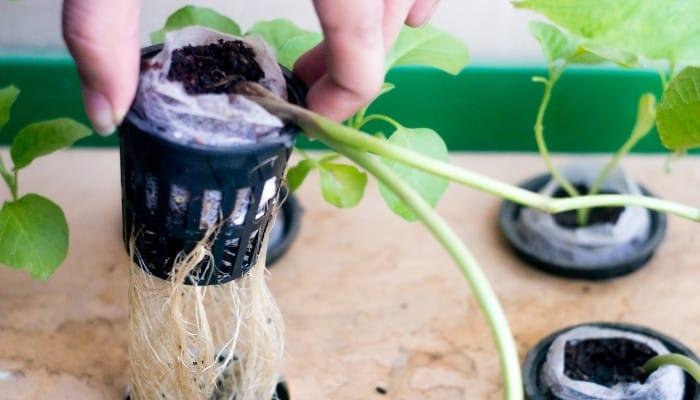
- Removing your net pot plants from your hydroponic system is necessary.
- Run the root under water to get rid of the dead root and any other debris.
- Remove the remaining contaminated root with a pair of clean scissors.
- Drain the solution from the reservoir now if you haven’t already.
- Remove and disinfect your single-plant hydroponic system. Isolate, clean, and sterilize any diseased plants in your hydroponic system. Don’t let the root rot spread to other parts of your yard.
- Now is the time to restart your computer. It’s time to rehydrate the plants.
- Cut or clip the drooping leaves and some of the rooting base from a larger plant. By doing this, you’ll free up the plant’s energy so it can put it into regrowing a strong root system and healthy leaves.
- Maintain a nutritional level of 70 degrees Fahrenheit and enough oxygenation at the conclusion of the day. Additionally, it is important to have the air pump running at all times in order to ensure sufficient air circulation.
Causes Of Brown Roots In Hydroponics
Root rot is caused by a lack of air movement in the water. Indirect air exposure or a combination of the two may also be to blame. When roots are submerged for an extended period of time in a deep water culture system, this is a common occurrence.
Roots can die from oversaturation in hydroponics, despite the fact that water is the primary medium. When pathogenic bacteria, germs, and fungi can get into the root system and feed off of it, this promotes root rot.
If you don’t fix the situation, the illness will spread throughout your garden. As long as you catch these sick plants early enough, your hydroponic garden can be saved.
Prevention Of Root Rot In Hydroponic
Hydroponics root rot can be prevented if you recognize and avoid its sources. Even if you don’t get root rot, knowing how to cure a root rot problem fast in the event that it occurs will be quite beneficial. To fix your decaying root, simply follow the methods listed above.
To prevent root rot, you can take the following steps:
- Make sure your hydroponics system is always spotless and sterile. Decontaminate and sanitize your hydroponic system, if necessary. Make certain that pathogenic microorganisms cannot multiply.
- Invest in a good pump and air stone to ensure that your home is well ventilated.
- The roots of your plants should be regularly trimmed so that oxygen and nutrients can flow freely. Don’t let the roots of your plants grow too big, as this can impede their ability to get the nutrients they require.
What are the Signs and Symptoms of Root Rot?
Root rot affects the plant’s root system, and over time, the plant’s leaves and overall look show signs and symptoms of root rot.
Detecting and monitoring this disease is difficult since the disease’s first symptoms appear in the roots, which are either hidden or subterranean, making it nearly impossible to notice. When symptoms begin to show on the plant’s leaves, root rot is commonly diagnosed.
Root rot has a wide range of symptoms, so it’s crucial to be aware of all of the plant’s signs and symptoms. The plant’s roots, leaves, and general look will all be discussed separately.
Signs and Symptoms of Root Rot in the Plants Roots
Root rot can be detected here for the first time. It’s critical to first understand what healthy roots look like in order to spot those that have root rot.
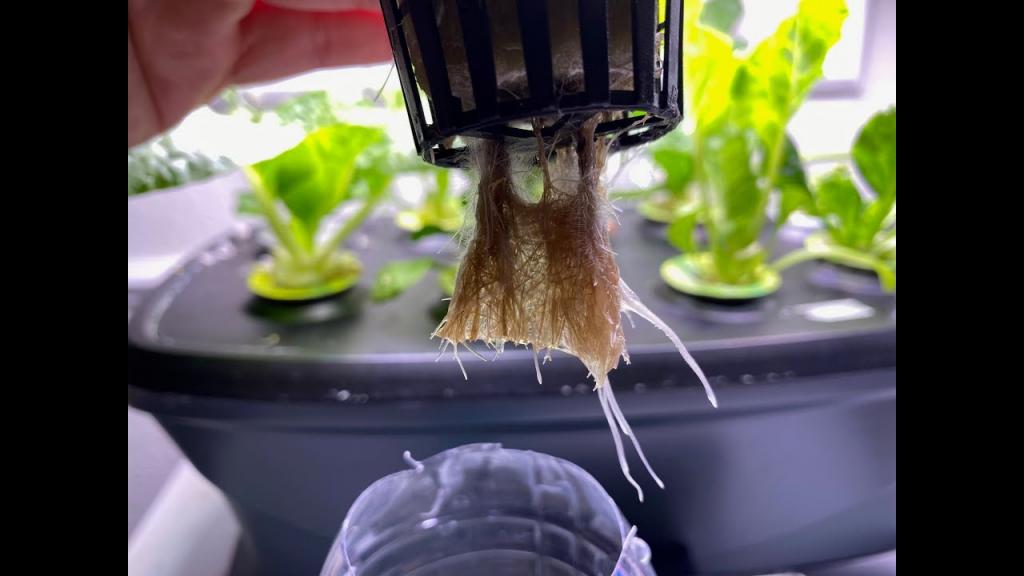
White or tan, firm, and odorless, the roots of a healthy plant look to be in perfect condition. Oxygen, nutrition, and the correct temperature are all necessary for healthy roots.
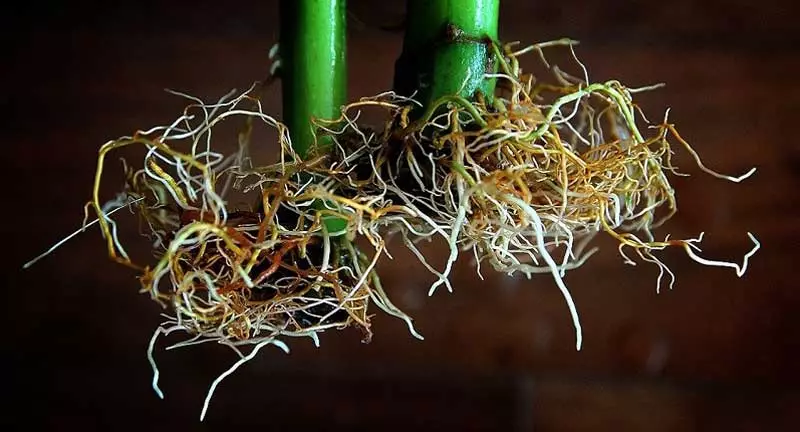
Root rot is a plant disease that causes the roots to turn brown and squishy (mushy). The roots may also smell rotten or swampy. If these roots are touched, they may even fall out because of the sluggish or stunted growth they’ve experienced.
Signs and Symptoms of Root Rot in the Plants Leaves
It’s not uncommon for root rot to spread from the plant’s roots to the plant’s leaves. root decay is frequently seen at this point. Like before, recognizing root rot is made simpler when you’re familiar with the symptoms as well as a healthy plant that doesn’t have root rot.
With the exception of variegated or bi-colored leaves, healthy plants should have leaf tissue that is firm and green, with a uniformly bright hue.
Root rot is clearly visible in the leaves of a diseased plant.
Included in these leaves are:
- Inflamed or charred margins
- Leaves may drop out or grow slowly.
- Growth that isn’t normally occurring
- Curled-up or wilted leaves are a common occurrence.
- New leaves that are developing yellow development or are pale in color
- The lower leaves of mature trees may become yellow.
- On the leaves, a brown or dark marking
The drooping leaves of a plant suffering from root rot can resemble those of a plant that has been submerged. The wilting of the leaves is due to the fact that the roots have been severely injured. If your hydroponic plant appears to be wilting, be sure to inspect the roots. Make sure to inspect the roots if the leaves are withered and the soil is damp.
Signs and Symptoms of Root Rot in the Plants Overall Appearance
The plant’s entire structure will be affected as well as the leaves after root rot has taken over the root system. As part of our investigation, we will also compare the appearance of healthy plants versus those with root rot disease.
The overall appearance of a healthy plant should be lush and bushy.
Root rot, on the other hand, causes weak stems and a drooping or withering plant as depicted above. Root rot reduces a plant’s ability to absorb water, which results in reduced or even stopped growth in affected plants.
What are the Different Causes of Root Rot?
Root rot can be controlled and prevented by addressing the four most common causes. As we’ll see in the following sections, any of these four reasons might have a domino impact on the others. Overwatering, for example, can lead to poor drainage, which can lead to a lack of oxygen for the roots of the plants, which in turn can stimulate the growth of bacteria and fungi, as you will learn.
Overwatering is a common cause of root rot. Overwatering causes root aeration to be disrupted, resulting in low oxygenation and degradation..
Poor drainage is another reason for root rot. Aeration and root degradation can occur as a result of a lack of aeration due to water logging in the growing media, which is very similar to overwatering because there is no place for the excess water to go.
Additionally, lack of oxygen is another cause of root rot. This is the most common cause of root rot in hydroponic systems. There are two ways in which a lack of oxygen may arise. The water can cover all of the macro and micro pore spaces in the growing media and force out all of the oxygen, which is most commonly the case for plants grown in soil. An air stone or air bubbler that supplies oxygen to the water can stop operating or need to be replaced in a hydroponic system, which can result in a lack of oxygen. Oxygen deprivation harms the plant’s ability to absorb nutrients and water, making it less able to thrive. Pathogenic bacteria and fungi can smother the remaining live roots once the root cells die, which is the final cause of root rot.
Additionally, lack of oxygen is another cause of root rot. This is the most common cause of root rot in hydroponic systems. There are two ways in which a lack of oxygen may arise. The water can cover all of the macro and micro pore spaces in the growing media and force out all of the oxygen, which is most commonly the case for plants grown in soil. An air stone or air bubbler that supplies oxygen to the water can stop operating or need to be replaced in a hydroponic system, which can result in a lack of oxygen. Oxygen deprivation harms the plant’s ability to absorb nutrients and water, making it less able to thrive. Pathogenic bacteria and fungi can smother the remaining live roots once the root cells die, which is the final cause of root rot.
How to Solve Root Rot in a Hydroponic Set Up
Root rot can also be caused by an absence of oxygen. If you’re a hydroponic grower, this is the most common cause of root rot. Deficiency of oxygen can arise in two ways. The water can cover all of the macro and micro pore spaces in the growing media and force out all of the oxygen, which is most commonly the case for plants growing in soil. Another way a lack of oxygen might develop in a hydroponic system is if the air stone or air bubbler that distributes oxygen to the water is not working or has to be changed is taken into consideration. In the absence of oxygen, the plant’s nutrition and water uptake systems all suffer. Pathogenic bacteria and fungi can then suffocate the remaining healthy roots, resulting in the final cause of root rot: the death of the root cells.
This is what you should do in the event of root rot.
- In order to remove dead roots and other debris from your plant’s hydroponic system, you should remove it from the system. Removing any mushy roots that are easy to take from the plant is a good idea.
- Sterilized scissors can be used to trim back any infected roots that haven’t been easily removed by root rot (recall these will be brown mushy roots).
- Purge and disinfect your water tank and any tools or equipment that were previously utilized.
- Hydrogen peroxide, sprayed on the roots, aids in killing root rot by reintroducing oxygen to the roots. Hydrogen peroxide can be added to hydroponic systems directly or diluted and added to soil-based systems.
- Restart your hydroponics system.
Plants with enormous leaves may need to be pruned so that they may focus on repairing their root systems rather than supporting so much growth.
Changing the water in the reservoir every two weeks or more regularly is another way to prevent root rot in a hydroponic system. Keeping the water reservoir covered from light and possibly lowering the temperature to make it more difficult for fungi to thrive.
Purple buds can also be achieved by reducing the temperature at which a cannabis plant grows.
Get your hands on one of our newest offerings at our online shop! The aerator. A hydroponic system such as a Grobo can benefit from this product.
How to Prevent Root Rot
For the greatest results, avoid root rot in the first place by following these simple steps!
Oxygen, temperature, water, and nutrients all play a role in keeping roots healthy and preventing root rot.
Oxygen
This may come as a shock to you if you’re a novice gardener or plant enthusiast. Photosynthesis on the leaves of plants removes carbon dioxide from the atmosphere and replaces it with oxygen in the roots through the process of respiration. As a result, oxygen is required for the synthesis of ATP, which aids in the transmission of chemical energy throughout the plant. The plant would be unable to transport energy and would starve to death if this oxygen wasn’t taken up by the roots. Some fungal diseases, such as root rot, can grow in an anaerobic or oxygen-depleted environment like this one.
Adding perlite, vermiculite, or orchid bark to your soil mix will keep it light and fluffy, which can improve airflow around the roots of your plant if you’re growing it in soil.
Using an air stone to regularly aerate the water in a hydroponic system is a good way to ensure that the water is oxygen-rich.
Temperature
Your plant’s general health and the development of a healthy root system depend on knowing the temperature at which it flourishes. 75°F (24°C) is the ideal temperature for producing marijuana.
As temperatures drop, more oxygen is able to be stored in the water. Root rot is considerably reduced if the temperature is kept at or below 72°F (22°C).
Temperature control can be accomplished in a number of ways when growing in soil. Place a fan under your plant’s canopy and an exhaust above it to keep the air moving around it healthy. When there isn’t enough air moving through your plant, hotspots form and the temperature rises dramatically. Using a thermometer or adding mulch and hay to the topsoil to help insulate the roots are two other options.
The water temperature in a hydroponic system should be between 66°F and 77°F (19°C and 25°C) in order to prevent root rot. Better absorption of nutrients and faster growth are both correlated with these temperatures. In order to keep your reservoir between these two points, you can do a couple of different things. If you want to keep your reservoir cool, you could paint it white, as white reflects heat and helps maintain it that way. A hydroponic water chiller can also be used to keep the temperature lower in the reservoir.
Water
Xem thêm : How To Grow Wholesale Basil In A Greenhouse? Comprehensive Guide
You should keep an eye on the amount of water your plants receive because their roots constantly seek out water and nutrients. Root rot isn’t caused by how much water you give your plants; it’s caused by how often you water.
Growers who use soil should increase the amount of water they provide their plants as they mature. Soil should be completely saturated, and water should be let to drain via the pot’s drainage holes. This ensures that all of the roots receive adequate water. Prior to re-watering, ensure that the soil has dried out slightly. That harmful fungus won’t have a perfect habitat to thrive in if oxygen can get into its pores.
Change the water reservoir as often as every two weeks or even more frequently in a hydroponic setup. Additionally, the water must be constantly aerated in order to provide the roots with the oxygen they need to grow. When it comes to making sure the roots are getting enough air to breathe and grow properly, an air stone or air bubbler is frequently the best option.
Nutrients
Nutrients aren’t simply vital for vegetative growth and bloom; they also play a role in the development of a strong root system. Root growth and strengthening are dependent on phosphorus and potassium, two essential nutrients. Purchasing fertilizer will allow you to supplement your diet with additional nutrients. Make sure to read the product’s directions before using it, as overdosing can kill the plant.
A Grobo system, on the other hand, ensures that you never have to worry about this aspect of growing.
How to know you’re dealing with root rot in your hydroponic system
Do a thorough inspection of your plants’ leaves and roots on a regular basis.
Hydroponic system root problems can be identified by looking for the following telltale indicators.
- A change in color, a browing or drying of the leaves will be apparent.
- Your plants’ roots may be in peril if you notice that their leaves are looking bad. The roots of unhealthy plants might appear sticky and twisted. A browning of the roots indicates an advanced stage of root rot. It’s imperative that you do it right away.
- A root rot scent will fill the air when you open the tank’s cover, and it’s one that you won’t soon forget.
Fixing root rot in a hydroponic system
If the leaves of your plants exhibit signs of deterioration, the roots must be removed and disposed of.
Carefully clean the root systems of your plants over a sink. Remove all of the sludge and decay from the roots.
After that, the root bed will be sterilized for a maximum of 12 hours by submerging it in chemical solutions.
Physan 20 is a viable alternative in this situation.
This product does not know the difference between hazardous and beneficial microorganisms, and that must be kept in mind.
Adding root boosters now, while your hydroponic system is being cleaned, will strengthen your plants’ roots and improve their overall health.
Helps to increase the aeration of your nutrition solution by containing beneficial microorganisms.
Next, follow these steps (expanded from the brief explanation given earlier) to save your plants from root rot.
- It’s time to perform a system clean. Disconnect your hydroponics system’s electronic components first.
- Remove the plants that are infected with root rot from the soil. Pre-made growth plugs and Rockwool are more difficult to work with than natural materials like peat moss, coconut coir, clay pellets, and so on.
- With a hose, wash the roots. Make sure that the water’s pH is as close to zero as feasible before using it (i.e., at, or nearly 7.0).
- Rinse the roots well to remove any debris or extra water.
- Roots that are yellow/brownish in color and greasy should be cut with an instrument like a scissor or a knife and removed from the plant one by one.
- If possible, use a hydrogen peroxide solution to clean your reservoir; otherwise, use plain water.
- Use a water-based nutrition solution to refill the reservoir. This time, don’t go all the way to the top. Only use enough to keep the roots from floating in the reservoir.
- Initiate the hydroponics process Keep the air pump running all the time and keep the temperature about 70 degrees Fahrenheit.
- Keep an eye on the root development for a few days.
Increasing the feeding solution amount if the root system is healthy (roots should be brittle to the touch and have a pale, white color)
In order to maintain an appropriate oxygen supply, it is also necessary to keep the air pump working.
Hydroguard or hydrogen peroxide may be used if the root system appears to be infested with rot.
How to prevent root rot in your hydroponic system
It is always preferable to avoid a problem in the first place. Root rot can be avoided in hydroponics if you understand the causes and methods of prevention.
Keep the reservoir sterile and properly aerated
Your hydroponic system should be kept in an immaculate and hygienic condition.
Clean all the components of your setup and remove any impurities that may have gotten into the system. Make sure there isn’t a breeding ground for pathogenic germs.
The better the pump and air stone, the better the air flow will be.
In order to prevent root rot from ever threatening the hydroponics system, the nutrient solution must be properly aerated.
In order to get the greatest results, you can use air stones.
Allow oxygen and nutrients to flow freely through your roots by trimming them on a regular basis.
Make sure that your plants’ roots don’t become so large that they impede their ability to absorb the nutrients they need.
Change the water frequently
The water in the reservoir of hydroponic systems must be replaced on a regular basis.
Roots can be affected if you don’t do this.
The roots are particularly sensitive to changes in pH and other nutrients throughout the flowering stage of a plant’s life cycle.
This necessitates weekly to ten-day water changes.
In the early stages of cloning or seedling establishment, it is critical that you do not disturb the plants.
They do not yet develop an efficient bacterial colony or their own biofilm to protect their roots from infections at this stage.
Beware of fungi and other pathogens
Pathogens are spread through pests, thus keeping an eye out for them is a must.
Setting traps and vents may be a good idea if you’re concerned about pests in your garden.
It’s a good idea to introduce beneficial microorganisms while trying to improve a crop.
As a result, more oxygen will be absorbed by the roots, which will lead to improved plant growth.
Plants with healthy roots, on the other hand, are shielded from the hazards of root rot.
The best defense against root rot is a reservoir that is free of debris and well-aerated.
Detecting warning signals and taking action when they appear is also a possibility.
How to Diagnose Root Rot in Hydroponics
A thorough examination of your plants’ leaves and roots is necessary to diagnose root rot in hydroponics. You should be on the lookout for telltale symptoms that your crops are infected with the illness. Root rot treatment takes time, so don’t underestimate its importance. The sooner you recognize this problem, the better off you’ll be.
The first thing to look for is yellowing or drying leaves. In general, diseased leaves are a sign that the roots may be sick as well. Check your roots as soon as you see this. Roots that have been infected with a disease are usually slimy, knotted, and turning a dark brown color.
Root rot can also be detected by sniffing the roots. Your plants may be infected if they emit an off-putting odor and exhibit the other symptoms listed below.
One last thing. Due to the nutrients in the soil, roots may appear somewhat discolored. Thus, concluding that your plants are suffering from root rot because of discoloration alone should not be absolute.
Nguồn: https://iatsabbioneta.org
Danh mục: Garden


