In photography, there are a plethora of lighting options. If you’re a photographer, you’re bound to come across a variety of lighting situations. The shadows cast on your subjects will be less distinct when lit by diffused light rather than by direct or natural light.
- How To Plant Sedum Tiles? Comprehensive Guide
- What Color Light Would Be The Best For Growing Plants In A Greenhouse?
- How To Get Rid Of Liverwort? The Simple Secrets To Success
- When Were Greenhouses Invented? Building a Greenhouse in 10 Easy Steps
- How To Propagate Russian Sage? Complete Guide for Beginners
Photograph by Leeann Marie of ShootDotEdit Wedding Pro.
Bạn đang xem: How To Diffuse Light? Comprehensive Guide
With this light, you can see things that aren’t possible with harsher lighting, creating unique photographs that your clients will like. As if it weren’t easy enough already, learning how to diffuse your lighting can be done in a matter of minutes. We’ve compiled four quick tips to help you work with less-than-ideal lighting conditions and still produce beautiful portraits of your lovebirds.
What Is a Light Diffuser?
A light diffuser is a device that disperses the light that comes out of your lamp. Diffusion of light softens and evens out your lighting effects, giving your subjects a softer glow (similar to that of a lampshade). To diffuse light, film producers typically employ a softbox, although these kinds of accessories may not be cost-effective for many filmmakers.
4 Ways to Make a Light Diffuser on a Budget
To save money, filmmakers can utilize DIY light diffusers instead of expensive studio diffuser panels or polycarbonate flat sheets.
- A frosted shower curtain is recommended. It is possible for amateur filmmakers to save money by employing a shower curtain as a soft light source. It’s as simple as attaching a shower curtain to the C stand (a multi-functional platform that can be used to mount diffusers, lights and even a shotgun microphone), then placing the stand a few feet in front of the light source to achieve an ambient look and feel. It is easier to get a soft light if you are close enough to the subject. To further soften the light on your subject, you can attach a second shower curtain to the C-stand.
- Use a bedsheet as a substitute for a duvet cover. It’s possible to construct a DIY diffuser out of a semi-transparent white sheet. How much light you need to diffuse and how transparent your sheet is dependent on these two factors. The thicker the sheet, the less light diffusion you’ll require. Use a C-stand to place the bedsheet a few feet away from the light source. To avoid a dangerous situation, combine LED illumination, which produces very little heat, with your bedsheets. A safe distance away from the light source and fire safety procedures should be taken while utilizing non-LED lights for filming.
- Use a pillowcase instead of a bag. A white pillowcase can also be used as a light diffraction device.. Thin enough to let some light through, but not so much that it becomes harsh or glaring. Also, a white t-shirt will do the trick (different colors of t-shirts can help adjust the light temperature). Using these materials with non-LED lights is recommended for fire safety reasons, just as you would with bedsheets. Place the pillowcase on a C-stand far enough away from the light source if you have no other choice but to use incandescent lighting.
- You can use parchment paper instead of regular paper. To make your own DIY softbox diffuser, you can use printer paper (or even tissue paper), although parchment paper is preferable because it is heat-resistant and opaque enough. In comparison to other flammable papers, parchment paper can be placed immediately on top of your lights without posing an immediate risk of fire.
UNDERSTAND HOW LIGHT WORKS
Understanding how light works is essential before beginning the process of dispersing it. The size of the light source in relation to your couple has a significant impact on the final results. Sunlight buried behind clouds or reflected off of a massive white reflector are also possibilities for the source of the eerie glow. Because light travels farther away, its size decreases. As a result, you may see that the more unpleasant details appear on your partners’ faces as a result of harsh lighting.=
Flat and even, diffused light can be one of the nicest lighting settings. With diffused light, there is less possibility that your clients’ features will be filled with lines or shadows. Your clients will love the gorgeous photographs you make with soft light.
USE A FABRIC DIFFUSER
If you’re a busy photographer, having equipment that you can rapidly put up to help diffuse light is essential. Pop-up reflectors and fabric diffusers can help you regulate how light falls on your clients. A cloth diffuser is small, lightweight, and can usually fit in a camera bag without taking up much room. You can cover your camera’s on-camera flash with a diffuser to reduce the harshness of the light.
When shooting indoors, a sheer piece of fabric can be used to filter the light and give your photographs a natural window light look. The goal is to make your subjects stand out from the background while avoiding harsh light on their faces. Quick and inexpensive ways to produce diffused light in your photographs are by using a piece of fabric as a diffuser.
UTILIZE TOOLS TO DIFFUSE LIGHT
Xem thêm : How Long Do Bulbs Last Unplanted? Common Question And Answers
Soft lighting can be achieved with a variety of techniques, not just cloth diffusers. Use a soft box, which photographers can modify and take with them wherever they go. The soft box can be placed on top of off-camera flashes or spotlights to generate even and level illumination. Because they don’t produce harsh shadows on your subject, soft boxes make excellent light fillers because they give you more control over the light than an umbrella would. In any lighting condition, soft boxes are a simple and convenient way to get the light you want for your photoshoot.
QUICK TIP
Place your off-camera flash on a light stand behind your pair, and have your second photographer hold the flash with the umbrella in front of them for an outside photoshoot. In addition to creating an even light, this will also give your photograph a dramatic background. It’s easy to employ tools you already have when working with diffused light in this way. These five strategies will help you get the most out of your off-camera flash.
WORK WITH NATURAL DIFFUSERS
There are many natural diffusers that you may utilize in most of your wedding shoots to enhance your off-camera lighting. Off-camera equipment or backlighting techniques aren’t what we’re talking about here; instead, we’re talking about making use of the diffused light that nature provides. Even though it doesn’t always work, this is a quick and easy method to add diffused light photography into your next photo session! When the sky is partly clouded and only a few rays of sunlight can through, we have a wonderful natural diffuser. This style of sky will give you the same amount of light as if you were using a piece of equipment.
If the sun is out, you’ll need all of the advice in this article to get the most out of your photography on the beach. Snow and sunlight both have the potential to be hazardous.
The bride and groom should be moved to a shady location if you’re doing an outdoor shot in direct sunlight. As an example, move your pair to a location with nearby buildings or trees to capture diffused light. Your choice of backdrops can assist you bounce light, ensuring that the bride and groom’s faces are illuminated to perfection.
With the ability to use diffused lighting in every setting, you have the opportunity to create gorgeous photographs, no matter where the shoot takes place. The better your photographs look, the more control you have over the lighting conditions (and the happier your clients will be). Begin practicing with off-camera lighting after sending your photographs to a photography post production firm. This can help you feel more confident in your abilities as a photographer in a variety of settings.
How To Diffuse Light In The Greenhouse
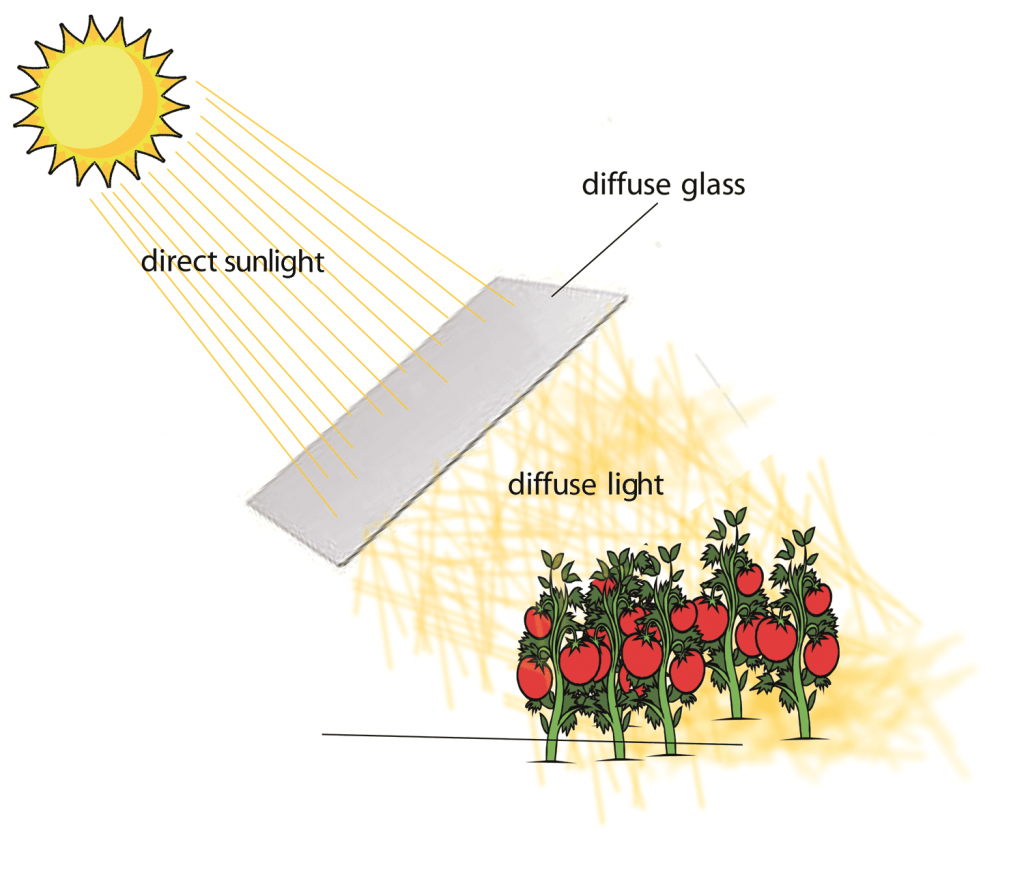
How to diffuse light in the greenhouse is critical, and there are three simple ways to do so. Light diffuses differently indoors than it does outdoors. This is something gardeners often fail to take into consideration. Wasn’t it interesting to learn that plants prefer diffuse light to direct sunlight?
Your crops will profit substantially from well-diffused light, even if you initially believe that light doesn’t require any assistance in dispersing. For example, a study found that plants with a higher rate of photosynthesis grew and yielded more. When there is a lot of irradiation from the outside, the equal distribution of light helps keep the temperature inside stable.
How To Diffuse Light: 3 Best Methods For The Greenhouse
Method #1. Using films
In order to disperse light effectively, the first and most usual approach is to apply films to your greenhouse. A wide variety of white and frosted products are readily available on the market. You can use numerous layers of film if you want something that is more durable and able to withstand changes in the environment.
In order to avoid a common problem with light dispersion in the winter, it is best to use an adjustable film when selecting a diffuser. A plain white film will not work effectively for blocking out direct sunshine, especially in cold weather. To avoid this, use films that will change color as the light changes.
Method #2. Using covers
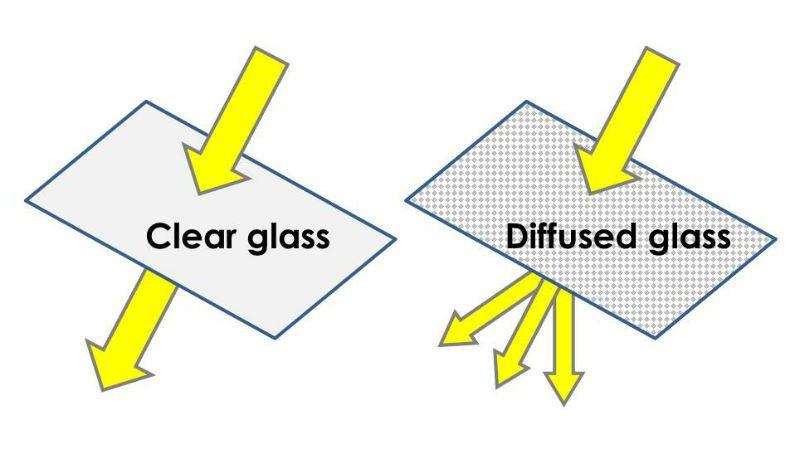
Glass, acrylic, and polycarbonate are just a few of the greenhouse covers you can choose from in addition to films. Achieving high levels of haze and light transmission inside is the key objective. Greenhouse covers come in a variety of materials, so you may be able to select a cover with a range of light-transmission capabilities.
Xem thêm : How To Grow Curcuma Plants? What You Need To Know
Polycarbonate and polyethylene have high haze values, but glass has the maximum light transmission. There are single-layer and inflated and double-wall panels available. You may discover rough, stippled, or coloured surfaces, but the key line is to choose the material that will transfer light well on sunny and overcast days while still providing your crops with the light they need to thrive..
Method #3. Using coatings
You can also use coatings for a semi-permanent solution to light diffusion if you choose. Whitewashing or applying temporary dispersing coatings to the greenhouse during spring is a great illustration of this. Since you can get rid of it in the fall, the only downside here is the added labor cost in return for a more cost-effective lighting solution.
Light diffusion can be improved by applying coatings to an existing cover. Anti-reflective coatings can be found on some glasses, for example, to improve light transmission. Think about it: darkening the greenhouse with coatings is an effective way of distributing light.
Why Is Diffusing Light In The Greenhouse Important?
Better temperature without blocking the lighting needs of plants
Diffuse light in greenhouses has been shown in numerous studies to be beneficial. To begin, the light entering the greenhouse is diffused so that it is less harmful to the plants. The plants will still get enough light to perform photosynthesis even if you don’t shade them, however.
Because there are no regions in the greenhouses where crops appear to be failing, you’ll notice. In order to avoid hot and cold areas, it is important to evenly distribute light throughout the house. As a result, your crops will all be of the same quality because they will not have to contend with fluctuating temperatures.
Increased growth from efficient photosynthesis
Plants with more efficient photosynthesis will grow faster and produce their crops in less time. Even under dense canopies, if the light is well distributed, it will reach all the plants. Due to the increased growth rate, several greenhouse farmers have noticed a reduction in the time it takes to complete their production cycles when using light diffusion.
As long as you maintain the limiting parameters under check, the greenhouse’s photosynthetic rate will always be optimal. Light is one of them, but it must also be effectively diffused indoors in order to prevent crop damage. If the photosynthesis of the plants is good, they should grow well and shorten the time it takes to harvest or sell them.
Better adaptability to climate
The most notable benefit of greenhouse farming is that the plants are always in the right habitat, regardless of the weather. Diffusing light has the added benefit of allowing you to adjust to changing environmental conditions. Even in the dead of winter, you don’t have to stop light from getting in.
Some greenhouse films, as previously indicated, are intended to be used permanently and can be adjusted to suit the local climate throughout the year. You don’t have to worry about your plants getting stressed out at certain times of the year, and your production won’t be halted as a result.
Conclusion
The dispersion of light is just as important for greenhouse production as the light itself. Even so, is it simple to master the art of diffusing light? Every one of the three main approaches is straightforward.
To protect your greenhouse, you can use films, covers, or coatings of various kinds. Depending on your environment and the needs of your crops, you may have to choose one over the other. Improve photosynthesis and temperature without cutting down on your plants’ requirements is the current key trend in indoor lighting distribution.
Nguồn: https://iatsabbioneta.org
Danh mục: Garden


