The city of Sandy, Utah, is a must-see in the United States. This metro area, which has a population of over 85,000, is ideal for gardeners and greenhouse owners.
The Loveland Living Planet Aquarium, the Bell Canyon Trail, the Jordan River Parkway Trail, Lone Peak, and Mount Olympus are just a few of the must-see attractions in this Salt Lake City hotspot.
Bạn đang xem: When Do You Start Planting Greenhouse Seeds In Sandy, Utah? Garden Guide
In Sandy, Utah, the question of when to plant greenhouse seeds is a fascinating one. Learn about the finest plants to grow in a greenhouse and when to plant seeds in specific seasons by reading this page.
When Should I Plant Seeds In My Greenhouse?
In a greenhouse, farmers can manage the crops’ humidity and temperature, which is essential for seed and seedling propagation. Gardeners can start planting seeds whenever they want thanks to the controlled environment. This is a unique advantage that greenhouses can provide for farmers. If you’re interested in learning more about the specifics, be sure to click on the links provided.
A few weeks before the final projected date of frost, you can start seedlings in the greenhouse if you plan on transplanting your gardens outside in the spring.
They are germinated in the greenhouse in seed trays that are left open to the air. A variety of techniques are employed, such as soaking over night, stratification, scarification, and finally planting in greenhouse trays, depending on the species.
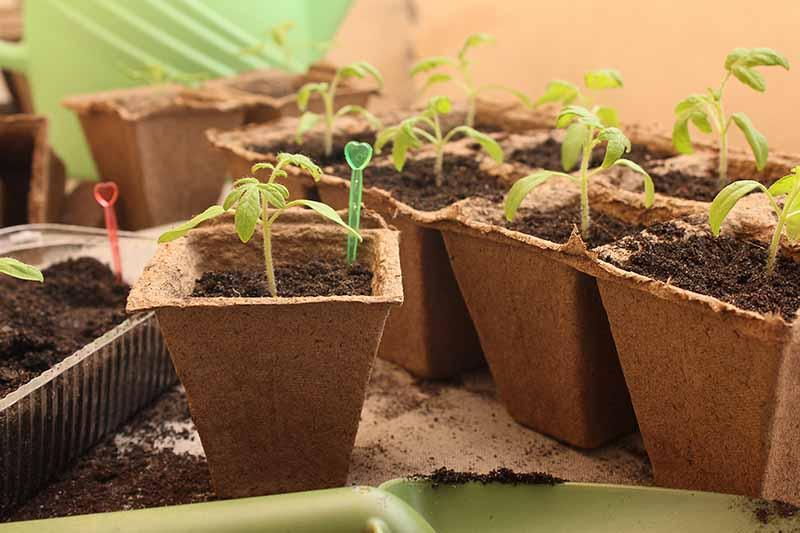
Seedlings may be easily watered, fertilized, and treated for seedling illnesses like damping off with the help of these trays. The seedlings are then implanted into your cells as soon as they produce their first pair of leaves.
What Can I Plant In April In Utah?
When it comes to April, Utah is unlike any other state in the union. The greatest time to visit Lake Powell, Zion, Bryce, Arches, and CanyonLand is during the month of July. When flying into the area, you have the option of booking seven nights in your schedule.
It’s a great time of year to go for a walk in the woods. There are 14 national parks in the state, all of which are stunning, as well as ski resorts where you may test your skiing prowess. These parks are a photographer’s dream and a sight-seeing enthusiast’s dream come true. Temperatures in April range from the upper teens to the upper twenties.
Gardening is a popular pastime in Utah this season. Peas, radishes, and lettuce are the ideal plants to have in the greenhouse this month. Late spring to early summer is a good time to plant pumpkins, tomatoes, watermelons and cantaloupes if you have seeds. During the cooler months, you can also have veggies.
Pea
Grow peas in greenhouses using certain methods. There are two ways to make use of the greenhouse. You can start with a late-winter or early-spring sowing of seeds, such as April, for example. When the danger of frost has passed, you can put them in troughs in the greenhouse and cultivate them there.
Sowing seeds in the fall and winter is possible with some cultivars.
Radish
Various meals can benefit from the radish’s yield, which is a magnificent crop. In addition to providing numerous health benefits, the radish is also an excellent source of vitamin C. These include promoting cardiovascular health, controlling blood pressure, enhancing immunity, reinforcing blood vessels, and being the finest nutritional source for hydration.
Lettuce Seeds
When it comes to making fresh salads, lettuce seeds are your best bet. For home use, half-barrel or tray sowing in the greenhouse is an option. In order to avoid sowing the seeds too thickly, you can next dilute the seeds with smaller amounts of sand. A 12-inch distance between the seedlings may also be optimal for their growth. Your lettuce seeds may take up to 45 days to develop.
What Vegetables Can I Plant Now In Utah?
Summer is in full swing in Utah at the moment. The following are examples of veggies that will thrive in your greenhouse:
- Beans
- Cowpeas
- Corns
- Squashes
- Pumpkins
- Cucumbers
- Watermelon
- Gourds and
- Sunflowers
When Should I Plant My Garden In Utah?
When do you begin planting greenhouse seeds in Sandy, Utah? There are several factors to consider. Temperature is the most important factor, followed by the weather. You may use this guide to figure out which months are optimal for growing certain types of crops.
- Here are the plants to grow from March 5th to May 1st: Artichoke, Kohlrabi, Asparagus, Onion, Rhubarb, Broccoli, Peas, Spinach, Cabbage, Radish, and Turnip are included in this recipe.
- The following crops can be planted from March 30 to May 1: Beet lettuce, potato, carrots parsley salsify cauliflower parsnip swiss chard and endive.
- Plant fragile plants such as celery, spinach, cucumber, summer squash, dry beans, sweet corn, and snap beans between May 5th and June 1st.
- Summer squash, cantaloupe, eggplant, tomato, lima beans and watermelon are all available till June 10th.
The importance of time cannot be overstated when it comes to gardening, be it in the greenhouse or elsewhere. It’s possible to plant seeds that won’t do well if planted in the wrong month since they are out of season. No matter how convenient a greenhouse may be for growing plants at any time, careful consideration of when to plant seeds must still be made.
When Is It Safe To Start Growing Seeds In Greenhouse For Success
Frost dates
Six weeks before the last frost date, it is safe to begin cultivating seeds in the greenhouse. What is the best method for determining when the last frost was? Using the state’s hardiness zone will help determine when to expect the weather to change. Using this information, you may plan your greenhouse’s growing season in a more natural way.
You’re probably trying to figure out why you can’t start your seeds too early. There are many advantages to greenhouse growing over outdoor cultivation because of its ability to control temperature and humidity. If the two elements are correct in terms of their impact on plant growth, recall that it all begins with seeds.
Seeds can be started in the greenhouse at any time, but if you wish to later transplant them, it’s best if you do so six to eight weeks before the last frost day. You should also keep in mind the greenhouse’s light conditions, which have an impact on when you can start growing seeds. If you live in the north of the United States, you’ll have to wait until the middle of February to take advantage of the longer daylight hours.
Temperatures and seasons
You must plant seeds before the final frost date so that the greenhouse temperature is ideal for seed germination. The ideal germination temperature range, according to researchers at the University of New Hampshire, is 65° to 75°F. However, keep in mind that the ideal germination temperature for each plant varies.
When it comes to greenhouses, the season is also critical. Due of its construction, it can get rather cold at night. Using a seedling heat pad will ensure that the soil is continually warmed in this situation. Most gardeners choose to plant in the spring because of the characteristics listed above.
How To Grow Seeds In Greenhouse
Xem thêm : How To Keep Birds Out Of Ferns? A Few Tips to Remember
Check to see whether the seeds have any specific instructions before you begin sowing. Soaking, scarification, or stratification may be required for certain seeds. For example, chia seeds. Open flat trays or individual plug trays can be used in the greenhouse at this point, according on your preference.
Single-cell and open flat trays have different growing processes. It’s important to plan the seed spacing so that you can easily thin the plants later on. Individually pot up the seedlings when they’ve grown their first set of genuine leaves.
One or two seeds per cell can be kept in the tray for a longer period of time. As a result, you don’t have to be concerned about the plants’ roots running out of room. However, if necessary, you can later transplant your seedlings.
Is there a specific greenhouse seed starting mix you’ll need to purchase? The good news is that peat moss, perlite, and compost may be used to make a potting mix. Use a sterilized potting media to avoid the spread of illnesses.
Other Factors To Consider When Growing Seeds In Greenhouse
Temperature, seasons and light are all factors that affect the seed’s growth in a greenhouse, but water and oxygen also play an important role. Water is essential for seed germination, and as the seeds grow, so does their demand for oxygen. You can check that you can meet these needs in the greenhouse.
It’s critical not to over or under provide water. A lack of water can destroy embryos, while an abundance of water can promote rot. Instead, spray the seeds and cover them with peat moss to keep them from drying out, which will help them germinate more quickly.
Germination causes the seeds to increase their respiration rate. It’s critical that the media you’re using drains efficiently in order to keep up with the increased demand for oxygen. There should be no heaviness or wateriness in the mix.
When Should I Plant Seeds In My Greenhouse?
Here, we’re discussing a certain point in time. You must start your seeds in the greenhouse no later than eight weeks before the final day of expected frost in your area if you wish to start planting, which means transferring into gardens outside during the spring season. In order to have the best results, seeds need to be germinated around 27 degrees Celsius.
A maximum nighttime temperature of 55 degrees Fahrenheit is required. In the daytime and when the sun is shining, greenhouse temperatures are usually pleasant, but they can also get colder at night. The use of seedling heat maps might assist you in maintaining a constant soil temperature for your seeds.
Keep an eye out for a greenhouse with fans or opening windows that can help cool down an overheated greenhouse.
When Should I Start Flower Seeds?
For spring planting, you need to know when to start flower seeds in a greenhouse. Seeds must be put directly into the ground in April for cold-season flowers to thrive. They do a good job of retaining the cold and producing blooms in the late stages of spring. Warm-season flowers should also be seeded outside towards the end of April.

How Do You Start Seeds In A Small Greenhouse?
We’ve zoomed in on the mini-greenhouse, a tiny greenhouse where you have complete control over what goes on the table for your family and yourself. Flowers are necessary, and you should give them the attention they deserve because they enhance your life with their aesthetic appeal and enticing aroma.
If you open both ends of the greenhouse, creating a tunnel effect, you’ll get the appropriate amount of draft ventilation for your plants. The following are the steps to follow.
Filling in the greenhouse tray or pots
Consider the greenhouse’s architecture before you begin filling the planting tray. When you fill the water tray with an inch of lukewarm water and set the soil tray or pots therein, it must have the sterile potting mix. While emptying the plate’s water, allow the soil to soak up the moisture for 30 minutes, or until the soil surface is moist.
Sowing the seeds
Sowing the seeds in the soil mixture is the next stage. It has to be twice as deep as the seed itself. Two seeds per pot or cell are ideal. You may also disperse the seeds in rows one inch apart in flats and trays. You can also use a spray bottle to moisten the surface.
Setting the greenhouse
You can put the greenhouse cover on top of the tray if you position it in an area that receives bright, indirect sunshine at a temperature of 75 degrees Fahrenheit or less. Watering is not necessary until after germination because of the cover’s ability to retain moisture in the soil.
After the seeds begin to sprout, leave the greenhouse open to allow condensation to escape. You can hold one end of the cover-up with your pencil or stick.
Watering the seedlings
Seedlings need irrigation as soon as the soil surface begins to dry out. Because the soil absorbs moisture from below, watering the tray does not cause the seedling leaves to become wet. Make sure the seedlings don’t grow tall enough to get their hands on greenhouse plastic before doing so.
What Month Is Best To Plant Flowers?
When it comes to greenhouse gardening, it’s common knowledge that you don’t have to worry about weather conditions since you’re in a controlled environment. Even in the greenhouse, some farmers and gardeners wish to follow the conventional production and harvesting schedule.
Planting flowers, shrubs, and trees in North America’s dormant season is the finest time of year. This includes the months of November and December through early March. You can plant at any time of the year, but you’ll have to put in the time and work to maintain it if you go against our advice.
trees and shrubs thrive in fall because they may expand their root systems during the winter, allowing them to take up more water during the dry months ahead. While many people believe that the spring is the greatest time to plant, the fall is actually a good time to conserve energy and resources.
What Temperature Will Kill Seeds?
Does the temperature damage seeds while starting flower seeds in a greenhouse for spring planting? There is no doubt about that.
Xem thêm : How Much Mycorrhizae To Use? All You Need To Know
Temperatures above 108 degrees Fahrenheit may cause seeds to perish, although they require longer exposure times at lower temperatures. Some species are unaffected by heating treatments if the temperature is less than 140 degrees Fahrenheit.
All About How to Start Vegetable Seeds Inside
Why We Start Seeds Indoors
Sowing seeds inside has numerous advantages, including the following:
- This provides you a head start on the growth season, which can result in a more productive crop.
- Quite a few plants truly require it. It’s best to wait until after the earth has warmed up before planting warm season veggies like tomatoes, peppers, and eggplant. Most of the time, those plants won’t be able to reach harvest if they’re grown outside in various parts of the country. By starting seeds indoors, you may extend your growing season by several weeks, which can make all the difference in the world. It’s possible to cultivate additional crops (especially cool-season ones) by beginning seeds indoors in warmer places.
- If you don’t start seedlings inside, you’ll need to buy “transplants” or “starts” from a garden store or nursery to get your plants started. There are some nursery starting plants that are well-grown, but others that fail to survive when they arrive at their new home. Planting your own seeds gives you a better chance of getting a better start because you can take care of them from the beginning.
- You can get seeds of all kinds of unusual plants that you would never find in a six-pack at your neighborhood garden center.
- You’ll know exactly how they’ve been cared for—organically, rather than in a chemical bath. It is possible to schedule the planting of the plants so that they are ready when you want them.
- Because seeds are cheaper than purchasing plants from the garden store, they are a better option.
A wide range of vegetables can be grown from seed, not simply those that thrive in the spring and summer months. The roots of many vegetables, such as those in the radish and carrot family, resent being disturbed once the plant has begun to grow. The following is a list of seeds that should be started indoors versus outside.
Which Seeds Should You Start Indoors?
You don’t have to start all seedlings indoors. When it comes to most vegetables, starting them in the ground is the best option. In the end, it’s crucial to think about how each sort of vegetable grows as well as where you’re growing it.
See which crops are usually started indoors and which are usually started outdoors in the table below. As a general rule, you can start any type of plant both indoors and outdoors, depending on your personal preference, your location’s weather conditions, and the type of plant. In the majority of cases, we find:
- Broccoli, Brussels sprouts, cabbage, and tomatoes are among the best crops to start inside. This includes vegetables like cauliflower, celery and eggplant that take longer to grow their roots.
- In the spring, it’s better to start tender crops like tomatoes and eggplants inside, where they’ll be protected from the cold and the unpredictable.
- Cucumbers, muskmelon, pumpkins, squash, and watermelon are some of the plants that don’t fare well when transplanted and should be grown outdoors or in pots. All of these, however, are delicate and should not be sown outside while frost is still a possibility.
- Transplanting some plants can be a real challenge. Sowing seeds in the ground rather than transplanting root crops like beets, carrots, and turnips can save you a lot of time and money in the long run. Dill and parsley, for example, have long tap roots and dislike being transplanted.
- Finally, because plants like radishes and peas grow so quickly and can tolerate freezing temperatures, planting them now is the best option.
When to Start Seeds Indoors
The timing of seed germination is critical. We don’t want to put ourselves in a dangerous position! By the time the weather warms up enough to plant them outside, plants that were started too early may have outgrown their pots. Seeds can be started too late, however, and they won’t have time to mature before the season ends. It’s all about striking a balance.
In the Almanac’s Planting Calendar, you’ll find the best times to start your vegetable garden. Your zip code and local frost dates are used to create this personalized tool.
- About six weeks before the final frost in your area, most annual vegetables should be sown in the greenhouse. Check the dates of your local frost.
- You can usually find information on when to start your seeds indoors on the packet. “Start inside 8 weeks prior to the last estimated frost date in your location.”
Also included in our Garden Planner are all the planting dates for the season, which are synchronized with your overall garden plan. Planting dates are calculated by consulting climate data from a nearby weather station and the Garden Planner software. Color-coded dates for indoor and outdoor seeding, as well as growth and harvest, are included.
Equipment Needed for Seed-Starting
Simply a seed-starting mix, some pots, and some light are all you actually need to get started with seedlings.
Seed-starting mix is the first step. Big seeds like beans and squash can be grown in either an all-purpose or multipurpose potting mix. We recommend using a seed-starting mix, though, for more delicate seeds (designed especially for starting seeds). Because the seed itself contains so many nutrients, we prefer the seed-starting mix. Make sure your mix is not made up of peat bogs. (Because peat extraction releases carbon and destroys natural habitat, we choose to utilize a more environmentally friendly substitute like coconut coir.)
This is the proper vessel: Plug trays/module trays or pots/single seed trays can both be used for sowing. Each one has its own benefits:
- Since seedlings take up less room in a pot or tray, this is a more space-efficient method of planting. You can germinate the seeds in a pot and then transfer each seedling into its own pot or plug, making it a more efficient use of seeds. It is also handy for spreading extremely small seeds like basil or easy-to-transplant flower seeds. Multiple seeds can be sown in the same flat container for convenient cool-season crops like onions, celery, and cabbage. After sowing, you can even stack the trays together to save room. After two or three days, begin examining the seeds daily for indications of germination, then transfer them to a greenhouse or cold frame. Alternatively, you can use grow lights to ensure vigorous, even growth of seedlings indoors.
- To put it another way, the plug tray is a container that has distinct compartments for each seed. Seedlings aren’t transferred as frequently, which minimizes root disruption. If the roots fill the plugs before it’s time to plant them out, they may need to be transplanted into larger plugs or pots until they’re ready to be transplanted into their final location. If two or more seeds are planted in each plug, the seedlings are either let to grow together as a cluster or thinned out to leave only the strongest seedling in each one. Small plug trays are ideal for quickly transplanting lettuce, radishes, and other leafy greens (within three or four weeks of sowing). This strategy is especially great for crops like beets or beetroot and salad onions, which are produced in clusters.
Recycled containers
Yogurt and sour cream bowls, for example, are frequently repurposed as seed starting containers. Make a few holes in the bottoms of the containers to allow water to drain. It is possible to keep one or two little seedlings in them for a few weeks. There will come a time when seedlings will require new pots.
To avoid plastic, search for containers and trays composed of biodegradable fibers rather than well-crafted plastic containers and trays.
How to Sow Seeds
Using a pot or plug tray to start seedlings is an easy and convenient method of growing.
- If you’re sowing in a pot, make sure the potting mix is full before tamping it down to a firm level. You can’t over-firm it and seedlings like potting mix to keep them going strong. Use plug trays and fill them to the brim, then tamp them down to settle. Brush the excess off with a scrubbing brush after adding a little more of the mix.
- Plant your seeds in the depressions according to the seed packet’s instructions. Using your fingers or the eraser end of a pencil, gently push the seeds into the mixture. The best likelihood of germination comes from planting the largest, healthiest-looking seeds in the packet. Pinch three to five seeds each plug for planting out as a cluster of seedlings for common vegetables such as salad greens, onions, beets, peas and radishes (to later be thinned out). A dibber (a particular seed-planting tool) is used to plant larger seeds, such as beans, in deeper holes formed with a finger, pencil, or pencil.
- Seeds need to be covered with potting mix once they’ve been sown, so that they’re at the correct depth.
- Your seedlings, especially those of different kinds of the same plant, should be tagged with their respective variety’ names. This matters! When it comes to seedlings with extremely identical leaves, it’s a lot easier to get mixed up than you may imagine. Just type in the date of sowing, as well as the kind of seed you’ve used.
- Use a watering can with a fine sprinkling rose or a clean turkey baster to water the pots or trays. Seeds and immature seedlings may be dislodged by a pitcher’s vigorous release of water. A mist sprayer is mild, but it can take a long time to get the mix fully soaked with the water. Repeat the process when the surface drains completely. Wet the mix thoroughly so that the seeds can be awakened from their slumber! No worries, if you’ve got the right proportions, you’ll be fine; any excess water will simply drain out of the bottom.
Speeding Up Germination
We’re all eager to see the seedlings grow as soon as possible, and we’re all impatient. In most situations, that means bringing these early sowings inside the warmth of your house so they may germinate, which is the greatest way to ensure perfect conditions.
- The recommended temperatures for growing seeds should be specified on the seed packet. The top of a refrigerator or freezer or a warm mantelpiece for warm-season crops like tomatoes, for example, should work just well in most cases because they give off a little warmth.
- A clear cover for the plug tray or pot will keep the potting mix from drying out and keep the conditions pleasant and warm. A propagator cover or a humidity dome specifically designed for this purpose will work well. To prevent mold growth, you can cover the container loosely with plastic and poke a few holes with a toothpick into the plastic.
- When it comes to germination, seed packs usually offer you an estimate of how long it should take, although regular inspections are always better.
- Remove the seedlings from the humidity dome or plastic covering once about half of them have sprouted, and then place them in a location with good, strong light.
Let There Be Light
Putting seedlings on a windowsill, which does not provide the same quality of light as growing them outside, is a typical blunder. To encourage straighter growth, you can try flipping seedlings regularly, although this usually results in leggy seedlings that are difficult to recover from. For cool-season crops, it is more common for low light levels than extreme cold to be the determining factor in crop failure at this time of year. Full-spectrum grow lights may be a good investment for those who lack a greenhouse or cold frame for their plants to thrive in.
- When it comes to grow lights, there is no need to go over the top. You can often find a “full spectrum” LED or fluorescent light fixture for about $40 at your local hardware or department store (i.e., producing light in the entire visible spectrum, like the Sun).
- The lamp unit can be raised or lowered with low-cost grow lights. Ideally, the lights should be between 4 and 6 inches above the seedlings’ canopy. While it’s not directly overhead, it’s distant enough to provide ample illumination without being overly warm. As the plants get bigger and need more room, raise the lamp unit.
- Light exposure of up to 16 hours each day is acceptable. For the most part, leaving them on for a longer period of time encourages seedlings to grow faster, making this a useful strategy for catching up on growth early in the season. (Although plants do require a period of darkness, so don’t leave your lights on all the time!) Many gardeners turn on their lights when they get up in the morning and turn them off when they go to sleep, which means they’re on for around 15 to 16 hours at a stretch. Alternatively, you might set your grow lights to timed mode.
- Growing under grow lights is an option for warm-season crops, but it’s more common for cool-season crops to be moved outside or under cover after the light levels have improved.
How to Transfer Seedlings
If you germinated your seeds in a tray, you’ll need to separate the seedlings and put them in their own pots once they’ve sprouted. After two sets of leaves—typically seedlings and the first set of true or adult ones—the optimal time to accomplish this is when the plants have two sets of leaves. (You can see the video here.) On the other hand, if the seedlings are big enough, you can move them on much earlier—as soon as they’re ready. Don’t put off transferring your seedlings, as overcrowding can lead to leggy seedlings and disease, among other problems. Seedlings are also easy to separate when they’re young.
- Fill new pots with your potting mix before transplanting seedlings. An all-purpose or multipurpose potting mix will do just fine at this point in the growing process. The seedlings must first be carefully removed from their nursery pots after the holes have been dug. Lift out only what you need if you aren’t transferring all of the seeds.
- Transfer the seedlings to their waiting holes after they have been separated. By damaging or crushing their delicate stems, you are effectively ending the seedling’s life.
- Also, take care not to damage the roots. This can be done by bringing along as much of the potting soil as possible. For this reason, it is generally preferable to work with young, little seedlings because their roots are less widespread and grow more quickly than those of more established seedlings.
- In order to provide them more support and bring them back on track, you can plant leggy seedlings deeper in the soil.
- Keep a tight grip on the soil around the seedlings. Once you’re done, use a watering can to gently mist the seedlings. If the seedlings are a little flattened, don’t worry too much about it. They’ll rebound quickly.
- Soil moisture should be checked on a regular basis for seedlings and plants. To find out how heavy the pot is, insert your thumb into the potting mix or simply lift it. After a little more practice, you’ll be able to tell how much water your plants require because of their weight.
Hardening Off Seedlings
“Hardening off” refers to the process of slowly exposing delicate crop seedlings to the outer environment before planting. The sudden change in temperature, light, and wind from a stable environment to one that is far more unstable can significantly harm plants.
Hardening off begins 7 to 10 days before your area’s final frost date. Work backwards from our Planting Calendar, which lists the safest times to plant outside. Reduce the amount of fertilizer you give them and how often you water them.
- Prior to transplanting, let the seedlings outside for a few hours in the dappled sunlight. It’s important to choose a location that is protected from the wind.
- Allowing plants to spend more time in the sun is a great way to help them become accustomed to being outside all day.
- During this time, make sure the soil is always moist. Exhaustion can be sped up by the combination of dry air and spring winds. Transfer plants when the sun isn’t too hot, such as on a cloudy day or early in the morning.
- Hardening off isn’t necessary for crops that grow in the fall and winter. When the soil is no longer cold and damp and has attained a temperature of roughly 50oF (10oC), you can plant lettuce, onions, beets, and peas outside. Tomatoes and peppers, on the other hand, need to be acclimated.
- Run your fingertips lightly over the foliage to help toughen up plants, whether they’re indoors or under cover in a greenhouse or cold frame. Sturdier plants are created by mimicking wind. A fan can be used indoors as well.
- If the weather permits, plant seedlings out as soon as 3 to 4 weeks following the first sowing, if possible. Seedlings that have not yet become root-bound in their pots take longer to establish themselves than older seedlings.
While it isn’t ideal, you may still keep a close eye on your seedlings by placing them in a cold frame and gradually increasing the quantity of airflow by opening vents wider every day. Ensure that they are totally shut off before the sun sets on them. Cold-weather protection can be achieved by building a cold frame (see how here).
Conclusion
Inexperienced gardeners needn’t fear seed-sowing because greenhouses make it easier. To begin seedlings in the greenhouse, you must know when it is safe. Six weeks before the latest frost date is often recommended since seeds are more vulnerable to extreme conditions.
Because of this, it’s important to plan your growing season by checking your state’s growing zone to see when the first frosts are expected. As a greenhouse grower, you have the ability to control the temperature to assure germination. After that, follow the instructions provided by university extension services in order to ensure that your seeds will develop well.
Nguồn: https://iatsabbioneta.org
Danh mục: Garden


