Gardeners love geraniums because of their vibrant colors, which may be used in window boxes, borders, and flowerbeds.
- How To Propagate Snapdragons? Step-by-Step Tutorial
- What Is A Good Size Hobby Greenhouse? Helpful Information!
- How To Purify Air In The Small Greenhouse? Comprehensive Guide
- How To Measure Plant Growth? What Makes Plants Grow?
- How To Tell If A HPS Bulb Is Burnt Out? Signs that the HPS bulbs are damaged or used
For the hardy cranesbill, Pelargonium peltatum (the ivy-hanging variety), and for garden geranium (Pelargoniumx hortorum), there are three varieties.
Bạn đang xem: How To Root Geraniums From Cuttings? A Perfect Guide For You!
How to grow new plants from stem cuttings from existing ones is the focus of this short article.
By establishing connections with suppliers, we make it easier for you to locate the right products. Our links may earn us a profit if you make a purchase through them.
The following is what you can expect:
What You’ll Learn
Learn how simple it is by reading on.
Preparing a Stem Cutting
Any time during the growing season is ideal for taking a cutting while the plant has a flush of new growth and before it develops buds.
Taking cuttings in the fall before the plants fade means you’ll have fresh new plants to set out in the spring if you’re planting garden geraniums as annuals.
What you need to know:
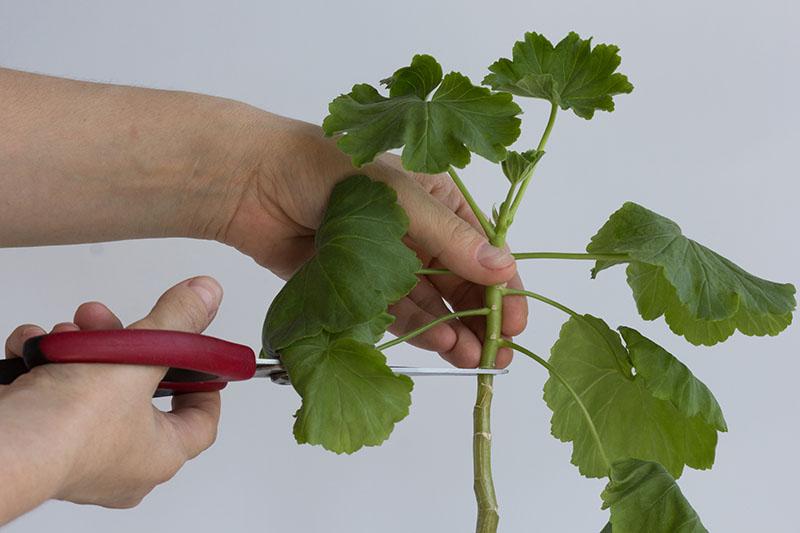
To ensure a strong stem and healthy foliage, shop around. Stay away from the weakest, newest growth, the oldest, most woody stems, and any foliage that is discolored or damaged.
Sharp pruners or a fine blade can be used to cut through a stem cleanly and quickly.
A leaf node and four to six inches down from the stem tip are good places to start.
Trim the lower foliage to three to four inches of bare stem, and only leave two or three leaves at the top. Remove any flower or leaf buds, as they may divert energy away from root growth..
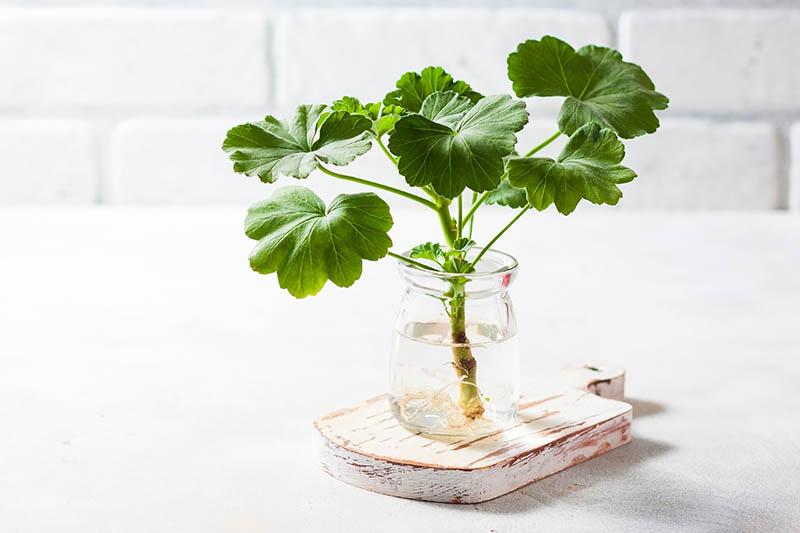
Rooting Stems in Water
Place the stem in a transparent, four- to six-inch-deep glass or jar.
Take care not to overfill the jar so that the leaves are submerged.
Put it on a sunny window sill in a room that’s between 65 and 75 degrees Fahrenheit.
To keep the water fresh, change it every day. Roots should appear at the stem’s base in four weeks or less.
Rooting in Potting Medium
Instead of water, you might use a sterile potting media.
Choose a container that is at least four to six inches deep and that has sufficient drainage holes.
Fill the container to about one-half inch below the rim with potting material. For those who choose, you might also use powdered rooting hormone to coat the cut end of the stem.
In order to ensure that all of the leaf nodes are covered by the potting medium, make a hole in the soil and insert the stem into it.
The stem should be firmly held in place by the potting medium.
Place in an area with an average temperature of 65 to 75 degrees Fahrenheit and bright sunlight. If you choose, you may use a heating pad and a grow lamp.
Avoid over-watering the potting soil, but don’t let it become mushy or entirely dry out.
Xem thêm : How Much Does A Small Family Greenhouse Business Make? Helpful Information For You!
A clear plastic bag can be used to make a tiny greenhouse for a cutting. This is a brilliant approach to ensure that the temperature and humidity levels are maintained at the proper levels.
Avoid sealing the bag or placing the plant in direct sunlight if using this method to prevent overheating.
Transplanting
Cuttings will thrive when you can see roots through the clear container or fresh shoots on stems growing in the potting material.
The process of acclimating your potted cuttings to the outdoors, known as hardening off, can begin when the roots are one or two inches long or fresh foliar growth appears on your cuttings.
If you took cuttings in the fall, wait until the risk of frost has passed before transplanting.
For a week, leave the plants outside for a few hours every day. Place them in a secluded area at first, and then gradually expose them to the outside world. On days when there is a chance of bad weather, don’t go out.
After a week of propagation, it’s time to place your rooted and sprouted cuttings in the garden.
Geraniums Galore
Taking cuttings from plants that we can only grow as an annual here in the Northeast, like this one, is a viable option for those of us who live there.
When the earth outside is frozen solid, it’s great pleasure to have a plant nursery inside.
In the event that you decide to try your hand at geranium replication, be prepared to run out of sunny areas for all of your tiny plant babies!
Geraniums are a great source of cuttings. Please share your thoughts in the space provided.
Plant propagation can be a rewarding hobby for those with a creative streak.
How to Grow Geraniums from Cuttings
Geranium | Genus: Pelargonium
In the Geraniaceae plant family are 430 species of Geranium, 280 species of Pelargonium, as well as the Erodium genus (80 species).
Pelargoniums are also known as zonal, perfumed, ivy-leaved, and Martha Washington geraniums because of their common names.
However, the botanical name of Pelargoniums (Pelargonium x hortorum) is not “geraniums,” which is what we typically refer to them as. Misplaced nickname that will not go away at this point.
Growing Instructions for Pelargoniums (Geraniums)
Flowering annuals that last a long time (tender perennial)
• Hardiness zones range from 10 to 11, depending on location.
• Full exposure to the sun’s rays
Well-draining soil.
Cuttings or divisions are used in the process of propagation.
Overwintering tips for cold climates
Steps For Propagating Cuttings
Plant Patents: Some plants are patented, and asexual reproduction is not authorized without the permission of the patent holder. Plant tags include a list of patents and trademarks.
Geranium cuttings can be propagated in the same way as many other plants.
Xem thêm : How To Pollinate In A Greenhouse? Easy Step-by-step Guide
This procedure is also known as cloning since we are re-creating a plant from a stem cutting, which is essentially a continuation of the original plant’s growth.
Detailed instructions on how to take softwood cuttings can be found in this illustrated guide.
1 Get Your Supplies Ready
- Small pots with drainage holes that are free of dirt and debris.
- Mixture for planting pots
- Drip tray
- A drip tray.
- Several large, clear plastic containers for food.
- Pots of wet container mix should be ready to go on drip trays.
- Clean your scalpel or cutting knife with rubbing alcohol to keep them in top condition.
2 Take Cuttings
- Stems that are between 4 and 6 inches long and have two healthy leaves at the top are ideal.
- Choose a new stem that is green (not old and woody).
- Replace the stem with a fresh one that’s greener in color (not old and woody).
Video Showing Geranium Cutting
These videos demonstrate the process of cutting geraniums.
Each gardener’s methods are slightly different, but you’ll get the gist.
3 Prepare for Planting
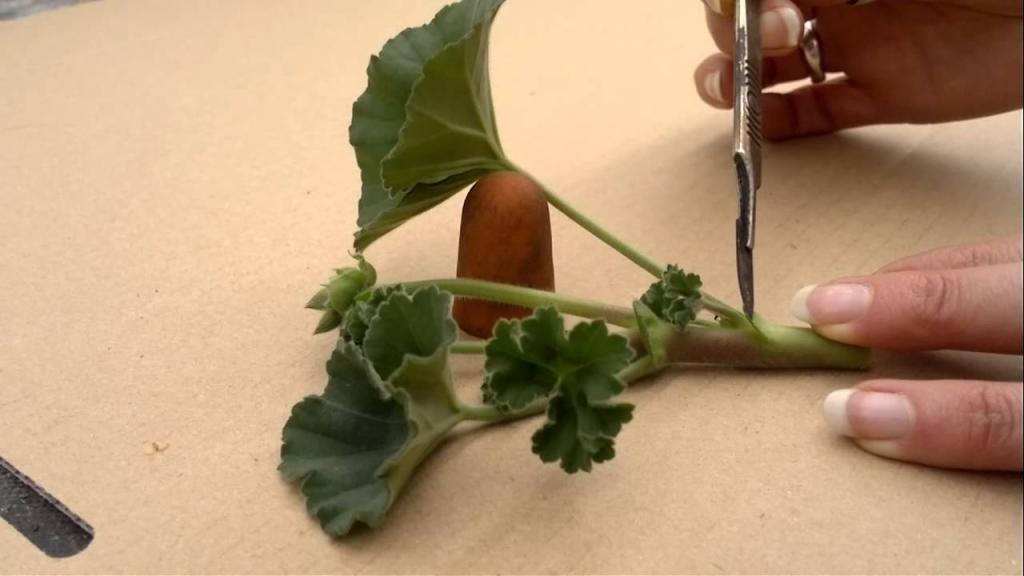
- Remove all stems, blooms, and buds from the plants. For the time being, you don’t want the plant to expend any energy on those items.
- Do not leave more than a 2-inch layer of leaves.
- Keep the rest of the leaves attached.
- Rooting hormone powder should be sprayed on the base (optional- some cuttings will root fine without it)
- Use a sponge to remove any remaining powder.
Is this your first time here?
4 Planting
- Make a hole in the container mix with your finger or a dibber and insert the geranium stem.
- Take care not to squish the powdered rooting hormone.
- Fill the hole surrounding the stem with container mix.
- Keep the stem buried by burying it deep enough to cover any exposed leaf nodes.
A single pot can hold many cuttings. Each side should have one on it.
- The drip tray can be filled and emptied after 30 minutes, or you can water the pots directly.
5 Cover (Optional)
- You shouldn’t need to cover your cuttings if the humidity in your growing area is high enough (at least 50%) and there is no danger of them drying out.
- It’s also an option to place a clear bag or a dome loosely on top if the area is dry enough to allow for airflow.
Keep an eye on the soil underneath to make sure the cover isn’t accumulating too much dampness or fungus.
6 Location
- Keep in a warm spot, such as near a window or in the shade outside (during the summer). As a general rule of thumb, keep your roots out of direct sunlight until they’ve had time (it usually takes a few weeks).
- Ensure that the container mix is well-hydrated but not drenched in water.
7 Growth
- Roots should begin to appear between six to eight weeks. As little as four weeks is possible.
- It’s possible to observe geranium roots protruding from the bottom of the pot.
- You can also feel for roots holding the stem in place by gently pushing on it.
8 Repot
- Each cutting can be repotted now that its roots have developed themselves.
9 Where to Grow
- Geraniums can be grown as houseplants in the winter.
- They can be progressively introduced to the outside world in the spring following the final frost.
This video demonstrates the process of hardening off plants so they can survive in the wild.
Frequently Asked Questions
When should you take geranium cuttings?
You can take cuttings any time the plant is actively growing.
You may want to take them in summer so you can get new plants started in pots outdoors.
You can also take cuttings in fall and grow them indoors during the winter.
Can you root geranium cuttings in water?
Yes, you can. I do, however, find that directly planting the cuttings in moist soil is more successful.
Overall, plants rooted in water can grow bloated, fragile roots that may not transition well to pots. Many people do root them in water but for the long game, do it directly in potting mix.
The general rule for propagating plants is, the younger and less woody the stem, the more readily it will grow roots in water.
How long does it take for geranium cuttings to root?
Depending on growing conditions time will vary, but you should notice new root growth in 6 to 8 weeks.
Can you keep a geranium in the winter?
Yes, there are several options for keeping geraniums over the winter:
Keep them as houseplants.
Grow cuttings.
Store potted geraniums in an above-freezing shed, garage, or basement.
Remove soil and store bare roots in cool, dark place.
My geranium cuttings are turning yellow. What is the problem?
Yellowing stems and leaves can have many different causes.
Here’s a few possibilities:
1) Under or over-watering: lower leaves start yellowing first.
2) Exposure to cold temperatures (below 45°F or 7°C).
3) Unhealthy plant.
4) Nutrient deficiency in the potting mix.
You could try repotting it in new potting mix or adding a slow-release organic fertilizer (follow instructions on label).
Nguồn: https://iatsabbioneta.org
Danh mục: Garden


