Moth Orchid Basics
Moth orchids range in height from 6 inches to 3 feet, and they flower all year round. In USDA plant hardiness zones 10–12, they can be cultivated outdoors, but they are most typically grown indoors. These orchids are not parasitic and are epiphytic, which means they grow on trees but are not attached. Their roots do not draw nutrition from their host, but from the air and water around them. These plants thrive on a mixture of medium-sized bits of fir bark and sphagnum-moss.
Growing Moth Orchid Keikies
The Hawaiian word for infant is keiki. Rooting hormone specifically designed to promote the growth of orchid offshoots is needed to encourage the growth of moth orchids. Most garden supply stores carry it.
Bạn đang xem: How To Reproduce Phalaenopsis Orchids? Comprehensive Guide
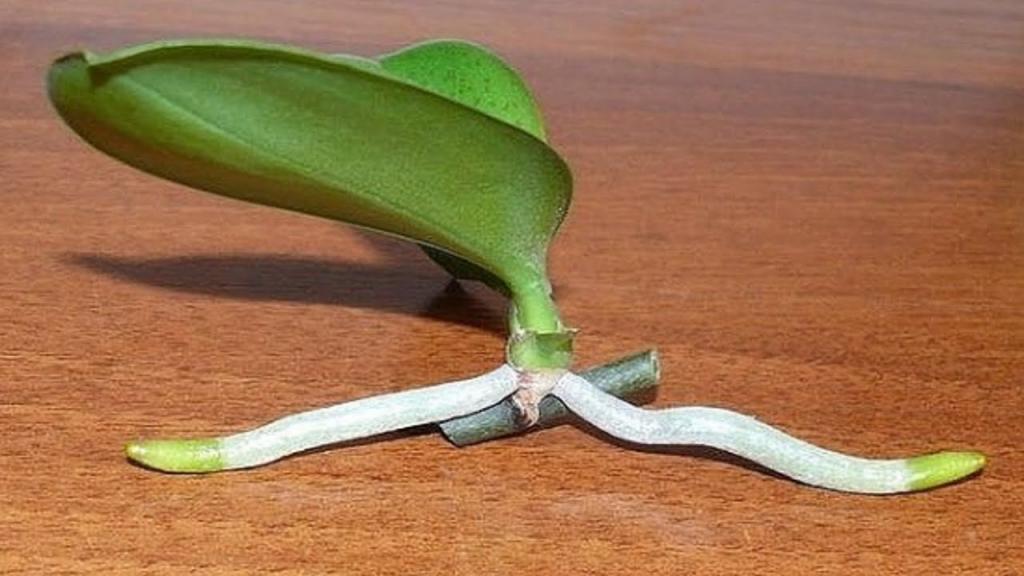
Five minutes in a solution of one part household bleach to three parts water is all it takes to sterilize a scalpel or sharp knife, and tweezers are all they need. Allow them to dry naturally. Buds growing at nodes have their covering, or bract, removed. Cutting into the node is a bad idea. Pull back the bract with tweezers, then apply a small amount of keiki rooting hormone. For rooting hormone paste, follow the manufacturer’s directions.
Planting the Keikies
Sever the stem and plant the keiki when the roots have grown to a length of about 3 inches. Do not submerge the pot completely in water, but do not let it to dry out. Using water to hydrate the sphagnum or bark, sprinkle the keiki on a daily basis as they grow.
Luminous indirect light is preferred by moth orchids. A window facing east or west, with daytime temperatures of between 66 and 86 degrees Fahrenheit and nighttime temperatures of between 61 and 66 degrees Fahrenheit, is the best location for your newly planted keikies to thrive.
After the roots have established themselves in the potting mix, water once a week or as needed. When it’s time to water, avoid doing so at night. Don’t let the orchid’s roots get submerged in the water or allow water to build above the top. Once a month, apply 1/4 teaspoon of 20-20-20 fertilizer to 1 gallon of water and water established moth orchids.
Growing Keikies in Sphagnum Moss
Cut into the bract of a node, administer keiki rooting hormone, then wrap sphagnum moss around the keiki using a nylon stocking as an alternative propagation method. The roots of the keiki should be let to develop into the sphagnum moss, rather than being removed. If you notice that your keiki is starting to produce roots, remove the sphagnum from the spike and place it in a pot with more sphagnum.
Layering Orchid Keikies
In a third way to grow an offset of Phalaenopsis, you might bend the plant to the ground in order to encourage root growth. Uncover the node, apply the keiki rooting hormone, and bend the spike of the orchid till it contacts the sphagnum or bark compost in the pot in order to layer it. Place it where you want it. The roots of the keiki will develop into the growth media as they are still being fed by the mother plant. Remove the keiki from its mother as soon as it is able to care for itself.
How to propagate an orchid: What you’ll need
In most circumstances, orchid propagation is simple and doesn’t require a lot of equipment. Even if you’ve never grown orchids before, you can easily grow them at home with the appropriate instructions.
- Herbicide-infected shears (you can disinfect with rubbing alcohol)
- Orchid planters or orchid hangers of the proper size.
- Mastic moss
- Make sure your orchid is healthy and not in bloom!
How to propagate an orchid: The myths
One thing to bear in mind when it comes to orchid propagation is that there are a lot of misinformation out there regarding how to do it.
- To begin, I’ve read in a number of places that an orchid can be propagated only by the use of air roots. Even if that sounds amazing, the rumor is untrue. Just because the roots lack the proper cells for new growth, it doesn’t work.
- Phalaenopsis (also known as moth orchid) flower stem cuttings can also be used to propagate the plant. For the purpose of propagation, you must have at least one seedling present in order for the blossom stem to be used.
- Finally, leaf propagation is required. Some plants, such as succulents and Begonia, can be regrown from a single leaf, while orchids cannot. The stem is the only component of the leaf that contains the appropriate cells for regrowth, hence it must be linked to the leaf.
Xem thêm : When Were Greenhouses Invented? Building a Greenhouse in 10 Easy Steps
That being said, let us move on to discussing the various methods of re-propagating orchids.
There are exceptions to the last myth, as stated by Orchideria: gem orchids (genus Ludisia). Leaves and regular stem cuttings are two of the most straightforward methods of propagation for these plants. Compared to other orchids, they’re a little unique!
How to grow an orchid from a cutting
Phalaenopsis orchids, for example, cannot be grown from a flower stem cutting, as previously stated. However, this does not rule out the use of stem cuttings!
Monopodial orchid stem cuttings
A Vanda or similar monopodial (single-stemmed) orchid, such as a Phalaenopsis, can be propagated by severing the stem. In the case of mature orchids, there are so many leaves on top of each other that a substantial stem has formed. This isn’t the case with a flower stem, though.
A clean knife or pair of shears can be used to “top” the plant, essentially cutting the orchid in half. Keeping the bottom portion in the current container, which includes roots, will allow it to continue to grow with proper care.
Sod can be used to cover the rootless top portion of the plant. Hopefully, it will take root and continue to develop normally.
Sympodial orchid stem cuttings
As the name suggests, a sympodial orchid is one that grows from many canes or bulbs rather than a single stem. It is impossible to propagate these stems via cuttings for the vast majority of them.
Dendrobium nobile, a well-known example, is an exception to this rule. Canes from this species can be cut up and placed in a wet sphagnum seedling tray. Some cuttings will produce new Dendrobiums if they have a few nodes.
Vining orchid stem cuttings
There are several orchids that grow on vines, despite their lack of popularity. Vanilla planifolia, also known as the vanilla orchid, is a good example. Vanilla pods are indeed produced by this species. Even though it’s not the simplest orchid to care for, this one makes a great addition to any collection.
As you can imagine, propagating a vining orchid is a piece of cake. No bother with topping or chopping up canes: just snip the vine wherever you want and the cuttings will root. This also works with Ludisia orchids!
How to propagate an orchid through division
Vining orchids are easy to propagate, as you can imagine. Snip the vine where you desire and it will root; no need to remove or slice off canes. Using Ludisia orchids is also possible!
In an appropriate medium, place both of your orchid’s halves. Because each plant has its own root system, they should continue to grow normally.
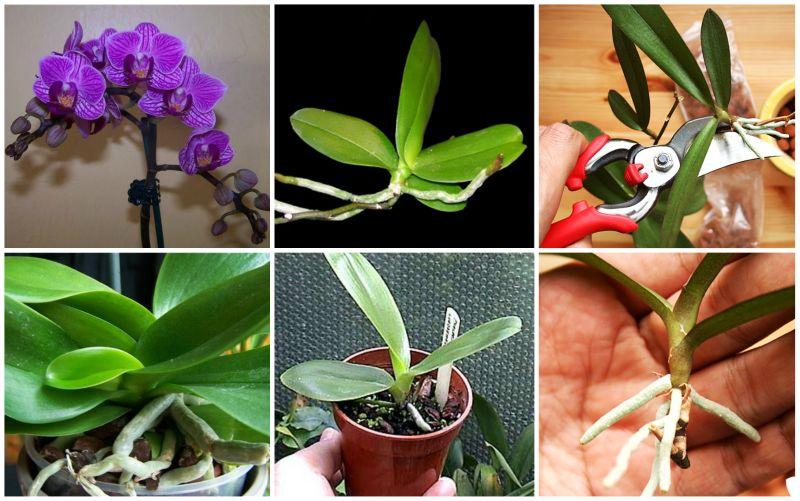
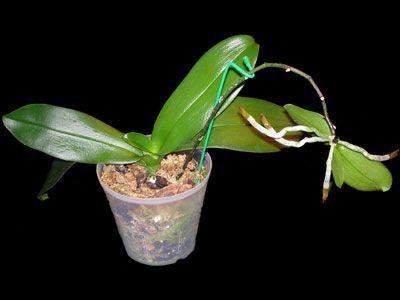
How to propagate an orchid from keikis
‘Keiki’ is a Hawaiian word that translates to ‘baby or child’. Orchid mother plants can produce microscopic duplicates of themselves on their stems or at the base of their roots, thus this is a very true description when it comes to developing orchids.
Xem thêm : How To Purify Air In The Small Greenhouse? Comprehensive Guide
If your orchid bears a keiki, you’re in for a treat. When it comes to propagation, your plant is practically doing half of the job on its own! The monopodial Phalaenopsis, which is difficult to spread by topping but frequently produces keikis, is a good candidate for this technique. Dendrobium is another typical keiki producer.
Is it possible to remove a keiki from an orchid’s stem or base?
- A few leaves and robust air roots are all that is needed to keep the young plant under your care for the time being.
- Once the keiki is ripe, use clean shears or a knife to detach it from the mother plant.
- Using the same container and soil that you used for the mother plant, pot up your baby orchid. Alternatively, you can use the same container to house both the baby and the original plant.
- A root system is already in place, so it should be able to develop normally.
How to propagate an orchid from back bulbs
The term “back bulb” may be recognizable to those who are familiar with sympodial orchids. Pseudobulbs on the canes of some orchids, like Cymbidiums, are for people who don’t know. Nutrients or water can be stored in these containers. Back bulbs are pseudobulbs that have ceased to grow but continue to feed nutrition.
To propagate an orchid, you can use rear bulbs that aren’t too withered or sad. Their stems are still capable of producing new growth, but they don’t use them until they’re potted up and left to their own devices.
It’s really simple to propagate back-blooming bulbs. Sphagnum moss is all that is needed to pot up the back bulb. A typical orchid medium can be used once it appears to be rooted properly.
Remember that the back bulbs of your orchids don’t grow as quickly as the rest of the plant. Back bulbs should not be neglected. Even though it can take a long time for a plant to come out of dormancy, it works!
Tip: Don’t divide your orchid while it’s in bloom. If you disturb it too much during this time, it may lose its blossoms.
Bonus: How to grow an orchid from seed
Planting an orchid from seed, like many other houseplants, is a task best left to the most dedicated gardeners. Creating new orchids by vegetative propagation is simply more convenient (the methods listed above). It takes a long time to grow plants from seed, but the results are worth the wait.
To start an orchid from seed, you can buy seed pods from a trustworthy firm (not AliExpress, Wish, or Amazon), receive them from another hobbyist, or pollinate your own orchids.
Getting the pods is straightforward; the rest of the process scares 99.9% of hobbyists. Orchids are typically produced in flasks using specialized fertilizer combinations and extremely delicate handling of the infant plants. The American Orchid Society has a comprehensive PDF on the process, so I won’t even try to discuss it here.
After successfully propagating an orchid, you may be wondering how to care for your newly minted plant. The most popular orchid houseplant, Phalaenopsis, has a comprehensive care guide you may check out.
Don’t hesitate to leave a comment if you have any more questions on orchid propagation or if you’d want to share your own experiences with these beautiful houseplants!
Nguồn: https://iatsabbioneta.org
Danh mục: Garden


