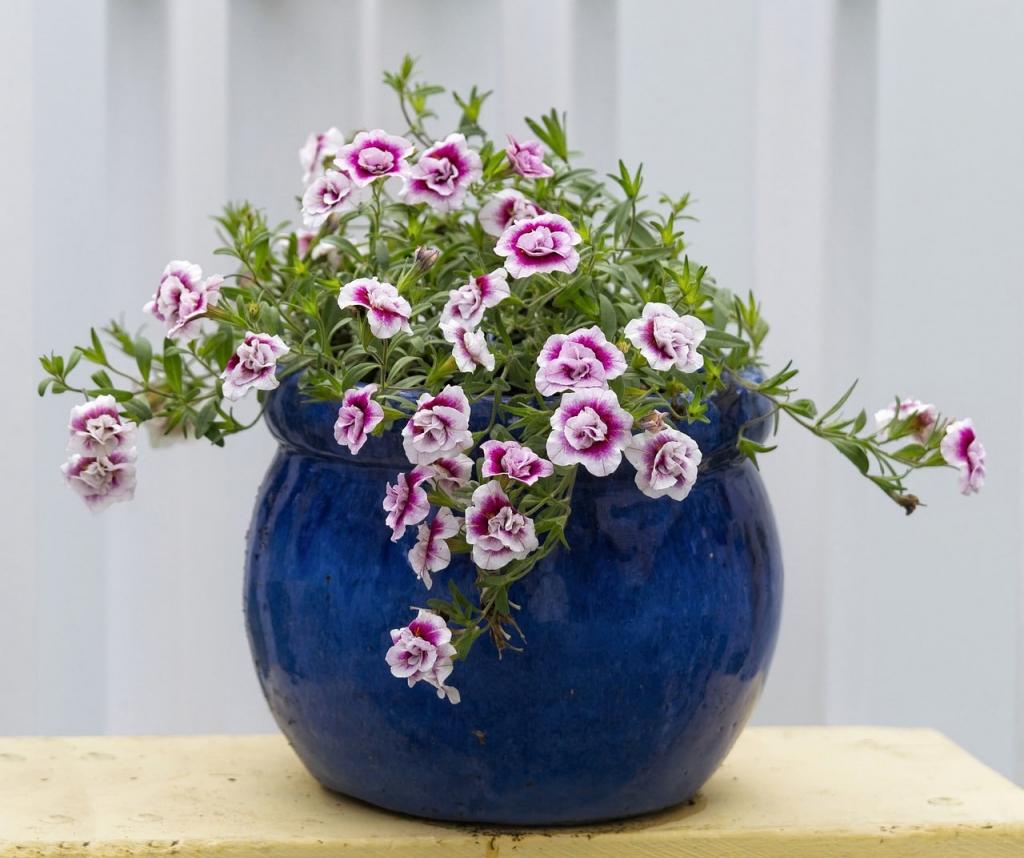
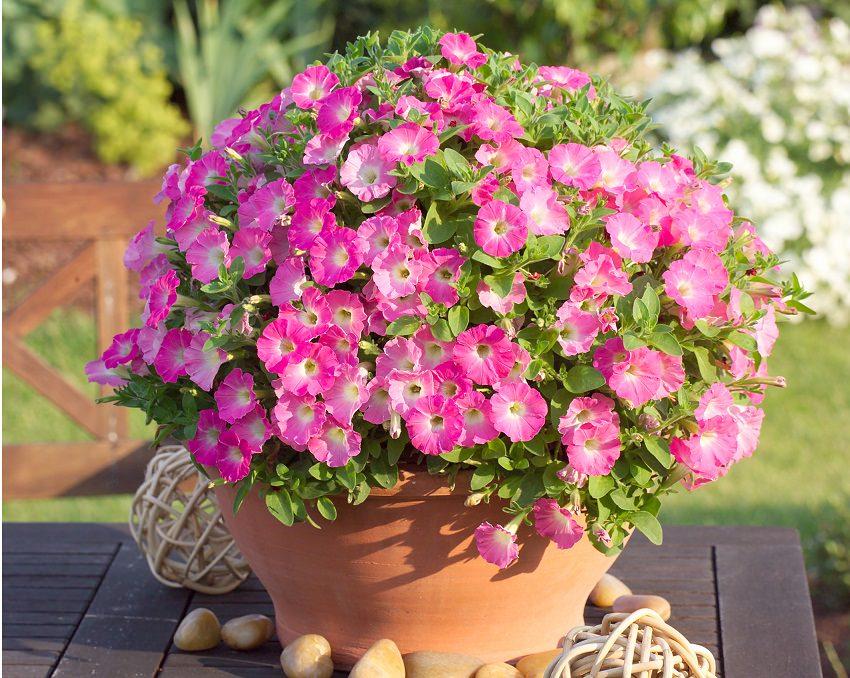
There are a vast range of colors and sizes of Calibrachoa species that bloom during the spring and summer months. Called trailing petunia for the flower’s resemblance to petunia blossoms, the plants grow only 3 to 8 inches tall, but they can spread up to two feet wide. Use them in pots, window boxes, or the front of the border. Calibrachoa survives winters in U.S. Department of Agriculture hardiness zones 9 through 11, but they are usually grown as annuals. The plants can’t be grown from seeds or divided so they are propagated from tip cuttings. As a result, it is forbidden to propagate any of the “Million Bells” hybrid Calibrachoa cultivars.
- How Much Lighting Is Used Growing Tomatoes In Commercial Greenhouse?
- What Is The Ideal Temperature For Growing Cannabis In A Greenhouse? Helpful Information!
- How To Deadhead Dianthus? Special Tips and Tricks
- What To Know When Growing In A Greenhouse? Helpful Information!
- How To Identify Pepper Plants? Complete Step-by-Step Guide
Cutting
Calibrachoa species produce an abundance of tiny flowers in a variety of hues throughout the spring and summer months. In spite of its short stature (only 3 to 8 inches tall), trailing petunias can cover an area up to two feet wide, hence the common name. Use them in pots and window boxes, or in the front of the border. USDA hardiness zones 9 through 11 allow calebrachoa to survive winters, but they are typically cultivated as annuals. Tip cuttings are used to propagate the plants since they cannot be grown from seed or divided. Because the hybrid Calibrachoa “Million Bells” line is patented, it’s unlawful to propagate any of the cultivars in that line.
Bạn đang xem: How To Propagate Calibrachoa? Comprehensive Guide
Pots and Potting Soil
There are many benefits to using an organic, nutrient-dense cutting soil, but there are also drawbacks. When organic matter is kept damp in a sealed environment, it is more likely to decompose and become infested with fungi. Using a soilless seed starting medium, which lacks organic matter and nutrients, is less likely to result in plant problems. In order to maximize your chances of a good rooting, you’ll have to feed the cutting every two weeks after the roots form. Add water to the medium.
Preparation
Remove all but a handful of the plant’s lower leaves. If you pull the leaves off the stem with a downward motion, you risk damaging the outer part of the stem. When you remove leaves from a plant, the roots begin to grow from those spots. Faster and more robust roots can be achieved by applying a rooting chemical to the stem’s lower two inches.
Sticking
“Sticking” refers to the practice of planting the stems in the ground. Directly inserting the stem into the soil may result in harm to the stem and removal of the rooting agent. Instead, use a pencil to dig a 2-inch-deep hole in the pot’s middle, then insert the cutting’s bottom end into the opening. Firm the soil around the cutting’s base to provide a straight cut surface.
Humidity
Rooting success rates for calibrachoa cuttings are improved when humidity is kept at a high level. Placing a cut-out soda bottle over the pot is the quickest and simplest solution. When the cutting begins to grow, remove the cover from the plant and expose it to bright but indirect sunshine.
What Is Calibrachoa?
Calibrachoa is a flowering plant that resembles miniature petunias in appearance. On the ground, there are multiple stalks of this plant. The plant, despite the fact that it typically grows in the spring and fall, is capable of living for a full year.
In places with frigid weather, this type of bloom is prevalent. For the most part, this plant is only four inches tall. Indeed, this flower has become a popular choice for gardeners in recent years.
Keep reading if you’re one of them and are having difficulties in spreading it. Here are the steps you need to follow to successfully propagate calibrachoa.
Propagating Calibrachoa Using The Cutting Method
Xem thêm : How To Use A Cloning Machine? A Perfect Guide For You!
Interested in growing your own calacoa? First, let’s look at how to propagate calibrachoa by cutting:
#1 Use a utility knife to ensure a straight cut
Start by removing about 15 centimeters from the stem. The rest of the stem should be trimmed by removing all of the leaves. It is common practice for the cuttings to be tipped at dawn. This procedure is carried out in order for the plant to regrow with more leaves and more visually pleasing blossoms.
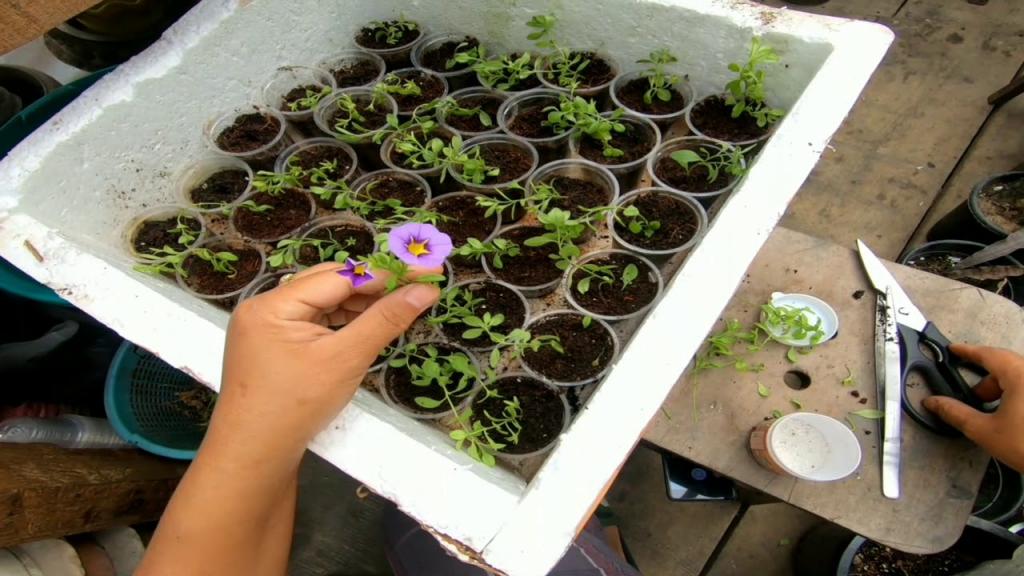
#2 Prepare a soilless potting medium
Instead of using soil, you need to use organic ingredients in the pot. Why? As a result, your plants will be healthier and pests and diseases will be kept out. It also drains nicely and prevents the feet from being wet. The chopped ends should be inserted into this put.
#3 Misting is the right way of watering your plants
Control and regulation of the water should be a top priority. So, we recommend spray bottles.
To avoid mineral salts, use water that has not been contaminated with minerals while dampening the soil. It is advisable to use tiny containers to allow the extra water to escape if the plant is too wet, as the stem may rot.
#4 Always remember the factors that may cause the cuttings to wilt
You’ll know whether anything is withering when you see the first signs. It could be due to excessive misting, excessive heat, or starvation.
#5 Put the container in a cooler place
Considering that this plant is often planted in spring and fall, it is vulnerable to rising temperatures. Make sure the container is in an area with an average temperature of 70 degrees Fahrenheit to avoid spoilage.
#6 Wait for days to finally see the delightful results
Fertilizers can be used to maintain the plant’s growth. Ensure that the amount you enter is accurate and necessary. The number of leaves on the tree will rise as a result of this action.
#7 Observe your calibrachoa as the days pass by
Observe the color of the leaves. It’s a sign of iron deficiency and malnutrition in your plant. Take care of it as soon as possible so that it doesn’t become contagious. It is possible to avoid iron shortage by placing it in a temperature-controlled environment.
#8 Sever and frequent cutting can help you achieve better results
We want you to do it more frequently so that you can observe larger shrubs and a wider variety of flowers.
#9 Transfer to a permanent container once it matures
Xem thêm : How To Train Cucumbers? Comprehensive Guide
The plant can be moved to a permanent container if its stem has stiffened, the flowers begin to bloom, and the leaves begin to grow. Make sure you take into account the temperature and the amount of sunlight it receives.
Propagating Calibrachoa Using Seeds
However, it is far more difficult to cultivate it from seeds than it is to propagate it through cuttings. Gardeners who are just getting started with calibrachoas, on the other hand, should use this method.
It spreads quickly, and the consequences are also spectacular. In order to successfully grow calibrachoa from seed, you must follow these guidelines.
#1 Sow the seeds thinly
A seating formula for pressing your seeds should be drawn up. Because the seed relies on natural light, be sure to plant it where it receives direct sunlight. Regularly spray the coating to dissolve it.
#2 Opt for a good and healthy soul
Soil temperatures of 70-75 degrees Fahrenheit are critical for Calibrachoas, as they are extremely sensitive to changes in temperature.
#3 Ensure access to sunlight
Your plant will begin to flourish in 10-14 days. As long as the days are still long and the sun is shining, your plant will be OK. In addition, you must ensure that the temperature and humidity levels are maintained at a proper level.
#4 Use artificial lights
Artificial lighting is already possible at this point. In order to keep growing, it requires additional energy. Fluorescent bulbs can be used. On cold nights, it helps to keep the food from freezing. Exposure to artificial light for eight to sixteen hours a day is probably sufficient, however exposure for up to twenty-four hours a day could be harmful.
#5 Regulate the amount of fertilizer that you use
Put in the exact amount that you’ll be using. You can move it from the nursery to a permanent container if its stem is already hard enough. In the new location, make sure it’s safe.
Conclusion
That’s all there is to it; calibrachoas can be propagated through cuttings or seeds. Consider your own efficiency when selecting a method. Keep in mind the things that influence its development.
Our major priority is always to spread knowledge. I hope you follow the advice and recommendations in this post to improve your garden. Many thanks for taking the time to check this out.
Nguồn: https://iatsabbioneta.org
Danh mục: Garden


