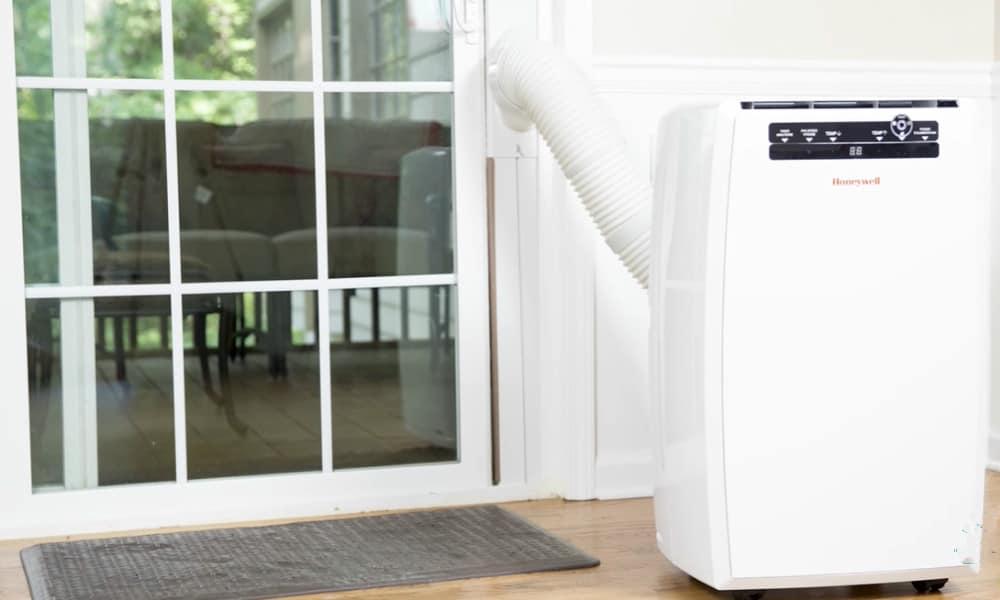
There is a portable air conditioner that does not require a window to be installed. For the most part, this isn’t something we’d contemplate doing. But for areas without windows, including flats and renting spaces, they would need to know about the five options outlined below.
Before you choose a portable air conditioner, you need to think about ventilation. Don’t freak out if you bought it and then realized you needed a window. You’ll benefit from reading this article.
Bạn đang xem: How To Install Portable Air Conditioner Without Window? Comprehensive Guide
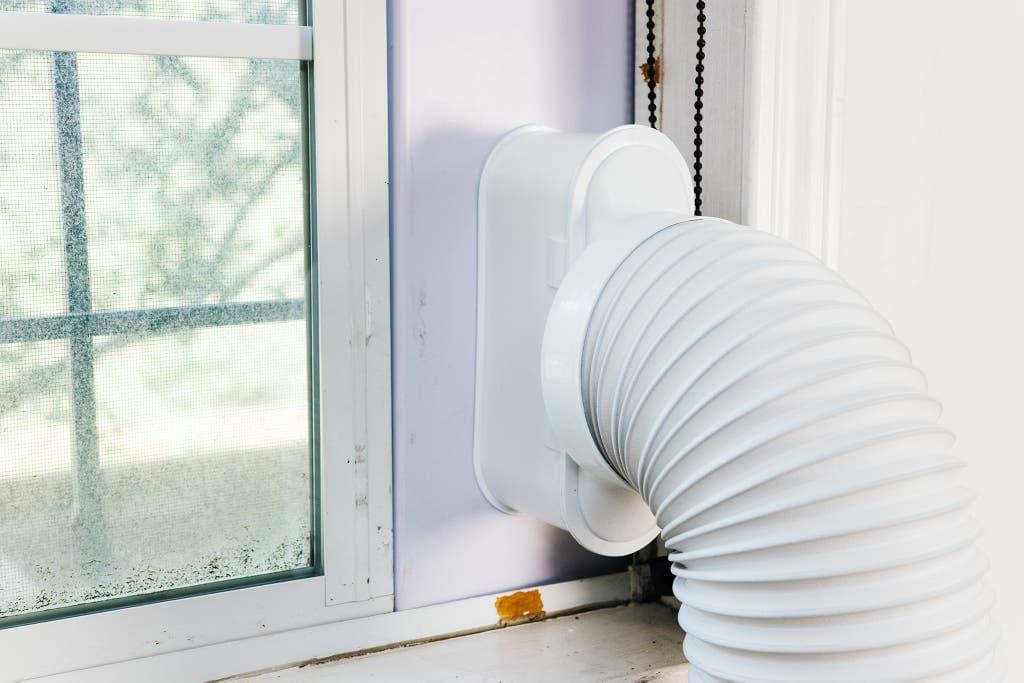
The exhaust hose can also be utilized as an alternative to your window. Please don’t think that you don’t need the hose for the portable air conditioner.
It’s utterly implausible!’ It will work, but you won’t be able to keep your room cool. Attempting to cool down your home without the aid of a hose will do more harm than good.
To succeed, you’ll have to think beyond the box. So, don’t stop reading!
Ways To Install Portable AC Without Window
Now, we’ll show you how to install a portable air conditioner without the need for a window.
Way #1. Through your wall
With this option, you are not constrained by the location of your vent tube. However, there are a few things to keep in mind.
You’re wall is one of those things. For easier drilling, you should choose a wall made of wood or drywall. In order to drill through massive walls made of bricks or stones, the process becomes more difficult.
Check to see if there are any cables or piping in the wall you intend to drill through. Making a hole in these materials could result in a loss of water and electricity to your home..
To ensure that your wall may be used for ventilation, follow these instructions.
Step #1. Drill a hole
A pen can be used to mark where you’ll drill. For the hole, you can also adhere to the contours of your duct.
The use of a hole saw makes it easy to create the ideal location for your vents. However, they only work on walls with a thin layer.
Step #2. Seal the flange
The flange will be used to attach the hose to the wall. As a result, your border will have two flanges.
Sealing it with caulk is an option. Finally, seal the flange on the outside of your wall with a vent grill.
Step #3. Attach your hose and cables
Make that the opposite end of the hose is snapped to the internal flange, and then to the unit itself. Finally, wire up everything else.
Way #2. Through your sliding door
Consider this as a larger version of your horizontal sliding window. Purchase a tall panel to match the height of your door, for example.
Afterwards, you can utilize this as an exhaust hose support panel. You can also use the pre-installed window panel. Use a sealant or screw to secure the panels together.
As a final precaution, drill an additional hole in the bigger panel. It may also be slid from one side of your door to the other. Sliding doors can be used to keep it in position. After that, you may connect your exhaust hose to the panel and unit by connecting both ends to the hose barbs.
Way #3. Use your dryer vent
If you have a dryer that you don’t use very often, this option is for you. However, the majority of experts advise against it.
Both a portable air conditioner hose and a dryer vent have the same appearance and function. If you don’t need to make a new hole, why not just use what’s already there?
If you purchase a portable air conditioner, it should include a ventilation kit as standard equipment. That way, you can remove the dryer vent and use your own. Because of characteristics like length, you may want to use the dryer vent. Alternatively, they may be permanently affixed to the opening.
Way #4. Through the ceiling
In some companies or restaurants, you’ll notice a square hole in the ceiling with a vent grill cover. You can use this opening to vent your portable air conditioner if your home lacks windows.
Let’s say you want to lower the temperature in your private office because it doesn’t have any windows. The heated air can be directed upward by connecting the other end of your hose to the ceiling.
The downside is that this choice would make your vent stand out and draw attention to itself. As a result, it should be placed in a less visible area of your office.
Way #5. Utilize your chimney
This option is rarely used by homeowners because there are many other options that would function just as well. The purpose of a chimney is to permit the escape of stale indoor air. Most often, however, you’ll find them over a fireplace or just next to a kitchen.
To make matters more difficult, you’d need to find someplace for your hose. However, if you want to use this option, you’ll need a clean and unused chimney.
Your exhaust hose might melt if you place it on a fire, thus we don’t think you should do that. If you want to go this route, you’ll need the help of a professional to get the job done. Some chimneys are even taller than the others.
If you live in a smaller house, such as a cottage, you may want to consider this alternative.
Basic Safety Tips
To ensure your safety, here are a few things to bear in mind before you begin setting up a portable air conditioner:
Read the instructions in the manual before beginning any project.
Portable air conditioners are cumbersome to move around because of their size and weight. Take care!
Never use an extension cord or a power strip with a portable AC.
Keep youngsters away from the appliance. ”
After you’ve finished installing it, you can connect it.
Before operating a portable air conditioner, check to see if the accompanying air filter is in place.
Do not try to fix a portable air conditioner on your own.
Where To Place A Portable AC
A portable air conditioner should be placed at least 8-12 inches away from any obstructions, such as furniture and flowers, on a hard, flat floor. Inquire about clearance requirements from walls in a product’s instruction manual.
Never put a portable air conditioner on a chair, desk, or shelf. Devices like this one are designed to be used on the ground.
The ideal location for a portable air conditioner is near an outdoor window and an electrical outlet.
Check to see if the power cable is long enough to reach the outlet. Verify that the vent hose can reach the window without being overstretched as well.
Xem thêm : How To Install Portable Air Conditioner In Crank Window? Step-By-Step Guide
The hose should be as short and straight as possible, according to the majority of manufacturers.
You’re ready to begin installation once you’ve determined the best location for your AC.
Compare the contents of the package with the manual’s list of components. Check to see if you’ve forgotten anything!
Included in a standard window kit are the following:
- a hose for venting
- hose adapters for venting
- Connector for sliding windows.
Screws, weatherstrips, or foam may also be included in certain packages.
If something is amiss, get in touch with the retailer right away.
Venting the Exhaust Properly
Hot air from a portable air conditioner is typically vented to the outdoors through a window.
Do not proceed to the next section if your room does not have an exterior window or you cannot make use of an existing window (for example, because it is a casement window).
With the correct equipment, installing window vents is a breeze. Make sure you have everything you need before you begin.

Step 1: Install the adjustable window kit
All sorts of windows can be fitted with window kits, including those that open outward and those that open inward.
Make sure the kit is placed at the bottom and extended to the width of your window opening if you have a classic up-down operation.
Place the kit on one side of the window and extend it till it reaches the full height of the window if yours is a slidable model.
For a narrower window opening, you’ll need to cut the slider kit down to its minimal length.
Plywood, Plexiglas, or cardboard can be used to fill in the gap if your window opening is longer than the slider kit’s maximum length. At your local hardware or home improvement store, you may purchase filler material and have it cut to the exact size you require.
In order to keep the slider kit in place, close the window after you’ve completed the installation of the window kit.
To keep bugs and warm air out, some kits include weather strips or foam to insert between the slider and the window. Screws may also be included with your kit if you need to fix it in place.
A supplementary security lock can be purchased to ensure that the window cannot be opened from the outside if desired.
Step 2: Connect the hose
To begin, connect the AC’s exhaust pipe to the unit’s back. Check to see if the AC already has a hookup in place. If there isn’t, attach the hose after installing the connector.
Using the window vent kit’s exhaust connector, connect the opposite end of the hose. Connect the slider kit to the hose by extending the hose. Secure it in place by turning the knob all the way clockwise.
To avoid damaging the unit or preventing it from cooling as effectively as possible, keep the exhaust hose between the unit and the window as straight and direct (short) as feasible.
Additionally, some manufacturers advocate extending the hose to a maximum of 9 feet. The better the exhaust hose, the shorter and straighter it should be.
Step 3: Plug in the AC
Your portable air conditioner can now be connected to the wall outlet.
Using a power strip or extension cord to connect the AC to a properly grounded socket is a safety hazard.
When you insert a device into an outlet, an indicator light on the plug will light up. Reset and test should also be buttons on the plug.
The ‘TEST’ button is there for your convenience. This triggers the built-in safety device that shuts down the power supply if it detects any abnormalities in the flow of electricity. The indicator light should go out and the unit should be turned off. To get the air conditioner working again, use the RESET button.
Please be aware that these buttons will not turn your air conditioning on or off. They are only to be used for routine inspections and to turn on the air conditioner in the event of a power outage. If you’re not sure how to connect your air conditioner to an outlet, see your owner’s manual.
After pressing RESET on your AC, it will turn on and be ready for use.
Temperature and humidity settings can be found in your device’s manual. You’ll also need to learn how to use the remote control that comes with most devices.
Venting Without a Window
Venting through a window is simple and convenient.
However, this does not preclude you from taking advantage of your air conditioning even if you do not have a window or are unable to use the one that is present.
In the meantime, here are some other options:
Vent through a sliding door
Venting through a sliding door is an option if windows aren’t an option.
As with window venting, the method of installing a vent is straightforward.
In order to cover the gap that won’t be filled by the window slider kit, you’ll need a filler material. For sliding doors, I recommend purchasing a slider kit. It will occupy the entire height of the door. No filler material will be required.
Ventilating through a sliding door, on the other hand, has its drawbacks. Is the door still operable? So, how about safety?
Here’s a video with some helpful advice.
Ceiling vents are an option.
You may not be able to vent the portable AC out of a window if you’re using it in an office. A drop ceiling is a viable option in this instance.
Drop ceilings necessitate a specialized venting equipment and may necessitate the services of an HVAC specialist. For drop ceiling venting safety and air quality concerns, it’s also vital to consult the building management.
Vent through an exterior wall
Vent hoses can be run through the wall if there are no windows in the room.
Xem thêm : How To Put Freon In A Window Air Conditioner? 8 Easy To Follow Steps For You!
To install the vent hose, you’ll need to hire a contractor to cut the proper hole in the wall.
Vent through the chimney
Your chimney can be used as an alternative location to install the hose.
Make sure there is no soot in the chimney and that the flue is open before you start cleaning it.
Preventing Water Leakage
Most portable air conditioner owners have a problem with leakage.
Since water evaporates during the cooling process, it must be drained over time. It will leave a puddle of water on the floor if you don’t have a good system in place.
Portable AC water leaks are most often caused by improper drain hose sealing or by excessive humidity in the room exceeding your unit’s draining capabilities (or drip pan).
Make sure you know whether a portable air conditioner is self-evaporative or needs to be drained manually before you buy one. Each one has a unique way of collecting and disposing of the excess moisture in your home.
The exhaust pipe of self-evaporative portable air conditioners discharges heated air and water outside. Most of the time, you won’t need to drain these.
However, if the air is too humid, condensation can form in the air conditioner, overflow into the emergency pan, and finally leak out of the top, generally near the drain plug.
Emergency drain pans on some units are indicated by an indicator that reads “FL” (for “full”).
To drain the AC, you can either place it on a drain or connect a drain hose. Stop leakage by using a cap on the drain plug (some devices come with one).
Keep an eye on the floor below the unit if yours doesn’t have an indicator. It’s time to drain the tank if you see any leaks. When the unit stops working, you’ll know it’s full if you’ve covered the drain plug.
Unlike evaporative cooling systems, manual drain ACs include a drain pan (trap) that needs to be emptied, or it will overflow.
Either add a separate drain line or empty the unit’s drain pan manually on a regular basis to keep it out of the house.
How it works
Using a portable air conditioner, you can cool the air in your room before returning it to the room. An exhaust tube installed in a window vents the warm air outside. We’ve put together a guide to help you choose the best portable air conditioner for your needs.
How to install your portable air conditioner
1. Choose a location near a window and outlet
For a portable air conditioner to function properly, you’ll need at least several feet of clear floor space. Access to a nearby water source is also important. However, if you have an air conditioner that can be placed closer to the windowsill, the unit will run more efficiently. As a result, more of the room’s heated air will be able to be expelled rather than recirculated. If your portable air conditioner has a drain hose, you may need to use a bucket or set it near a sink or tub to allow it to drain continuously.
2. See if the portable air conditioner’s adapter kit creates a good seal in the window you’ve chosen
Most ordinary windows should have a solid seal thanks to the adaptor kit. Window adapters can be trimmed if necessary if the window is too small. For larger windows, you may need to buy some plexiglass to fill in the gap.
3. Install the adapter kit
Put the adapter kit in the window once you’ve determined it fits the window’s dimensions. Screwing it in may be necessary. Duct tape is another option for sealing it. That way, you can retain your cool air inside and not have it leak outside.
MORE IN HOME ENERGY AND UTILITIES
- Portable air conditioners versus window air conditioners
- Portable air conditioners: What to look for and how to get the best one for your needs.
- A smart thermostat can save you money in four simple ways.
4. Connect the ventilation hose
The first step is to connect your hose to the adapter kit. Make sure it’s a good fit before you buy it. Wrap a piece of duct tape around the connection point if it’s a little loose. To complete the installation, connect the portable air conditioner to the other end of the ventilation line. If duct tape is required, use it.
5. Attach the drainage hose
Drainage hoses that come with portable air conditioners should be attached to the unit and fastened to the drainage point. The hose should always be taped down when draining in order to prevent it from becoming dislodged and ending up on the floor.
6. Plug your portable air conditioner into the outlet
You can now plug in your portable air conditioner and turn it on.
Moving your portable AC to another room
To relocate a portable air conditioner from one room to another, all you have to do is disconnect it, remove the window adapter kit, and roll it into the new location. Then all you have to do is install the window kit, plug in your unit, and switch it on in the new room. However, before you relocate your unit, be careful to drain the water reservoir.
If you’re having trouble staying cool, consider investing in a portable air conditioner. To save money on your air conditioning, you may want to learn about the various options that are available, such as a central unit, window unit, or portable unit. A portable air conditioner can even be made from an ice cooler if you’re always on the go.
Frequently Asked Questions about Installing a Portable Air Conditioner
Do all portable air conditioners need to be vented outside?
Yes, in most cases. Most, but not all, must be vented to the outer world.
The exhaust air from a dehumidifier or fan-only mode AC unit doesn’t need to be vented outside if the equipment uses manual draining, for example.
Venting isn’t required in fan-only mode for the majority of units.
Because of this, a portable air conditioner must be able to vent outside anytime it is needed for cooling purposes. Without an AC, warm exhaust air will return to the room, thereby voiding its purpose.
Check your owner’s handbook to see what the manufacturer advises you to do, as always.
What size portable air conditioner do I need for my room?
BTUs are the standard unit of measurement for portable air conditioners.
Each square foot of space requires roughly 20 BTUs of heating power. In this case, a 6,000 BTU air conditioner should suffice for a room of 300 square feet.
Before purchasing an air conditioner, make sure you know how much space it needs. Manufacturers often state the maximum size of the room in which you can use their product. –
Do portable air conditioners need a water supply?
No. Portable air conditioners do not require water to operate. They aren’t humidifiers. Dehumidifiers remove moisture from the air, which results in water evaporation.
Can you vent a portable air conditioner through a dryer vent?
No, in the vast majority of cases. It’s possible that the manufacturer will explicitly say not to do it.
As a result of this, the dryer vent and the exhaust pipe of an air conditioner are frequently not the same size. Using a dryer vent is not without risks, such as the risk of lint blowing back into the unit, which could start a fire, which is another threat.
If you plan to use a dryer vent, you should get the advice of an HVAC specialist first.
How can I cool a room with no windows?
A sliding door, a drop ceiling, or even an exterior wall can all be used as vents.
See the tips above for additional information.
Conclusion
It’s possible to install a portable air conditioner without a window in any of these ways.
The hose and other cables can be connected directly to the unit and hole once a ventilation route has been found. It’s time to turn on your air conditioner!
For the sake of our survival, we need to be resourceful and creative.
If you’re looking for a way to improve the quality of air in your house, we hope that these alternatives can help. It’s a great day!
Nguồn: https://iatsabbioneta.org
Danh mục: Conditioner