You may start growing your own celosia from seed in only two easy steps. Despite their beauty, these annuals can be grown successfully from seed. Keep in mind that starting plants from seed is more time consuming than other methods of propagation, and hence avoided by many gardeners.
Growing celosia from seed is simple, and it may be done even more quickly in a greenhouse. The ability to control the environment for young plants is one of the main benefits of starting seedlings in a greenhouse. Indoors, the temperature and humidity can be precisely maintained to promote germination and growth.
Bạn đang xem: How To Grow Celosia From Seed? Complete Guide for Beginners
How to Sow
Before the first frost, start Celosia seeds indoors; then, when the weather warms up, transplant them outside.
How to Start Seeds Indoors:
- The ideal time to start sowing inside is four to five weeks before the last expected frost.
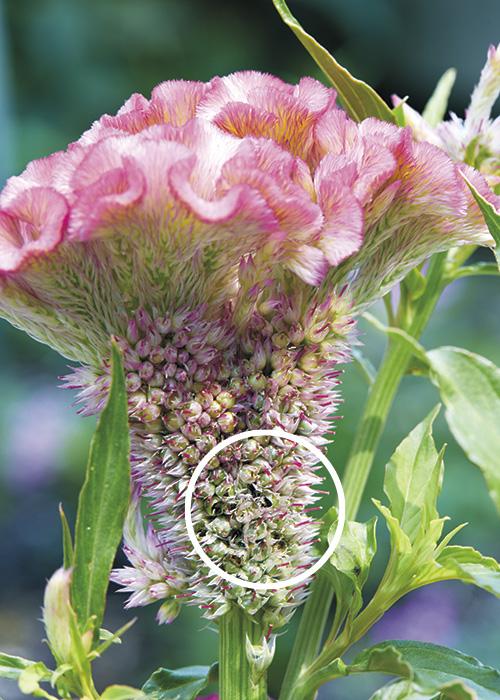
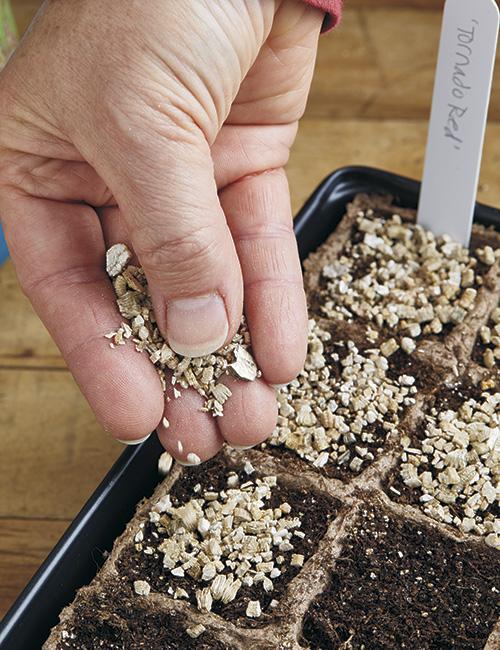
- Sow seeds thinly and simply press them into the seed starting formula since they require light to germinate.
- It’s best to keep the soil between 70 and 75 degrees Fahrenheit so it doesn’t dry out.
- The germination period for seeds is between 8 and 10 days.
- As soon as the seedlings emerge, they can be placed in a sunny windowsill or grown for 16 hours a day under fluorescent plant lights, 8 hours a night. Raise the light intensity as the plants mature and reach for the sky. Lights that use incandescent bulbs are unsuitable for this because they heat up too much to be safe to use. Most plants will not thrive with constant lighting.
- When the seedlings have two sets of leaves, they should be transplanted to their own individual cells.
- When seedlings are about three to four weeks old, feed them a starter solution (half strength of a complete indoor houseplant diet) according to the manufacturer’s instructions.
- Plant your hardened-off seedlings in the garden after the first frost.
- Before being placed in the garden, seedlings need to be “hardened off.” Transferring the seedlings to the external environment for a week is an effective method of acclimatization. They need to be protected from the sun and wind for the first several days. Keep your plants safe from the nighttime chill by taking them inside or covering them with something. Plant hardening off reduces the effects of transplant shock and overheating by strengthening the plant’s cellular structure.
How to Plant a Tree in Your Garden:
- In order to avoid any potential problems with frost damage, you shouldn’t plant your garden until after the last date of danger has passed. Temperatures in the 50s at night and 60s during the day retard growth.
- Pick an area that gets lots of sun and has organic soil that is rich, moist, and well-drained.
- Using a shovel, rake the earth 8 inches deep into the bed. Use a rake to get rid of the clumps of grass and stones.
- Using a shovel, rake the earth 8 inches deep into the bed. Use a rake to get rid of the clumps of grass and stones.
- Rake the soil in the bed to a depth of 8 inches with the shovel. Rake up the stones and grass that has clumped together.
- Create a space large enough to accommodate the root ball of each plant.
- The dirt should be shaped to fit the surrounding landscape. Put soil up to the top of the root ball. A little indentation should be left in the soil surrounding the plant after you press it down with your hand.
- Put enough water in your saucer to produce a puddle. Therefore, the roots have a better chance of making contact with the soil, which benefits in root establishment and the elimination of air pockets.
- Use the plant tag as a way to mark your spot.
How to Grow
- For best results, maintain a low weed population during the growing season. If you mulch your garden or regularly cultivate the soil, you may keep your garden free of weeds by preventing the seeds of weeds from germinating.
- Mulching also helps to keep the soil at a consistent temperature and retain moisture. Leaf mulch is a great organic mulch for annual plants since it looks great and improves the soil as it breaks down over time. Do not apply mulch directly to plant stems; doing so can cause rot.
- Maintain consistent moisture levels for your plants throughout the growing season, paying special care during dry periods. During the growing season, most plants only need a week’s worth of rain. Set up a rain gauge to ensure sufficient water supply. In order to get the most out of your irrigation system, a low-pressure drip or trickling system that supplies water directly to the soil is recommended. When utilizing overhead sprinklers, water early in the day so the foliage may dry before nightfall to reduce the risk of illness. The dirt shouldn’t be too dry or too damp.
- Growing plants often need shelter from strong winds and direct sunlight at the start of their growth cycles. Air quality is also very important.
- After new growth occurs, a light fertilizer can be applied. Prevent burns to the plant’s crown and foliage by not using granular fertilizers. An use of slow-release fertilizer at a low rate can help prevent root rot.
- Plants that reach a certain height may need support.
- Pinch back the first bloom to encourage further blooming and a fuller plant.
- Be on the lookout for pests and diseases. Get in touch with the local Cooperative Extension Service to learn about the pesticides they recommend for your area.
- Plants killed by frost should be removed in the fall to reduce disease issues in the following growing season.
Growing Tips
- Celosia is great for use in sunny gardens and borders, where it complements other annuals and perennials. Another option to explore is planting them above bulbs or cool-season annuals that won’t bloom until summer heat sets in.
- Low-growing varieties can be used for borders or in pots.
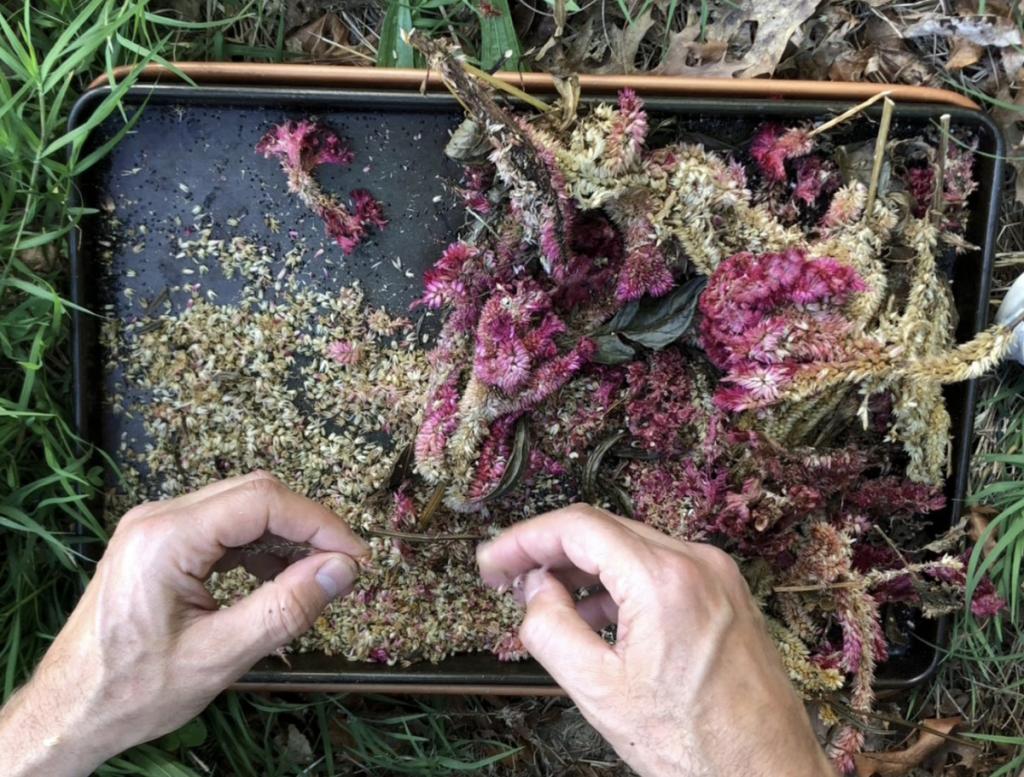
- When it comes to processing for the knife and dryer, tall varietals rank high. Herbs can be dried rapidly if their leaves are removed and they are hung upside down in a dark, cold place.
Common Disease Problems
Small, circular, reddish-brown spots with white to gray centers form on the upper surface of the leaves, a disease known as alternaria leaf spot. When the stems have lesions, they can wilt. This ailment is made worse by hot, wet weather. Burpee You should not water the plants. Never touch wet plants, and get rid of anything that could be contaminated. Assure a high volume of airflow. The Cooperative Extension Service in your area can provide advice on the best fungicides to use.
Damping off is a common problem when establishing plants from seed. At first glance, a healthy seedling emerges. And then, seemingly out of nowhere, it shrivels up and dies. The damping off fungus thrives in warm, moist environments with a temperature of at least 68 degrees Fahrenheit. This can be caused by too wet soil or excessive nitrogen fertilizer. Keep seedlings moist, but don’t drown them; don’t give seedlings too much fertilizer. Avoid overcrowding by thinning seedlings; give plants plenty of fresh air; thoroughly clean containers before using them. If planting in containers, use a 10 percent bleach solution to disinfect them.
Powdery mildew forms on the upper surfaces of leaves in damp weather. Leaf undersides are white or grayish, and the margins often curve inward. Burpee says to keep powdery mildew at bay by leaving plenty of space between plants and cutting them down regularly. The Cooperative Extension Service in your area can provide advice on the best fungicides to use.
Root knot nematodes are a type of microscopic worm-like parasite that causes root swellings (galls). When plants are stressed, they may seem wilted or grow abnormally slowly. In many states in the South, this is a major issue. When planting, Burpee advises staying away from diseased soil. Choose disease-resistant varieties. Planting marigolds around your plants will deter nematodes.
Many diseases can harm both young and established roots, leading to root rot. Planting celosia in the same area for numerous years is not advised and should be rotated with other crops. Infected vegetation needs to be uprooted and thrown away. Soil drainage is essential. Get in touch with the folks at the nearest Cooperative Extension Service for more details.
Common Pest and Cultural Problems
Xem thêm : What Are Good Things To Grow In A Small Greenhouse?
Aphids are disease-carrying sucking insects that feed on the undersides of leaves and come in a variety of colors and shapes. Those pesky ants love the sugary trail you leave behind. Lady beetles and wasps are natural predators that can be encouraged to your garden to help control aphid populations, as recommended by Burpee. Use an insecticide soap or spray with a lot of force to get rid of them as well.
To satisfy their appetites, rabbits often eat plant leaves. But the magnitude of the damage is typically less than that caused by deer. According to Burpee, you may keep rabbits away by spraying them with hot pepper wax.
The leaves may be entirely eaten or have large holes chewed out of them by slugs. They leave a slime trail when it’s wet outside, and they only feed at night. Burpee suggests the following products: When feasible, select by hand in the evening. Slugs can be enticed into traps with cornmeal or beer. Digging a hole in the ground and placing a huge cup or bowl inside it is an effective way to capture slugs, as the slugs will be unable to escape the trap. You should let the beer remain overnight in the bowl so that it is at least 3/4 full before serving. You can leave the bowl of slugs to drown overnight and then empty them out in the morning to feed the birds. Sprinkle some cornmeal over the top of the plants and set the container on its side to create this trap. The slugs are drawn to the scent, but they can’t metabolize it, so predators have an easy time picking them off. You can create a barrier around your plants with diatomaceous earth or old coffee grounds. They can’t reach these shelves.
Spider mites are small insects that resemble spiders and are approximately the size of a peppercorn. They come in a variety of colors, including red, black, brown, and yellow. They eat the chlorophyll off the leaves with their fangs and inject the plant with deadly compounds, leaving white spots on the leaves as a visual indicator. The plant often has apparent webbing. As a result, the leaves turn yellow and dry out, becoming stippled. They thrive in arid circumstances and are able to reproduce swiftly. Burpee suggests the following products: For occasional use, a strong spray can help keep spider mites at bay. If you want to get rid of insects, you can use hot pepper wax or insecticidal soap. If you need advice on which miticides to use, contact your local Cooperative Extension Service.
How To Grow Celosia From Seed For Beginners
Step #1. Sowing
These small pests, which resemble spiders, are called spider mites. They are about the size of a peppercorn. They can be any color you want them to be, from red to black to brown to yellow. They eat the plant’s chlorophyll with their teeth and inject it with deadly compounds, leaving white spots on the leaves. Webbing is a common feature of the plant. The leaves get stippled and dry, turning a dull yellow as a result. They can quickly multiply even in dry conditions, and their growth and development are not hindered by the lack of water. These are the products that Burpee suggests you use: If you spray vigorously once every other day, you can keep spider mites at bay. Try some insecticidal soap or hot pepper wax. Get in touch with your local Cooperative Extension Service for recommendations on effective miticides.
Indoor or outdoor planting
Spider mites are a pervasive nuisance that can be as small as a peppercorn. Red, black, brown, and yellow are just few of the colors available. They feed on plant sap, which they use to secrete toxins that cause white spots to appear on the leaf. There is a lot of webbing on the plant. Plants lose their green color and develop a stippled, flaky texture as they dry out. It’s a fast-growing plant that does well in dry conditions. A spray like this, in Burpee’s opinion, can be applied once every other day to keep spider mites at bay. Pepper wax or pesticide can be used. The best miticides can be found by contacting your local Cooperative Extension Service.
Germination requirements
Since celosia seeds germinate best in warm soil, timing is of the essence when planting them. Because of this, you can only seed directly in the garden in the springtime. The greenhouse can also be utilized to get a head start on the growing season by germinating seeds.
Sowing celosia seeds at the correct time of year is essential, as they need to germinate in warm soil. Sowing seeds indoors isn’t an option, so planting them outdoors is limited to the spring. Alternatively, seedlings can be started in the greenhouse before the growing season officially begins.
Step #2. Maintenance
Seedling care
As was previously said, moisture is required for celosia seeds to germinate. Thus, you should also think about what conditions young plants need to flourish. Celosia seedlings do best when nurtured at temperatures between 63 and 68 degrees Fahrenheit in the house.
Use grow lights for around 12 hours a day, beginning at a distance of 6 inches above the plants. The lights in the greenhouse are adjusted in a way that prevents the seedlings from being scorched, unlike in direct sunlight. Over time, you can thin the seedlings so that just one remains in each container by using small pruners and clipping the central stem tip when they are 8 inches tall.
Transplanting
Thin the seedlings and pound the main stem to help them branch out, and your plants will flourish. As soon as the celosia plants have produced true leaves, they can be transplanted as well. Before putting celosia plants out in the garden, they need to be hardened off for at least ten days.
Xem thêm : How To Mix Demon WP? Complete Step-by-Step Guide
The risk of transplant shock can be reduced by gradually exposing the plants to sunlight over the course of a few hours. Your plants can be moved outside permanently when the temperature drops to 55 degrees Fahrenheit at night. You can plant directly in the peat pots so long as there is no exposed top piece that can leech moisture away from your plants.
Growing celosia outdoors
As a tender annual, celosias do best in bright light. The soil can be made more fertile by adding compost and manure, which also increases water retention and drainage. Ensure the celosias you purchase will fit in the designated area.
Maintenance for celosia plants is simple. Maintain regular watering schedules for them just like you would for any other plant. Fertilizing once a month can also keep your plants healthy and provide gorgeous blooms throughout the summer and fall.
Remember to prune your plants’ initial plumes to promote further growth later on. Watch out for aphids and other pests and eliminate them with organic insecticides as time goes on. Make sure you’re not overwatering, as that might lead to fungal diseases as well.
Conclusion
Plants like celosia will keep you calm throughout the potentially terrifying propagation procedure. Growing celosia from seed requires only a few elementary techniques. Although it only lives for one year, Celosia is a breeze to grow from seed.
It’s possible to cultivate celosia outdoors, but greenhouse cultivation has a number of advantages. To improve germination, it is necessary to create the optimal circumstances of light, temperature, and moisture. Grow lights and subsequent environmental tweaks can be used to speed up the growth of seedlings.
You should pick a location with healthy, well-drained soil for your celosia plants. Plants need only water and fertilizer to thrive. Pests and diseases that target celosias are, for the most part, manageable.
FAQ
Deer typically don’t eat celosia. Deer won’t bother Celosia unless there’s a lot of it and not much else for them to eat.
The celosias in my garden are in full bloom, but I don’t know when to cut the blooms. The best time to cut flowers is first thing in the morning, right after they open. This is an ideal method for storing dried herb bundles in a cool, dry place.
Could you please tell me why my celosia is off to a shaky start and hasn’t bloomed yet? Celosia does not do well in cool, damp environments. It’s possible that flowering will be slowed.
What may possibly be hindering the development of my celosia? If your plants grew too rapidly in cramped conditions before transplanting, they may have become rootbound. Grow seeds in larger containers indoors before transplanting them outdoors.
Nguồn: https://iatsabbioneta.org
Danh mục: Garden


