A houseplant option is available for those who prefer to keep elephant ear plants indoors during the winter months. An elephant ear houseplant necessitates bright light and a moist soil environment to thrive. You should also make certain that it receives adequate humidity. Your elephant ear plants can be returned to the garden in the spring, as long as the risk of frost has been eliminated.
- How To Keep Swivel Recliners From Moving On Carpets? Comprehensive Guide
- How To Install Portable Air Conditioner In Horizontal Sliding Window? Quick Questions Before Starting
- What Is The Beet Apple Carrot Lemon Ginger Juice Good For?
- How To Make Lavender Oil Spray For Bed Bugs? Comprehensive Guide
- How To Propagate Aglaonema? The Simple Secrets To Success

Originally from Polynesia and Southeast Asia, elephant ears cannot withstand the harsh winters here in the United States. They can be moved indoors during the winter, but there are two ways to do it. Elephant ears are a long-term landscape investment because of this. Because of this, you’ll get even more plants out of your tubers!
Option 1: Bring Them Indoors
During the winter, you can bring elephant ears indoors and nurture them as a houseplant. Place it in a sunny, south-facing window for optimal growth. They also require temps in the 70s and a lot of water to thrive. A humid environment is necessary for the development of elephant ears. Because electric heat tends to reduce humidity, this could provide a challenge.
Option 2: Storing the Tubers
There are some people, including those in the horticultural sector, who refer to elephant ears as bulbs. They’re tubers, after all! However, it is feasible to keep the tubers in the house over the winter.
Freshly Dug Tubers
Digging up the tubers is the first step in storing them indoors. During my study for this essay, I came across a variety of viewpoints on when to excavate them. Before the first frost, some gardeners remove them, while others wait until later. If you wait until after the first frost, you won’t have to worry about it. However, you don’t want to put them in a freezer that’s too cold for too long.
Avoid damaging the tubers by working carefully around them. It’s possible for elephant ear tubers to rot if they’ve been damaged or bruised. Ensure that they are not damaged by digging them up at least a foot from the plant.
Xem thêm : How To Add Freon To Air Conditioner? Step by Step Instructions
The tubers need to be sanitized in the second phase. Rinse them with a pail of water to get rid of any remaining dirt. To carefully clean them, use only your hands and warm water. Tubers can get rotted when they are scratched with a scrub brush.
It’s now time to get rid of any superfluous leaves. Before digging up the leaves, I remove the majority of them. Finally, it’s time to trim the excess. The stems should be cut 1-2 inches above the tuber. When it dries, the rest of it could fall off. As a last step, I cut back the overgrown roots and separate any new offshoots that are large enough to be planted on their own in the spring.
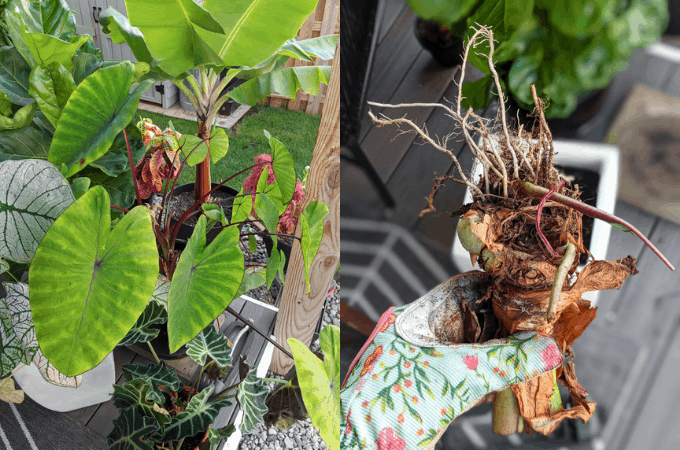
Dried Tubers
The drying of the tubers is the final process. When they are dried, the outer skin becomes more resistant to decay. In order to dry the tubers, place them in a dark, warm, and dry location with a lot of ventilation.
Storage is the fifth and final phase. In a cool, dry area, wrap the tuber in paper and keep it. Among other things, I keep mine in my basement on a shelf. Throughout the winter, make sure to check in on them on a regular basis. Tubers that show signs of rot should be removed to prevent the rot from spreading to the remainder of the tubers.
If you follow these instructions, your elephant ear crop will last for many, many years to come. Springtime planting is best done once frost has passed and the soil temperature has warmed up. Starting them indoors in late winter is another possibility. As a result, you’ll be able to sow your summer gardens with some pre-made leaves. With a couple of my smaller tubers, I tend to do this, and then wait until it’s a little warmer to plant the rest. In the spring, this offers the younger tubers an advantage.
How to Overwinter Elephant Ear Bulbs
Many people refer to elephant ears as “bulbs,” but they are actually tubers that sprout from the ground. To avoid confusion, we’ve decided to use the term incorrectly because so many people do. To store elephant ear bulbs, the first step is to dig them up.
It is critical that you remove the elephant ear bulbs from the ground in a clean and undamaged state. Damage to the elephant ear bulb could cause the bulb to decay over the winter. Starting your digging approximately a foot (31 cm) away from the plant’s base is a smart option if you don’t want to damage the bulb.
Xem thêm : How To Space Grommet When Making Curtains? Complete Guide
Step 2 in elephant ear bulb preservation is cleaning. Do not scrub them, but they can be rinsed. It’s fine if the bulb still has a little bit of dirt on it. At this time, you can also remove any residual foliage. The elephant ear bulbs must be dried after cleaning. For about a week, store elephant ear bulbs in a dark, warm (but not hot) location. To ensure that the bulbs dry correctly, make sure the location has excellent air circulation.
Elephant ear bulbs should be stored in an airtight container and kept away from direct sunlight for a minimum of six months. Keep an eye on your elephant ear bulbs while they are in storage to make sure they aren’t infested by bugs or rotted. Treat the bulbs with a pesticide if you notice any bugs. You should throw away any elephant ear bulbs that have been affected by rot to prevent it from spreading to other bulbs. If you have sensitive skin, avoid consuming elephant ear bulbs and leaves since they contain the chemical calcium oxalate, often known as oxalic acid. When working with these plants, be cautious at all times.
Elephant Ear Overwintering
Adding elephant ears (Colocasia esculenta) to your yard can give it a lush, tropical feel. Starchy tubers that can’t withstand rainy winters or freezing conditions develop from them. Elephant ears thrive in Wichita during the summer months, but they won’t be able to withstand the colder months. It is important to store them carefully, whether in dirt or in a greenhouse, to ensure their survival during the winter months.
Potted Plants
When elephant ears plants are kept in their pots, they are able to survive the winter. Move the pots to a frost-free spot where they aren’t exposed to rain so the soil in the pot remains dry during dormancy. Reduce watering for the pots and trim back the elephant ears foliage once it dies back naturally in late fall. Water the soil slightly as needed so it doesn’t dry completely, keeping it barely moist to the touch until new growth emerges in spring.
Indoor Tuber Storage
As long as they remain in their containers, potted elephant ears can withstand the winter. Soil should be kept dry during dormancy by placing the pots in a frost-free area that isn’t exposed to rain. Following a natural fall dieback, reduce pot watering and cut back elephant ear leaves. Until new growth appears in the spring, keep the soil moist but not soggy by watering only a small amount when necessary.

3 Tips for Overwintering Elephant Ears
After the first frost, clip the stems to about 6 inches tall.
- Find out what kind of elephant ears you have. To successfully overwinter elephant ears, you must know the specific species and cultivar. If the evenings grow too cold, some types won’t be able to live outside.
- Pick the tubers with care. Pick only the largest and healthiest elephant ear tubers while digging them up. After brushing them off, inspect them thoroughly and eliminate any that appear to have been damaged by pests or rotted.
- Make sure that the bulbs and tubers are completely dry before storing or using them. It’s a good idea to keep your elephant ear bulbs or tubers out at room temperature for a week before packing them. The tubers will be dried off by the circulating air, which reduces the likelihood of rotting.
How to Replant Elephant Ears Tubers
Simply transfer the pots outside or replant your elephant ears in your yard once the risk of frost has passed. Elephant ears can be grown by following these steps:
- Make a decision. When it comes to growing elephant ears, you’ll need some shade and a lot of space. How big the tuber or bulb is a good indicator of the plant’s size: The plant’s size increases in direct proportion to the size of the tuber or bulb. Select a location where your plants will have enough room to grow in partial shade.
- Preparation of the soil To thrive, elephant ears need well-draining soil that is acidic but not too loamy. Organic matter should be added to the soil prior to planting. Once you’ve done that, loosen the dirt up to about eight to ten inches deep. This will allow the roots to expand as the plant grows.
- Dig. Dig a hole five to six inches deep enough to accommodate the full bulb or tuber. A two-foot gap between the plants for smaller plants and three to four feet for the longer elephant ears is a good rule of thumb.
- Plant. As soon as you’re ready to plant, tuck the growing tip four to five inches below soil level with the blunt side facing down in soil. The plant should be buried four to five inches under the surface of the soil. Trim the fat.
Nguồn: https://iatsabbioneta.org
Danh mục: Home