Is the question “How to manufacture a walk in cooler with an air conditioner?” on your mind because you want to construct your own walk-in cooler? Some of you may not believe it, but building this would need only three easy steps and a couple of days. And you’ll benefit from having more hands to help you out.
- How To Drain A Portable Air Conditioner? Comprehensive Guide
- How Many Amps Does A Central Air Conditioner Draw? All Questions Answered!
- How To Clean Portable Air Conditioner Coils? A Few Tips to Remember
- How To Make An Air Conditioner Colder? What You Need To Know
- How To Drain Haier Portable Air Conditioner? Easy Step-by-step Guide
Beginning a food service establishment would be impossible without a walk-in cooler. In the long run, it could help you sell more of the high-quality meat and other commodities you’ve been storing.
Bạn đang xem: Steps To Make A Walk In Cooler With An Air Conditioner
Also useful for storing food and other items that benefit from a cool environment, such as plants. Another option is to launch a company that sells ice.
A walk-in cooler has multiple applications. Now we’ll talk about how to do it yourself.
What’s a Coolbot?
The CoolBot is a handheld controller that converts a regular window air conditioner into a walk-in cooler, maintaining temperatures in the upper 30s Fahrenheit. Website of CoolBot, which contains the following:
Using a number of temperature and humidity sensors and a heating element controlled by a micro-controller, the CoolBot can keep your air conditioner’s compressor from freezing up by setting the temperature in the room to a constant 36 degrees Fahrenheit. Installing the CoolBot controller to your air conditioner takes just 5 minutes and no special skills, tools, or training are required (not even cutting, soldering, or taping).
Whoever needs extra food storage space, or who enjoys hunting, farming, cheese-making, homesteading, brewing, prepping, taxidermy, or working with dairies, can benefit greatly from a CoolBot walk-in cooler.

Why Build a Walk In Cooler?
As the owner of a fruit and vegetable delivery service, I was having trouble keeping my inventory from rotting. We gradually outgrew our conventional refrigerators, and I had trouble maintaining a suitable temperature inside of them. As a result of the swings in temperature, some of the food would freeze and other kinds would go bad very quickly. I was regularly losing several hundred dollars in stock value.
A farmer pal of mine who also runs a nursery in the area highly recommended a device he’s used called a CoolBot. Her husband installed a Coolbot in their window air conditioner and double-insulated the walls, transforming their storage shed into a walk-in refrigerator. We did some investigating, and settled on equipping a space in the garage with a refrigerator.
Steps To Make A Walk In Cooler With An Air Conditioner
Any standard air conditioner will work in this configuration. Some people use CoolBot in conjunction with their air conditioning system to create a more efficient walk-in refrigerator. A lot of planning and thought must go into its creation.
It is necessary to first select the most suitable location or storage place for the equipment, materials, and other elements involved. Nonetheless, you shouldn’t fret. This post will teach you all you need to know to build a walk-in cooler with an AC unit.
Here they are, in order:
Step #1. Plan and build
We’ve gone through some of the factors to think about before you begin building it. The first step in building a cooler is to plan its layout out on paper.
These are the most important considerations to keep in mind if you want the procedure to go smoothly:
Factor #1. Location
While it may not be strictly necessary, knowing where the refrigerator is never a bad idea. When opening a restaurant, for instance, you wouldn’t want the walk-in cooler to be right next to the front door, would you agree?
For convenience, it should be located near the kitchen so that chefs may quickly grab fresh ingredients. The chefs also don’t have far to go just to grab a single tomato.
Factor #2. Dimensions
The size is often determined by the quantity or variety of stock being kept. Most refrigerators and freezers have shelves on the side and plenty of room in the middle for you to move about freely.
If you put it within a building like a kitchen or restaurant, you already have a ceiling and floor to work with, making it much easier to calculate the required dimensions. However, these two factors are required in particular situations.
Xem thêm : How To Decorate Around A Window Air Conditioner? A Few Tips to Remember
If you have a farm and need a place to store your harvest, a walk-in cooler is a need.
Factor #3. Materials
Insulation materials are required for all walk-in refrigerators and freezers. This means that no light, heat, or moisture could enter. Polystyrene and polyurethane are only two of the many insulating options available. ThermoSteel panels, however, can be used for both the ceiling and the walls.
Make sure you’ve thought everything through and settled on the materials you’ll use to insulate your cooler. Additionally, you may now go out and purchase the essentials and begin laying the groundwork.
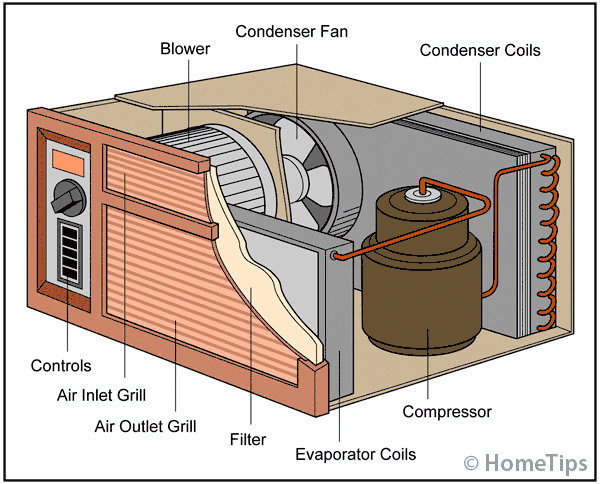
Step #2. Attach your AC
A window air conditioner requires a hole to be carved according to its dimensions. Verify that the stock will not obstruct the vents of the air conditioner.
If you need assistance setting up your AC, just ask! When installing an air conditioner in a window, it’s important to secure it with aluminum channels and steels to prevent it from falling.
Your air conditioner needs to be placed in an area with enough ventilation. Window air conditioners should be installed such that the outer side faces the outside, not another interior room. This is due to the fact that water leaks from the exterior. Condensation must be drained from the system, after all.
If you’re using an AC that isn’t an outdoor unit, make sure it has adequate ventilation or locate it close to the outdoor unit. An exhaust pipe for a portable air conditioner must fit through a small opening in the unit’s casing, but a walk-in cooler would be too large for it to effectively cool.

Step #3. Add a thermostat or CoolBot
As a result, your air conditioner will need some assistance in chilling the entire space. Get a separate thermostat from your air conditioner if you want to lower the temperature in the room.
Temperatures between 35 and 38 degrees Fahrenheit are suitable for storage in a walk-in cooler. Moreover, the highest temperature that can be achieved with your AC is around 60 degrees. To that end, some people choose to put their money into CoolBot, which mimics a thermostat but actually controls the climate inside. However, it also has other applications.
Alternately, you might use a thermostat for your heater or an aquarium controller. However, the other thermostat should be installed with the assistance of a licensed electrician.
Which Insulation is Best for a Walk In Cooler?
Standard fiberglass insulation
It turned out that fiberglass insulation was the cheapest option up front. Double that to get the suggested R-25 value (like my friend did). Condensation buildup is a drawback. After around five years, the insulation should be thrown out and replaced because of the inevitable growth of mold. This is the most cost-effective solution if you anticipate using the walk-in cooler for no more than five years.
Blown Insulation and Foam Insulation
Blown-in and foam insulation are convenient since they can be retrofitted into pre-existing walls. Not only does it not have an R-Value of 25 or higher, but it can also develop mold and moisture much like traditional fiberglass insulation.
Polystyrene
When the temperature needs to be kept low, polystyrene insulation is the best option. Commercial refrigerators and freezers are made with this material. The downside is that it is difficult to source and prohibitively expensive to transport.
In the end, we chose to check into secondhand walk-in coolers after weighing all of our available options and costs. Surprisingly, it wasn’t hard to track down a local (within a two-hour drive) contractor that specialized in the removal of commercial kitchen and grocery store equipment and who also sold secondhand walk-in coolers. We spent $300 on an 8×9 foot walk-in cooler with all the walls, roof, and enough additional panels to construct a door.
Because of the heat outside, we opted to put the cooler in the garage, which hubby gladly allowed us to use. Considering, among other things:
- The ground was made of concrete there (best recommended flooring)
- a supply of energy was available.
- The air conditioner would be shielded from the weather and the direct sunlight.
- The cooler’s efficiency and lifespan would both be improved by being stored in a garage.
Considering that we had to prefabricate several of the interlocking panels to fit our space, build and adapt a door, and run electricity to the cooler, I would rate this Do It Yourself project as a 4. Using insulation and sheathing, someone with average construction abilities may convert an existing shed or electrically-powered room into a cooler.
Which AC Unit Should I Use with a CoolBot?
Our window unit was installed after we finished the rest of the walk-in cooler. The size of the air conditioner needed to cool a given space varies with its square footage.
Walk-In Cooler Size Equals Air Conditioner Size
- 10,000 BTU = 6′ x 8′ x 8′
- 12,000 BTU = 8′ x 8′ x 8′
- 15,000 BTU = 8′ x 10′ x 8′
- 18,000 BTU = 8′ x 12′ x 8′
- 24,000 BTU = 10′ x 14′ x 8′
Xem thêm : How Long Does Air Conditioner Need To Deice? Common Question And Answers
The Coolbot cannot operate without a digital display, so make sure your A/C Model has one. For further details, check out “CoolBot AC Unit Size and Brand Recommendations.”
A walk-in cooler can be created by installing a CoolBot after the area to be cooled has been properly insulated and a window air conditioner has been set up.
How to Connect Your AC Unit and CoolBot for Your Walk In Cooler
Putting in a CoolBot with your window air conditioner (from storeitcold.com):
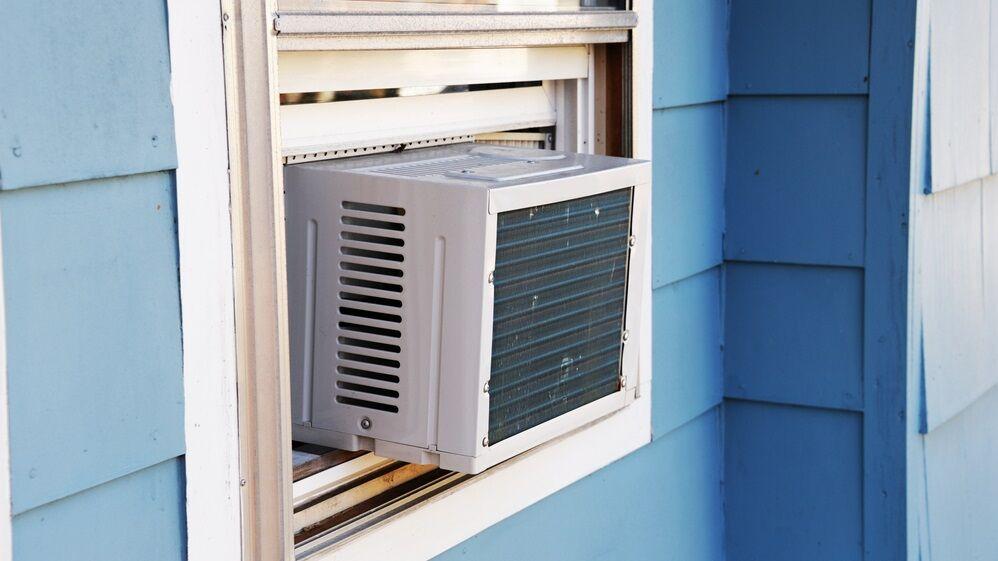
Arrange for the installation of a window air conditioner of any make and model that you happen to own. If you want to make sure you get the best air conditioner for your needs, check out our handy A/C Selection Guide. If you need to replace your air conditioner but don’t want to spend hours carving out the wall of your walk-in cooler, simply cut a hole large enough to accommodate the unit, install it, and then insulate the hole and the surrounding pipes with something like foam sleeves.

Simply plugging the CoolBot into any regular electrical outlet is sufficient to power it, as it consumes no more power than a mobile phone charger.
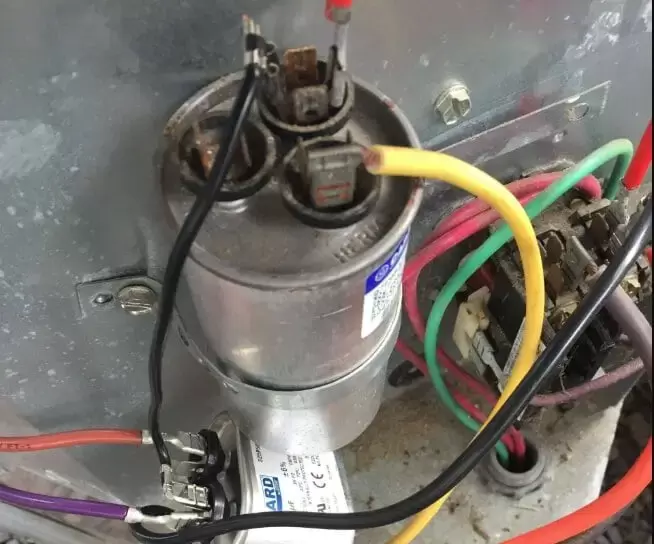
Wiring
The CoolBot has three different wires that all have names:
- The first one detects the ambient temperature (it’s labeled “Room”). You can let it dangle freely so long as it isn’t touching any metal or blocking the air conditioner’s vents.
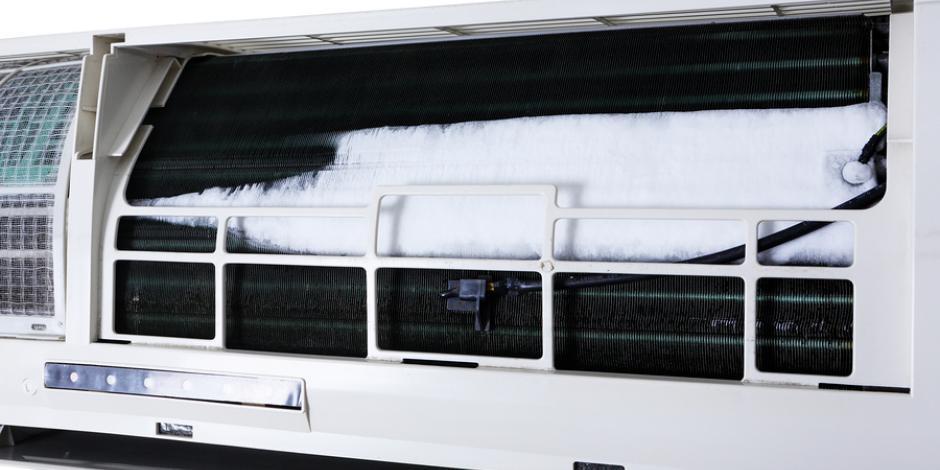
- It is recommended to run the second wire (designated “FIN Sensor”) via the front A/C cooling fins. Carefully set the sensor as close to the ground as feasible, but ABOVE the initial horizontal cooling tube. Place the fin sensor in a hole that is 1/3 of an inch deep and 1 to 2 inches from the bottom so that it does not touch the coolant pipes. It needs to be left alone to remain in place. There will be no screws or tape used. Caution should be used to avoid damaging the sensor since the fins may need to be carefully pinched together to form a snug enclosure around it.
- A/Cs have a temperature sensor, which is connected to the third wire (labeled “Heater”). In a modern air conditioner, the temperature sensor will be attached to a set of tiny plastic brackets that sit in front of the fins. An air conditioner’s temperature sensor is just around half an inch by an inch, so use the provided aluminum foil to wrap the CoolBot “Heater” wire around it. Leave this foil packet to dangle where it can’t come in contact with any metal and where it won’t be subjected to drafts.
Rooms may be cooled to a preset 42 degrees Fahrenheit (5.6 degrees Celsius) with the CoolBot, but the thermostat can be adjusted to your liking.
Does the CoolBot Cooler Work?
Almost a year after having this product installed, I have nothing but praise for it. As a pleasant surprise, our walk-in cooler also served as a safe haven during Hurricane Harvey, allowing me to extend our CSA business and our food storage capacity.
Recently, here on the South Carolina coast, we experienced Hurricane Matthew without being able to get out in time. As the storm’s center and strongest winds passed over us, my family and I sought refuge in our cooler. The sturdy construction, including the reinforced walls and concrete base, made it an ideal shelter from the storm.
How Much Does a CoolBot Walk In Cooler Cost?
A number of factors, including:
- Whether a preexisting space is utilized or a
- The Room’s Dimensions
- Installation of the flooring, insulation, air conditioning unit, and CoolBot
- Both hiring a professional and doing it yourself
Keeping an eye out for bargains and making purchases at the right time of year will help you save money. (Wood prices fluctuate weekly, air conditioning is more expensive in the summer than in the winter, etc.)
All these considerations aside, employing a CoolBot to construct a walk-in cooler will still cost you much less than purchasing a commercial unit. Here is a rundown of what we spent:
- Costs $330 for a Cool Robot
- Better frame and insulation to keep the cool air in – $300
- Air Conditioner (we were able to use our own) – Free
- $50 for electrical materials including wire, conduit, breaker, and light.
Total Cost $680.00
We’ve been able to save hundreds of dollars a year in electricity costs because to the CoolBot, which is 40% more efficient than standard coolers. Due to the cooler’s effectiveness, we’ve been able to avoid losing a significant sum of money on perishable goods.
While a root cellar can be adequate for cooling food in the north, in the south and in places where precise temperature control is required (such as commercial kitchens), a walk in cooler is essential.
Complete walk in cooler kits may be found on Coolbot’s website for a price tag of $4000 to $8000 if you have a more substantial budget. Setup of these devices is shown in the video below. Specifically, the air conditioner set-up instructions begin at 7:18, and the CoolBot set-up is scheduled for 9:00.
Do you own a CoolBot or walk-in cooler? Don’t be shy about letting us know how you feel about this topic down below.
Do you hope to construct a walk-in cooler in the near future? Don’t forget to save this post to Pinterest or your bookmarks, or share it with your friends in the hopes of recruiting their assistance in the construction.
Wrapping Up!
And we have shown you how to install an AC in a walk-in cooler.
We pray you get motivated and learn enough to construct your own cargo cooler. It might be a great place to keep your inventory safe and secure.
Nguồn: https://iatsabbioneta.org
Danh mục: Conditioner